Windows 7 dual boot, clone backup
A simple, robust backup system for Windows 7
-------------------------------------------------
created: 4/2/14
updated: 5/23/17
Overview
My
clone backup saves my ass (3/8/15)
Fix
weather gadget
Cloning
provides effective protection from encrypting ransomware like CryptoWall
(1/8/15)
Clone
vs image
Impact
of adding SSD (solid state drive)
Bios
roadblock
Hardware
modifications to my desktop computer
New Hardware
7200 rpm hard
drive (Seagate Barracuda, 1 Tb, internal, 3.5", 6 Gb/sec)
enclosure,
3.5", fan cooled, (Vantec Nexstar) esata, USB 3
USB
3 PCI card, 4 ports
Esata
port (passive), 2 port
2 Gbyte
internal RAM memory expansion
HDD
sata power switch, PCI card, 4 port (never installed)
SSD
(solid state drive), Crucial M500, 240 Gbyte, 2.5" (two)
enclosure
(Satechi) for SSD, 2.5", esata, USB 3
enclosure
(Acomdata Tango) for SSD, 2.5", esata, USB 2
USB
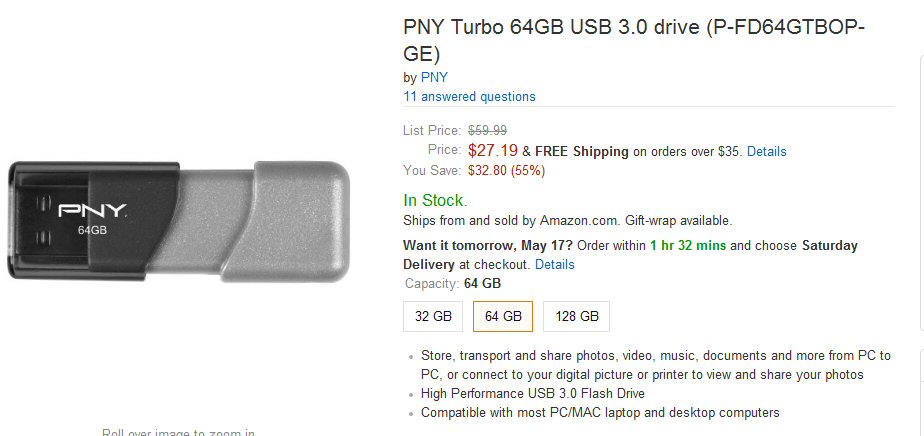
3 (fast) PNY flash memory stick, 64 Gbyte
USB
3 (faster) SanDisk flash memory stick, 16 Gbyte
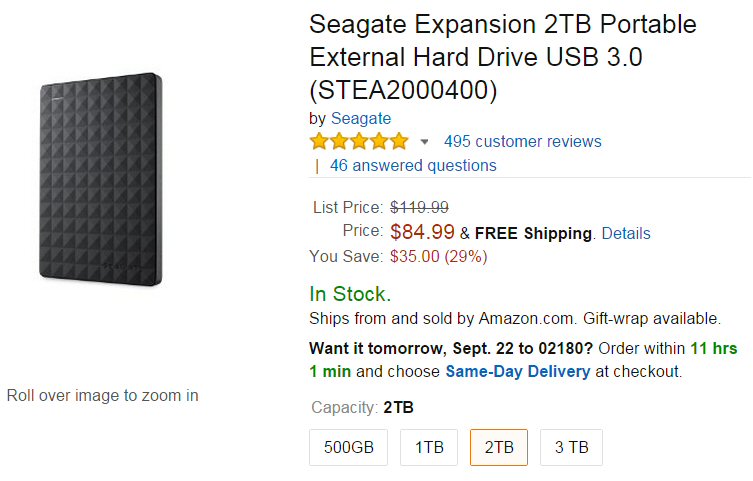
Seagate
portable external hard drive, 2 TB, 5400 rpm, USB 3
Flash drive speed
tests
Boot
failure, system crashes,Windows repair
Boot details
Windows repair
'chkdsk' and 'sfc
/scannow'
Types of Windows
7 disks
Re-installing my
programs
KMPlayer
setup
Casper 8 clone software
EasyBCD dual boot
program
Flash
memory -- booting and partitions
Clone
on a flash drive?
Yes,
clone on a flash drive -- (with limitations)
Bootable
flash needs to be 'active --- Microsoft trap
Image
recovery environment and image both on flash drive
SSD
(solid state drive) speed advantage
USB
3 flash thumb drives
SSD
drive considerations
Two versions of
Windows 7
Bootable
USB flash Windows repair thumb drive
Simple
way to prepare USB repair flash drive so it will boot
Getting
rid of two large .sys files
Windows
image restore is a piece of crap
Reformats by default every hard drive on your computer!
Casper for image backup
Windows activation
overview
* How
to extend the trial period forever
*** Reset
the rearm count (every 6 months)
Digital
River xxxx.iso windows 7 repository -- Links to Windows 7 downloads
Summary
of activation tools from the command window
Re-arm
Windows (extend trial period for another 30 days)
** Windows
7 bug allows rearm count to be reset
Verified -- adds an extra six months to trial period and can be repeated
indefinitely
Simplifying
reset rearm count procedure
Command
box tricks
More
on Activation
Microsoft's
narrow definition of 'computer'
Disable
'automatic activation'
Extend
trial time by changing the clock date -- works
Windows
COA keys
Available
versions of Windows 7
New
Windows 7 computer candidate (July 2014)
Bios sata options
Testing
IDE bios sata setting
Ruminations on Windows
7 ---email to engineering colleagues (8/5/14)
My Windows 8.1 trial
(9/1/14)
Misc notes
Computer
won't boot --- partially fixed (11/28/16)
WiFi
down (4/29/17)
How
to set local file links in Netscape Composer (5/23/17)
======================================================================================
Overview
A simple robust
way to protect your computer from failure of Windows is add a 2nd hard
drive configured as a bootable clone. The best place to mount any bootable
drive is inside the case, but an esata port will allow a booting clone
drive to be external. Unlike computer pros who switch over to clones by
reaching inside the case and switching cables, by using Windows dual boot
capability the boot drive can be selected from the keyboard. When Windows
is acting flaky or the main hard drive starts failing, I can switch over
to the clone drive with just a reboot. The clone drive has an exact copy
(as of date of clone update) of my main drive. It has the Windows OS, my
programs, data, setting and drivers, plus it is bootable. Good clone software
is fast, able to update a 50 Gbyte clone drive in as little as five minutes,
and really fast when cloning SSDs (solid state drives) with times as short
as one minute.
While this
essay was originally only about clones when I bought an SSD, bios complications
led me to greatly expand its scope. This essay now also covers SSDs, new
install of Windows 7 from downloaded xxxx.iso file, multiple drives in
esata connected enclosures, flash drives, Windows 7 trial mode, Windows
activation, improved way to keep Windows 7 running free forever.
I like two
new, lesser known clone/partition software packages, Casper 8 (cloning,
30 days free trial) and AOMEI partition assistant (free), and use the popular
utility EasyBCD (free) to make setting up Windows built-in dual boot quick
and easy. Casper does three jobs: makes bootable clones of the Windows
OS, backs up USB data drives (by cloning them), and can also do image backup
(far better than Windows). A utility to read hard disk temperature and
reallocated bad blocks is also useful, and for this I like Hard Disk Sentinel.
My clone backup
saves my ass (3/8/15 update)
I had not
had any virus (or corruption) problems since changing my FTP password 18
months ago, that is until a few days ago. First I began to get odd popup
windows saying security certificates were not valid. One now and then is
OK, but half a dozen in a few days is very suspicious, especially because
I had recently read that some deep attacks do this. Names in the security
windows were not familiar, but not incriminating either, but I stupidly
didn't write them down, so I lost file search targets. Then a few days
later a second weirdness, Bing image search in (old) Opera 12 suddenly
stopped working (image links did nothing when clicked), but it worked in
other browsers. A web search (in Bing) for others having this problem came
up empty. These two problems gave off a strong smell that my either Windows
OS, or perhaps more likely my Opera 12 brower, had recently been compromised,
perhaps by something deep, not definitive, but very suspicious.
I have a good
suite of anti-virus tools which had proven their worth when I was repeatedly
attacked a couple of years ago (System File Checker, Malewarebytes, .exe
search with Agent Ransack, etc), but they all came up clean! Then I remembered
that I cloned my OS just a week earlier. I booted into the clone and sure
enough Bing images in Opera was working. Here was proof either my OS or
an applications had somehow gotten corrupted.
Clone to the
rescue --- To recover I first updated the data files in the clone that
I had been working on in the last week. Did this using a combination of
memory and file dates in Explorer, and for extra safety against losing
a file, I saved my main data directory from my corrupted OS partition to
my primary USB data drive. Also needed to get the Windows weather gadget
in the clone working since I had recently used the trick below (which works!)
in my primary partition.
Fix weather
gadget --- Go to "C:\Users\USERNAME\AppData\Local\Microsoft\Windows
Live\Services\Cache", open "Config.xml" (Right Mouse Button -> Edit) and
save it (File -> Save) without doing any changes. After 10-20 seconds restart
the gadget!"
(http://forums.techguy.org/windows-7/1142347-win-7-weather-desktop-gadget-2.html)
With the clone
now up to date I just opened Casper 8 in the clone and (re)cloned it over
my primary OS partition. To keep my partitions straight I use descriptive
names ('SSD OS lower partition' and 'SSD OS upper partition'), so even
though assigned drive letters move around with good partition names I never
get confused while cloning or booting. I use the lower SSD partition for
my primary drive and the upper SSD partition for its backup clone. Since
both partitions are in an SSD and Casper 8 uses incremental cloning, cloning
from one to the other is very fast, less than 2 minutes. My primary partition
and clone partition now both the same and both fully functional, haven't
seen a popup security windows in two days. Problem solved. Dual clone backup
in a real world (deep) attack has worked well and saved my ass.
Cloning
provides effective protection from encrypting ransomware like CryptoWall
(1/8/15
update)
The value
of a keeping an up to date clone backup of your system and files was reinforced
today by an article in the New York Times discussing a new crippling variant
of ransomware. Most ransomware, like the FBI lock virus, just blocks booting
but leaves your files alone, but a new variant called 'CryptoWall 2.0'
actually encrypts all your files before popping up a window demanding
payment. And the scary thing the article says is IT experts are saying
at the present time there is no known way, other than paying the ransom,
to unencrypt your files and regain access to your data! Here's where a
clone backup shines. The clone copy of your system and files is in a different
partition of your hard drive and will be unaffected by any virus or ransomware
attack, so all you need to do to recover is boot into the clone and reclone
back. The procedure and hardware I use and describe in this essay allows
me to clone my system in 2-3 minutes, so I do it often keeping me well
protected from any attack.
Clone vs image
This essay
focuses on clone backups. There are two ways to backup hard drives:
clones and images. They are very different. (A backup program may do just
one type or both, though it is often hard to unpack their confusing terminology,
for example a 'clone' is sometimes called a 'copy'.) Images are files
(albeit
huge ones) and work like files, multiple images can be stored in a single
directory.
Clones are
very different. Each clone needs its own hard drive partition (it
wipes the partition when it is written), and if it is to be bootable (the
usual objective) the partition must be either on a sata (or esata) motherboard
connected drive or a USB flash drive. Clones and partition software go
together. A hard drive properly partitioned can hold about the same number
of clones as it can images. While clones may be more demanding to create,
they can quickly take over 'as is' selected during boot. In contrast to
recover using an image file there is a tricky (and prone to failure) unpacking
step that may require special software.
Clone backup
A clone backup
is the 'bytes used' on the primary hard drive (OS, programs, settings,
drivers and data) copied to a separate, dedicated hard drive (or
partition) preserving the primary file format.
If you boot
into a freshly made clone hard drive, it will look and function exactly
as your primary hard drive (with the possible exception of the volume name
and total capacity that may be different if the drives are different sizes).
Cloning can be fast, a 50 Gbyte primary drive can be cloned in 20 min and
re-cloned in 5 min, and I got re-clone time down to 1 minute by leaning
the c:\ partition to 20 Gybtes and cloning to another partition on an SSD.
A clone hard drive in Explorer looks and acts like any aux hard drive because
that is what it is. It just happens to start off with the same stuff as
the primary hard drive and is bootable too.
Image backup
An image backup
is 'bytes used' on the primary hard drive (OS, programs, settings, drivers
and data) glomed together into a single huge file, slightly compressed,
and written to a another hard drive (or partition) usually in a proprietary
format. An image file can easily be 500 Gbytes in size.
Proprietary
recovery media (DVD or flash) are needed to unpack the files and write
them back. Restrictions vary widely as to where the recovered files can
be written. Recovery with an image backup is usually an all or nothing
process. One bad byte and it can fail. Visibility into an image and file
access from an image is either zero or limited. Microsoft's version of
image backup and recovery is built into Windows 7, but like many Microsoft
utilities it works poorly. Far more flexible and reliable is 3rd party
image software, but it requires you keep on hand a bootable flash drive
or DVD with its recovery software. I'm using Casper 8, which I bought for
cloning, but it does a good job for image backups too.
A key thing I
learned about clone backups is not to worry initially about whether a clone
can be booted from the media to which it has been saved. Once you have
a clone your OS, programs, settings and data are captured. In Windows,
unlike with Apple computers, clones on USB drives cannot boot, but
not to worry, because clones can be recloned. A (potentially) bootable
clone on a USB drive will be able to boot if moved by recloning to a partition
on an internal drive, an esata connected external drive, or even (with
limitations) a removable flash drive.
Impact
of adding SSD (solid state drive)
What started
out as an exploration of clones got greatly expanded, doubling the size
of this essay, after I bought an SSD plus lots of other new hardware. I
had bought two new 7,200 rpm hard drives to mount internally, and then
I discovered the advantages of an SSD. This I thought would be the ultimage
in speed and cloning, and it is. I found a 20 Gbyte clone on an SSD can
be incrementally cloned in 1 minute! I bought a 240 Gbyte SSD ($105) and
divided it into two partitions, one for the working OS and one for an SSD
clone. I thought it would be strightforward to just add in an SSD to my
clone system, that it would work like an HDD but faster, but I ran into
a huge complication. The SSD I bought simply was not visible to my existing
clones. (It's some sort of bug or driver issue with AMD hardware and Crucial
SSD.)
Bios roadblock
I had my multiple
boot clone system with many HDD drives and partitions working slick. I
assumed it would be a simple matter to extend the cloning to my new SSD
drive. Wrong! I ran into a terrible complication, a roadblock. The bios
sata setting needed to change (RAID => AHCI) for the SSD (at least the
one I bought), but I then found clones (and images too) made under one
bios setting would not work with a different bios setting. I have tried
every trick to get around this roadblock, but to date without success.
Apparently this bios change issue affecting backups (and clones) is little
known, because Google searches repeatedly come up empty.
The root of the complication
is the bios, specifically the sata setting of the bios. This bios setting
determines how a disk is read, where the partitions are. The result is
clones made with the bios set to RAID only work if the bios is set to RAID,
and those made with the bios set to AHCI only work if the bios is set to
AHCI. The SSD only works well with the bios at AHCI (or later found under
IDE), but none of my (old) clones would work with this bios setting!. The
result has been I have ended up with two sets of clones, one set runs under
RAID on HDD running a de-bloated version of Windows 7 derived from original
equipment disks. The second set runs under AHCI mainly on the SSD running
a clean version of Windows 7 I obtained from a xxxx.iso Microsoft DVD.
The former has activated Windows, the latter (as of this date) does not,
its Windows is in its (30 day) trial period, but as I describe later in
this essay this trial period can be extended indefinitely.
Others have SSD visibility problems too (forum
posting)
-- I
recently bought an INTEL SSD and am trying to install but having plenty
of problems. My computer will not recognize the SSD unless I have the SATAs
in AHCI, and I am not switching all the SATAs to AHCI because that will
give me BSOD (everything has been installed previously under IDE). Oh and
this MB doesn't even have the 6mbps SATA ports, which is a disappointment.
His solution
(as a computer builder) was to look for a new mother board with two
sata controllers. This way he could run some sata ports under AHCI bios,
where he would plug in his SSD, and the other sata ports under IDE bios,
where he could run his old stuff.
Windows 7 sales cease (update 11/3/14)
Microsoft
officially announced that as of Oc 31, 2014 they have stopped selling Windows
7, both pre-installed on PCs and as a separate install DVD. However, it
can still be bought until inventory is cleared out. A few days later I
checked and Windows 7 install DVDs are still for sale on Amazon. Whether
the free downloadable version of Windows 7 from Digital River will disappear
too remains to be seen. I have no intention of 'upgrading' to horrible
Window 8, so I have covered all bases to stay with Windows 7. Not only
do I have the xxxx.iso Windows 7 install file from Digital River saved,
but I bought and filed away a Windows 7 install DVD from Amazon which comes
with an activation code.
Windows 7 desktops still for sale (update 4/2/16)
A check on
Amazon (4/2/16) surprisingly shows brand name, full size desktop computers
with Windows 7 preinstalled are still for sale. Note this is a year and
a half after Microsoft had announced sales of Window 7 to computer builder
had ceased! A computer with Window 7 preinstalled eliminates the concern
with finding Windows 7 drives for the new hardware, and while info about
bios setting is hard to dig out, there a good chance that a Window 7 machine
may have an older type bios too.
On Amazon both
HP and Dell have several models new for about $500 (used for $350). (New
computer with Windows 8.1 preinstalled are for sale too.) Most of
the HP models are varients on the HP Pavilion 500-xxx Desktop series (HP
Pavilion 500-281). This series uses Intel i3-4130 processors (dual
core, 3.4 Ghz, 3M cache, 54 watts, 2013). Staples web site shows they too
have Window 7 computers, though pushing in I see that some of their Window
7 machines are actually Window 8 .1 pro machines that come with right to
downgrade to Window 7 professional.
An interesting
cheap Staples Window 7 machine is HP
Pavilion 550-016 Desktop Computer, only $350 (new), supposedly marked
down from $500, with pretty good features (2 USB 2.0 and 4 USB 3.0 ports,
HDMI OUT, Intel Core i3-4170 Processor, 180 watt PS). I was assuming the
reason for the low price was that the processor would be a bit outdated,
but I find it's nearly the same as the processor in the Pavilion 500-xxx
series that Amazon sells for about $500. The case size (15 x 14.5 x 6.5)
is a little smaller than my HP p6510f, but it has two available PCI-E slots,
so the Inateck 4 port PCI-E x1 USB 3 expansion card (below) will fit. Pavilion
550-016 uses a Memphis2-S motherboard and from a picture of it I can see
three Sata connectors (space for four, but the 4th is not installed). The
Intel i3-4170 is dual core, 3.7 Ghz, 3M cache, 54 watts, 2015. The same
basic machine with a faster process (i5-4460, four core, 3.4 Ghz, 6M cache,
84 watts, 2014), more memory and a bigger hard drive sells for $550 (HP
Pavilion 550-026 Desktop).
The Staples
Window 7 machine is HP
Pavilion 550-016 Desktop Computer at $350 looks like a pretty good
deal (equivalent to the $500 Amazon Windows 7 HP Pavilion 500-xxx machines,
but in a slightly smaller case). However, both of these machines have a
dual core processor vs my older AMD processor which has four cores. However,
the Intel processor is newer with a bigger cashe, and it is difficult to
compare speeds of Intel and AMD processors.
HP motherboards and sata connectors
From the HP technical
support site I find the Amazon HP Pavilion 500-281 uses the Memphis-S motherboard
and the Staples HP Pavilion 550-016 uses the Memphis2-S motherboard. From
the photos they look like the same motherboard (exactly same size), the
only difference is that the Memphis2-S is slightly depulated. In the Amzon
Pavilion 500-281 Memphis-S motherboard all four sata connectors are there,
but in the Staples HP Pavilion 550-016 Memphis2-S motherboard one sata
connector is missing, only three are stuffed. Two sata connectors will
be in use to support the hard drive and DVD drive. The Amazon HP Pavilion
500-281 Memphis-S motherboard has two empty sata connectors for my passive
dual Sata to eSata bracket without disturbing the hard drive or DVD sata
connectors, but the dual Sata to eSata bracket can be used in the Staples
HP Pavilion 550-016 too with its depopulated Memphis2-S motherboard if
the internal hard drive sata cable is unplugged (and the drive optionally
removed) to free up a sata connector leaving the DVD drive in the 3rd sata
connector.
For reference
the processor in my HP p6510f computer is AMD Athlon II X4 650 (four core,
2M cache, AMD shows 95 watts for 3.2 Ghz, but HP gives the clock speed
as 2.8 Ghz so the power will be lower, 2011), mid size ATX case (16" x
15" x 7").
=======================================================================================================================================
Introduction
This essay
chronicles my discovery of clones, a detailed examination of how they can
work as a backup, and the mechanics of setting it up. After a failed Windows
installation repair, a failed image backup, and then a month of drudgery
reinstalling Window 7 plus all my programs and tweaking them, I decided
no more. I don't want to do this again. There had to be a better way to
backup my computer, and then I discovered cloning. A clone drive contains
a copy of your main drive with the OS, programs, settings and data arranged
just like on your main drive, and it's bootable. This means it can
be switched in to replace your main drive, and in minutes your are back
in business with the computer operating as of the date of the clone.
A clone backup is
different from an 'image' backup. An image has all the stuff on your hard
drive too, but it's all glommed together into a single monster file that
can easily be 500 Gbytes. The big problem with an image backup is that
it is not robust, it can easily fail. To recover you need to find and expand
this huge file to separate out the OS, programs, settings and data. One
bad byte in the file and the recover will fail. Or your sick computer may
not be able to find the image. This is what happened to me. Even though
Window 7 had made the image, the Windows 7 repair environment was unable
to see the drive where the image was, so the restore failed. Not robust.
A clone backup
is different too from a RAID 'backup'. A raid backup drive 'mirrors' the
main drive, so it's sort of a clone, but the raid 1 'mirror' concept has
a serious weakness. If the main drive suddenly fails, say it won't
spin up, then it works, you have an clean replacement drive, but if your
system gets infected or the main drive slowly goes bad, say developing
bad blocks that corrupt the OS files, which is what happened to me, then
the raid system doesn't protect you. The mirror backup drive will have
the same corrupted OS files and be unstable too. It's not a real backup,
it has no memory.
Pros swap drives
After doing some
reading I decided that cloning, an approach often used by the pros, was
the way to go. However, all the clone references I saw described recovery
as a physical swapping in of the clone drive for the main hard drive.
Swapping cables may be easy for pros with open computers on a lab bench
in good light and tools handy, but it is a different thing entirely in
a home setup. My computer sits on the floor, closed up, jammed in between
stuff, in dim light in a tangle of cable. What I wanted was a clone
backup where I didn't have to open the computer case to do the switch.
Never did find a reference on how to do this, but with a lot reading and
trial and error I made progress and eventually figured it out for myself.
In the end I ended up with a clean simple clone backup system that did
just what I wanted.
Curiously
clones seem to be little appreciated as a backup medium, though computer
pros like them. The big backup vendors tend to push image backup. I think
the reason is pretty obvious, an image doesn't require dedicated hardware
like a clone does. It's easier to apply, so you sell more backup software.
Windows 7 will do a basic image backup, it won't do a clone backup. Drive
manufacturers distribute clone software, but the recommended use is one
time to upgrade your hard drive. One backup vendor (Acronis) even said
on their web site, clones have limited utility as backup. I disagree.
Clone update in 5 min!
Just did my
first real update of my clone. Casper 8 by default chose it 'smart update'
mode and the entire 50 Gbytes on the 500 Gbyte clone #1 drive got updated
to match the main 1 Tbyte drive in five min. Yup, the clone update took
all of five minutes! Rebooted afterward selecting the clone with dual boot,
and it ran fine. I had installed new hardware since making the clone, a
USB 3 card. Prior to updating the clone the USB 3 card was unusable by
the clone because it didn't have the drivers for it installed, but the
card worked after the clone was updated, because the update brought with
it the drivers I had installed on the main drive to support the card. Verifies
that cloning updates drivers too.
Clone time update
After making
a lot of clones with various hardware and partitions, I find the time to
make clones varies a lot. An initial 50 Gbyte clone might take 20 min or
it might take can take 2.5 hr. Why the difference? Don't know. I see transfer
rates that vary 6:1. Here are some guesses: cables used, whether or not
the clone is being written on a freshly formatted partition, maybe the
degree of fragmentation of the source partition, whether the source and
target partitions are same or different sizes. But what really counts is
not the initial clone time, but the clone update time. In a recent experience
with Casper a clone that took 2.5 hr to write initially was updated in
15 min (1/10th the initial time) because Casper has an incremental clone
update capability. (Note, these clone times were with standard (rotating)
hard drives. When I got a SSD (solid state drive) and the clone software
was copying from one SSD partion to another SSD partition, re-clone times
dropped dramatically to just a couple of minutes.)
How to know which drive is running
Immediately
after a clone is updated it is easy to get confused as to which drive your
are running on, because they appear almost alike. When I booted
from the clone, the desktop was unchanged even though it was in
fact the clone's desktop, because, of course, the cloning had just reset
the clone's desktop to be exactly the same as the main drive's desktop.
I immediately moved an icon on the clone desktop and renamed its c:\ shortcut
to make the clone's desktop look a little different. Once I spend a few
seconds tweaking the look of the clone desktop, I am unlikely to get them
mixed up until I clone again .
Immediately
after cloning the one intrinsic difference that I checked first to verify
I was running on the clone was to look at the capacity of the c:\ drive.
I specifically bought a drive with a different capacity from my main drive
to be the clone drive. I am using 1Tbyte drive for the main and a 500 Gbyte
drive as the clone #1, so I can easily tell them apart in Explorer by checking
the c:\ drives properties. The disk configuration page can also be used
to show which drive is in control, and here having the two drives with
different capacity is a big advantage as it is pretty obvious which drive
is which. If the two drives have the same capacity, but different model
#, then it takes a right click of the drive # (left side) to see the model
number. If you have two identical drives, same manuf and model #, I think
you are screwed, there is no easy way to tell them apart. This is not what
you want for a clone drive.
Use Explorer to assign meaningful names to
the main and clone drives
I later realized
there is an easier way to identify the drives and keep them from getting
mixed up. In Explorer you cannot only rename files and folders but you
can rename the drive (or partition) too with a right click on the drive
letter. In Explorer I have assigned these names: 'OS main (C:)' and
'OS 500 GB clone drive #1 (F:). (Explorer adds the 'OS' and drive letter,
which can change.) When I am running on a clone, the clone drive's files
always show up as the c:\ drive, but the c:\ drive will retain its old
name. So in Explorer I will see: ''OS 500 GB clone drive #1 (C:) and
'OS main (F:)'. The main and clone have switched drive letters, so clearly
in this case I am running on the clone. The disk configuration page can
also be used to change both partition names and letters, plus it shows
clearly the partition that Windows is currently booted from.
Use data backup software to keep clone up to date
How often to update
the clone is a work in progress. One thought that occurred to me is that
the need to update the clone frequently to keep data fresh can be greatly
reduced by use of a scheduled backup of data directories (only) from the
main drive to the clone drive. Clearly a clone update is called for after
new hardware or new programs are added, but each update introduces an element
of risk that if the system is not running cleanly, the OS problem will
be passed on to the clone. Therefore it is desirable not too clone too
frequently, and only when the system is running well (virus free, etc).
Another
option to protect the clone would be to take it offline by powering it
down, but, of course, the problem with this is that it would make updating
the clone harder. I have addressed this with my new hardware which includes
rear bracket set of push buttons that allow the power to the drives to
be individually switched on/off.
I find I am tempted
to reclone after adding new data to the c:\ drive, which I do almost every
day, since I write on my computer updating essays for my homepage. [My
essays I suppose could be moved to my USB data directories, but I like
them where they are, where they have always been, and that is on the c:\
drive.]
I am thinking
now that rather than recloning frequently, or manually updating changed
files on the clone, a better approach might be to find the right file backup
software. Not a file backup like Windows, which stores away files in an
obscure directory format, but a backup program that would either overwrite,
or perhaps better add new version of changed files to the same directory.
There should be relatively little risk in this. I bet such a backup package
with the latter feature will be hard to find. So far have not found software
like this. (Maybe what I need is some sort of script or .bat file that
would just automate the 'copy' command.)
Different clone strategy (update)
After using
clones for a few weeks a different clone strategy has emerged: do lots
of clones. With my main OS partition running lean at 50 Gbytes and lots
of disk space with lots of partitions lots of clones are possible. I now
have
five clones, bootable or potentially bootable, spread around
on
four different physical hard drives. My dual boot expanded into
a multiple boot.
I
split in half the large 450 Gbyte partition on my internal 500 Gbyte clone
drive so it can hold two clones: an 'archive' clone#1 and a 'working' clone#1.
In other words one clone to update now and then, and a 2nd clone that can
be updated at any time This still leaves plenty of room for expansion as
only 50 Gbyte are used on 225 Gbyte partitions. I also recaptured the unallocated
233 Gbytes at the top of my main 1Tbyte internal drive and put another
clone (main backup clone) up there. After doing some cloning tests, I found
I could reclone a clone from a USB drive to a an esata (or sata) drive
and it would boot, so I partitioned off a tiny (125 Gbyte partition) at
the top of my two USB data drives, the loss of space is nothing on a 2
Tbyte drive, and put clones there too.
Dual boot clone backup -- a robust backup for hard drive
and Windows
What you need for online clone backup
A robust, easy to
use clone backup system for a desktop computer can be built from three
pieces: 2nd hard drive ($50-75) and two software programs (available free).
The 2nd hard drive should be a 3.5" sata type internal drive with a capacity
that (at minimum) exceeds largest expected 'bytes used' on the main hard
drive. It will serve as a dedicated clone drive. It can be mounted either
inside the case (in the drive bay plugged into a spare sata connector on
motherboard), or outside (mounted in an external enclosure that supports
an esata link to the computer). Clone software is used to copy (clone)
the main drive to the 2nd drive, make it bootable and keep it periodically
updated. A free utility (EasyBCD) makes setting up Windows dual boot capability
easy.
Quick emergency clone backup procedure
If your desktop
computer is still working, but you suspect trouble, you can quickly make
a bootable clone backup of your hard drive without mounting your clone
hard drive. You need a spare hard drive (or partition) to be dedicated
to the clone, because cloning will erase everything, and at a minimum it
needs to have more capacity than bytes used. The trick to operating a spare
drive outside the computer is something called a 'sata drive test kit'
or (confusingly) a 'Sata Drive to USB 2 Adaptor' (available
on Amazon for $10 or so), which is a set of cables, connectors and
a power supply. All you need do is take off the PC cover and locate an
open sata connector on the motherboard (rectangular, color coded with distinctive
L shaped center key) and connected the spare drives's sata data port to
the motherboard with a sata cable. A $10-$20 sata drive test kit will provides
a power brick to power the drive outside the case and the needed sata data
cable. In this setup the kit's sata-to-USB converter is not needed. For
the clone to be bootable the 2nd hard drive needs to be plugged directly
into the motherboard not connected via a USB cable.
Simpler way to clone (update)
I later realized
in an emergency there is an even quicker way (no opening the case, no sata
kit) to make a clone of your primary hard drive. Instead of a sata drive
you can use a USB drive (or a partition on a USB drive) whose contents
it is acceptable to erase. Download clone software and make the clone to
the USB drive. As it stands, this clone will not be bootable, because Microsoft
in its infinite wisdom (and in pursuit of maxiumum profit!) will not allow
USB drives to boot Windows 7, but your OS, programs and data are safe on
the USB drive. When you later get a sata (or esata) drive to use as a clone
drive, you can reclone the USB clone to the sata drive, and from
the sata drive it will boot. (I have confirmed this experimentally.)
Do the clone
Run free or trial
clone software to copy your main drive to the spare hard drive and make
it bootable. This doesn't take long as both drives are plugged into the
motherboard. I found a 50 Gbyte clone took only 20 min. If you want, you
can then unplug the spare drive, label it, and put it away in case of emergency.
To boot and run the computer from the clone drive connect it as before,
but this time also pull out one of the cables (either data or power) from
the main hard drive, which is still in the drive bay. With one of its cables
gone the main drive can no longer be seen by the OS, so when you power
up, the backup clone drive will automatically boot and run the system.
Your programs and data will be as of the date of the clone.
Clean up and make permanent
Once you have the
clone backup working this quick and dirty way, you can clean it up and
make it a permanent backup. Mount the clone drive in a spare drive bay
powering it from the system power supply. The cables needed to connect
to the sata connectors on the drive will either have come with the drive
or can be pulled from the sata drive kit. Now to allow an electronic choice
of booting between the two hard drives set up a dual boot using free utility
EasyBCD. Once that is working you no longer need to physically disable
to main drive to get the clone to boot, so you can close up the case.
Power switches as insurance
I kept wondering
is the above configuration robust? Will dual boot always work in the future
or might it be necessary to again open the case to physically disable the
main drive if it goes bad. Not that this would be a disaster, just nice
to avoid. It's hard to be 100% certain, so I found some insurance. On Ebay
I found a set of push button switches designed to switch sata hard drive
power on/off. (Ebay spec for it is included in this essay.) The switches
come mounted on a bracket with all the cabling and a little PC board that
electronically switches four drives power on/off. I have not mounted it
yet, but it looks well made. It should give great flexibility, because
normally both drives can be kept powered to allow clone updating, but from
outside the case either drive can be powered down if it acts up.
I've now got
an easy to use robust backup system for the hard drive working in my computer.
While I went down a lot of blind alleys trying to figure out what I wanted
and how to make it work, the final result is simple and operates slick.
I have two hard drives in my computer that are roughly the same size. I
use clone software to periodically copy my main hard drive to the 2nd drive,
which I designate as a clone drive, and to keep things simple it is used
only for this purpose. This is not time consuming, only 20 min for a full
50 Gbyte clone, because both hard drives are plugged into the motherboard.
The clone software also makes the clone drive bootable, so my computer
can boot and run from either drive with all programs, data, and setting
intact. With the case closed I can switch between the drives in two ways:
1)
Dual boot
2) Switches
on a rear bracket to allow drives to be individually powered on/off
Dual boot system with 2nd drive as a clone of the primary
drive
Windows
7 has a dual boot capability built in. Dual boot is just a pause during
boot for a few seconds that allow a keyboard select of which drive to boot
from with the default for no keystroke being the main drive. With both
drives powered the non-booting drive has it's c:\ files show up under letter
f:\. It looks like a normal drive that can be read and written to by Explorer
allowing its data files to be individually updated. When I reverse the
drives at boot, the c:\ and f:\ folders switch and the 2nd drive's desktop
comes up. So what I have is basically a general dual boot system where
the alternate boot is to another internal drive that contains a clone of
the primary drive.
Setting up a dual boot, clone backup system
Took me a long time
to figure out how to set it up, evaluate tools, etc, but the final result
is simple. Here are the steps:
* Buy an internal (sata) drive.
Same size or larger than existing drive will work with any clone software,
however, good clone software will allow a cloning to a smaller drive too
as long as it larger than the bytes used. (I ended up using a 500 Gbyte
clone for my 1 Tbyte primary drive.)
* (optional) Buy sata-to-USB drive
kit ($20). This provides a power supply brick for the hard drive, plus
cables. This allows the hard drive in beginning to just sit outside case
powered by brick and provides a long sata cable to plug it into motherboard.
Found my desktop HP motherboard had five sata (standard drive serial link)
connectors, three of which were free.
* Download free (or trial) clone
software and use it to format and clone the main drive to the new drive.
After testing several I like Casper 8, which at end of 30 day free trial
I will buy for $50.
* Download EasyBCD to help set
up dual boot. Dual boot is native to Windows 7, but free utility EasyBCD
makes setting it up much easier than trying to use the techy Windows commands.
Mounting 2nd drive
You now have
a working clone setup you can control from outside the case. There are
now two choices for mounting the 2nd drive. Cleanest is probably to mount
the clone drive inside the case. In this case it is powered from the computer
power supply and plugs into an open sata connector on the motherboard.
For extra flexibility I am going to install a bracket on my computer with
switches that will allow me from outside to power down each drive individually,
but this is optional. Normally both drive will be kept powered so I can
periodically update the clone.
An outside mount
is possible too. This entails either buying an external drive with an 'esata'
port or roll your own. For not much money you can buy an enclosure for
an internal drive that will protect it physically, power it, and provide
both a USB and the requisite esata port. I bought one of these enclosures
(NexStar HD by Vantex) and verified that I could put my standard internal
sata clone hard drive in it and boot and control the PC when it was hooked
up via an esata cable.
Esata is essentially
the internal sata bus of the motherboard brought to the outside. From a
signal integrity point of view and ease of use point of view an esata cable
connection is probably not as good as USB 3, but it has the advantage that
an esata connection allow an external drive to boot the PC. Esata is newer
and less standardized than USB so it can be troublesome, but it is showing
up on new computers and cable up to 6' for it are being sold, so it must
work. From basic engineering I would expect, given the super high clock
frequencies of sata/esata, that an internal mount with its shorter cables
would be preferred to an external mount. Booting from an external clone
via USB might be possible with Windows 7, but it's not native, and so far
it has been too techy for me to get working.
Checking out drives for bad blocks and temperature
Once drives
are working what you really would like to do, to have confidence in them,
is thoroughly check them out. Basically this means checking every sector
to see if there are any bad blocks and checking the operating temperature
of the drive. I found this remarkable difficult to do. Of course, I can
run chkdsk on the drives, but I wanted something better than this. If there
are any bad blocks, chkdsk will not show you where they are. I wanted a
bad block checking and mapping program and I found it in AOMEI
partition assistant lite. It verified that my two new sata drives and
my two USB data drives all have no bad blocks, and it showed where on my
old 750 Gbyte drive the bad blocks were and while it does not 'fix' bad
blocks itself, by being able to see them I was able to clear them with
repeated formats.
Temperature
monitoring of drives was an even more difficult nut to crack. All hard
drives have a built-in self monitoring/check code called SMART, which includes
the drive internal temperature (and bad blocks reallocated). Amazingly
Windows has no support for reading drive temperature or SMART data.
Even more amazingly the drive vendors (WD and Seagate) don't support this
either. WD just says buy a 3rd party utility (and never names any). Seagate
utilities are buggy junk.
I did locate
a bunch of disk check and monitoring programs from simple to fancy and
downloaded about half a dozen to try out. I found not one of them would
read the temperature of my two new internal drives! After a long hunt struggle,
I finally fixed this problem. It required the system's controller RAID
driver be updated to allow the controller to pass on SMART data. I can
now quickly read the temperature of all five drives with utilities: Crystal
Disk Info and Hard Drive Sentinel.
I found with
the case open and two 7,200 rpm hard drives in the drive bay, the drive
in the corner (1 Tbyte main drive) is running hotter than I would like.
I have seen 48C during a 2 hr cloning, and my old USB 2 data drive whose
plastic case has no holes runs even hotter (I have seen 51C). The coolest
running drive (not surprisingly) is my old 7,200 rpm drive now sitting
in a fan cooled enclosure. It typically runs about 35C. This is spring,
my livingroom will be a lot hotter come summertime.
Booting Windows from an external hard drive discussion
I put in a
huge effort trying to get a USB clone to boot Windows, a lot of trial and
error and research, and never succeeded. I was encouraged by forum posters,
who while not knowing themselves how to do it, would sometimes comment
they thought it was possible. Encouraged also by the Windows disk configuration
page showing that I had almost succeeded, that I had in fact (so is said)
booted from an external USB drive even if its desktop didn't come up.
But with more
reading I am now pretty convinced that an external clone drive just won't
boot Windows when connected via USB. Acronis, a leading clone software
vendor, states flat out it is impossible. And the reason is not hard to
find. It is a restriction that Microsoft built into Windows to protect
its profits. They don't want to make it easy to plug in a USB drive and
have Windows appear on a new computer. Sure Windows checks to see if it
is running on the same machine its key applies to, but it has to allow
some changes when customers upgrade their machine.
Apple takes
a different view, they allow it. A standard way to upgrade a hard drive
on an Apple computer is to clone the old hard drive to a new hard drive
hooked via USB (sata-to-USB converter or enclosure), then to check the
clone by booting from it over the USB link, selecting it at boot time with
Apple's built-in dual boot.
Even Windows
is relenting, at least a tiny bit. One version of new Windows 8 (Enterprise
version intended for IT professionals) will allow a USB connected hard
drive to boot. Surprisingly no one seems have yet figured out a trick to
bypass this Window's booting restriction on other versions of Windows.
For example, if a hard drive could be disguised as a flash drive it might
work, since booting from USB flash drives is allowed in Windows and is
even common with pros.
Esata to the rescue
However, technology
has provided a work around that apparently the guys in Redmund Washington
did not anticipate. The key workaround is the new esata standard. Esata
is just a bringing to the outside of the PC the internal sata (drive) connections
on the motherboard. In the last few years has emerged as a new fast external
link with standardized connectors, cables and protocols. Esata ports are
appearing on new computers and enclosures.
Windows basically
can't tell if an esata connected hard drive is internal or external, so
booting works! I sort of figured this out on my own doing booting
tests and reading about sata and esata. I was pretty sure that external
booting via esata would work, at least when the PC esata ports are just
pass-throughs, so I bought an enclosure with both USB 3 and esata connectors
and a pass-through esata bracket for my PC. Sure enough I found I could
clone to the drive in the enclosure and as long as it was hooked up via
esata the clone would boot. When I switched to a USB cable, I could still
write the clone, but the clone would not boot.
In my current
system I now have two bootable backup clone hard drives, one mounted
internally and the other mounted in an external enclosure connected via
esata. My desktop computer didn't come with an esata port, but I found
for a few bucks a simple non-electronic esata add-in on Amazon and so far
it has worked fine. (Whether booting would work with an esata card I don't
know. My guess would be yes, but I don't have such a card, nor have I seen
anyone say that it works.)
Hardware
modifications to my desktop computer (3/30/16)
Here's a sketch
showing the hardware modifications I have make to my mid-priced HP p6510f
desktop machine. Not only is it faster with solid state drives replacing
the rotary hard drive it comes with, but it is hugely redundant:
x4 redundant for the OS (operating with three clone backups) and x3 redundant
for data (operating with two backups).
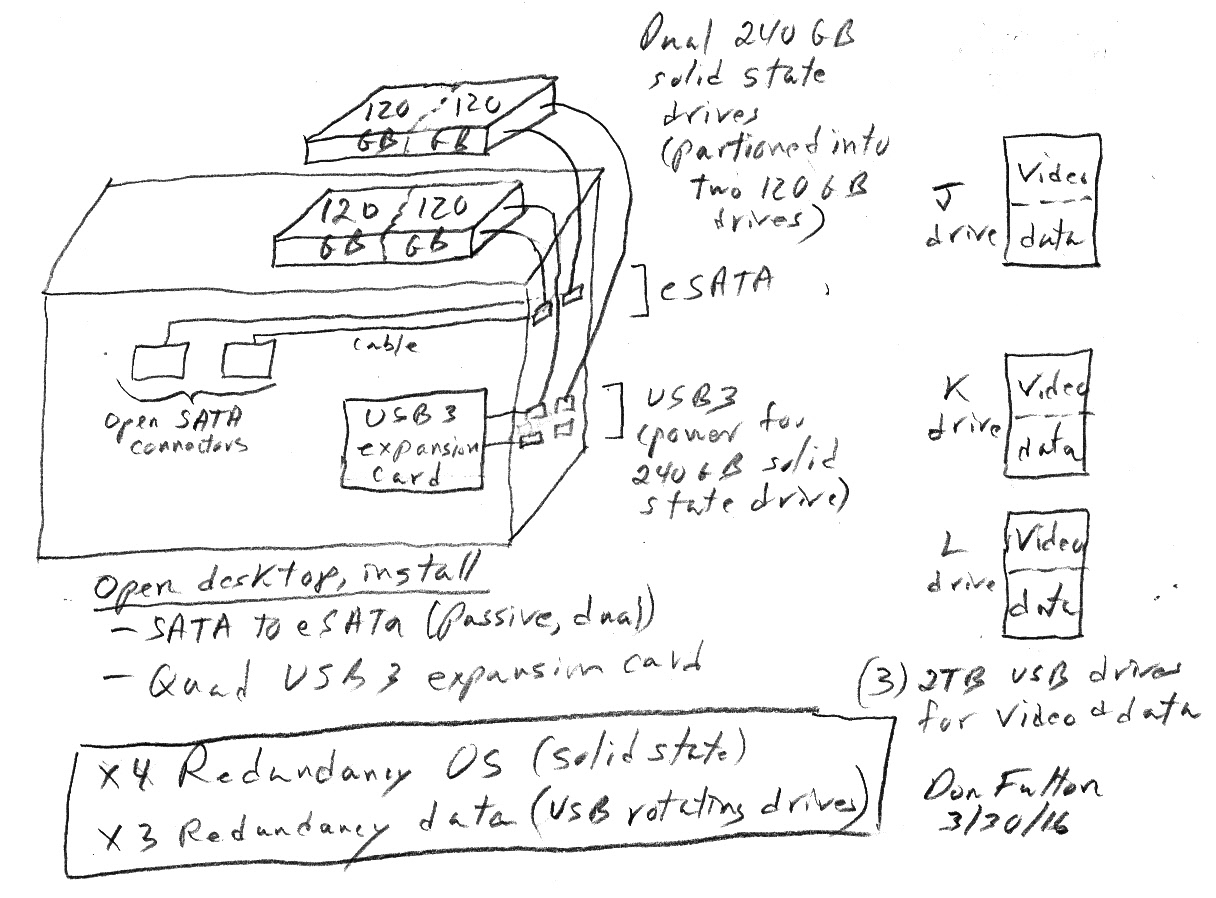
My desktop computer modified for speed and redundancy
(3/30/16)
Added internally: 2 port eSata to Sata slot plate bracket
(Startech)
Added internally: 4 ports PCI-E to USB 3 expansion
card
Added externally: two Crucial M500, 240 Gb solid state
drives installed in 2.5" eSata aluminum enclosures
Added externally: three 2 TB, USB 3, hard drives
(single disk drive that came with the computer remains
plugged in and operating, but is not in active use)
The idea is
to run the OS drive lean with only limited data so it will fit on an economical
solid state drive. The typically size of my OS drive is only 30-50 Gb,
so it fits comfortably on a 120 Gb solid state drive. Since for less than
100 bucks a 240 Gb solid state drive can be bought (Crucial M500), I start
by partitioning it into two 120 Gb drives. This gives me a backup clone
of the OS on the same physical hard drive. A second identical solid state
drive, also partitioned into two 120 GB drives, provides two additional
OS clones on separate hardware.
Physically
(as the sketch above shows) this is done as follows. I add to the desktop
an inexpensive (passive) Sata-to-eSata bracket. This is just two cables
and rear bracket that brings two (free) motherboard Sata connectors to
the rear panel. An eSata drive plugged into this eSata back panel bracket
will function just like an internal hard drive, so it supports booting.
An eSata cable run from the bracket to a small aluminium eSata enclosure
that holds my 2.5" Crucial 240 Gb sata solid state. Power for this drive
in this enclosure comes from second (USB) cable, so to be sure to have
sufficient USB ports I installed an inexpensive quad USB 3 expansion card
(Inateck).
For this to
work the computer needs two free Sata connectors on its motherboard. At
least as of 2014 this is usually the case with full size desktop computers.
(Be careful with reduced size computers where the motherboards are smaller.)
My full size HP desktop came with six Sata connectors on the motherboard
only
two of which were used (internal hard drive and disk drive), the other
four were open and easily accessed once the side panel was removed.
All large data
files like pictures, music, and especially video files are kept in external
USB drives. I have a lot of video files since I have a TV tuner connected
to my computer via USB and use the computer as a TV recorder. For 100 bucks
or so a 2 TB USB (rotating) hard drive can be bought. I start by partitioning
it into two 1 Gb drives. Video goes into the upper partition and all other
data into the lower partition. Dual data backup is provided by two more
2 TB USB drives that are simply copies of my operating data drives. All
these plug into the remaining USB 3 ports. My main USB data drive and its
first backup has a power supply brick, but when I added a 3rd backup data
drive, I opted for a low cost, 5400 RPM, USB 3, 2 TB drive (Seagate) that
is self powered through its single USB 3 cable.
While I have
400 bucks or so invested in the two external OS solid state drives and
three USB data drives, all these drives can be moved to a new computer
once it is modified (as shown) with an added dual eSata bracket and four
port USB 3 expansion card.
Keeping the drives straight
I have a lot
of drives connected to my computer: five physical drives, but since each
of them is partitioned in half, I have ten logical drives (really
eleven since the original 500 Gb drive the computer came with is still
active). I was initially concerned about how I would keep them straight,
since the file structure of a clone drive looks just like the master, but
I have found the trick is just to assign reasonable names to the
drives. (You cannot depend on Windows assigned letter designations, Windows
moves these around.)
For example,
my four solid state logical drives are named: SSD lower partition, SSD
upper partition, and SSD-2 lower partition, SSD-2 upper partition. SSD
lower partition is my main OS drive, the other three are clones (of varying
ages). I write 'SSD' and 'SSD-2' on the aluminium cases. My six logical
data drives are named: j drive lower, j drive video, k drive lower,
k drive video, L drive lower, L drive video. J drives are my
main data drives and the other two physical drives are copies.
I use the same
piece of software to do all the cloning and copying: Casper 8.0 ($50).
It is fast as it has an incremental update feature, and in over a year
of use I have found to be totally reliable.
Getting Windows to work on a newly installed solid
state drive
The physical
modifications to a new desktop I've described are restively straightforward
once the new hardware is obtained from Amazon. The external USB data drives
present no problem. Plug them in, rename them, and they are ready to use,
they will show up in your file system so just start saving your big data
files there.
However, replacing
the original installed, working and bootable rotary drive with the OS and
drivers with a bootable solid state drive clone or copy is not trivial.
It can be downright tricky. This is a problem which is time varying and
depends on several factors, so it's best to start off with a google search
to review options. For example, do you want to just move over the installed
OS from the installed rotary drive, which came with the new computer and
has the required drivers, to your newly connected sata solid state drive,
or are you going to do a new, clean install, possibly with a different
version of windows? A newly bought solid state drive is likely to come
with a utility that may (or may not) do the job you need done and many
others are available online. The two big complicating factors to be aware
of are:
1) drivers
2) bios settings
Drivers
The installed
hard drive in your new computer has the hardware drivers that this particular
computer needs for the version of Windows it is running. If the windows
version is not going to change, you want these drivers moved over to a
new solid state drive. When the OS is copied from the rotary drive to the
solid state drive, the hardware driver will come along for the ride, and
should work. If you are changing Windows version and you bought a brand
name computer, you might be able to get the drivers you need for
your particular model computer with the new Windows version from the computer
manufacturer.
I installed
on my hardware a clean (free) version of Windows 7 provided by Microsoft.
(I also bought a version of Windows 7 to archive before Microsoft stopped
selling it.) Install Windows files or DVDs will (and must) contain the
essential generic drivers for video, sound, hard drives and DVD drives
so the computer will work, but extra or more advanced hardware on your
computer is unlikely to work, or work to its full potential, without its
own drivers. I found the drivers I needed for my particular model of HP
computer with Windows 7 were available from download free from HP and would
self install. Many sites offer drivers, but be careful as they tend to
bring in a load of crap software with them, go the computer manuf for drivers
first.
Bios settings
The biggest,
and most difficult to understand, potential hangup is likely to be the
bios, which may need to change. I was blindsided by this. Several bios
settings are normally provided in a physical bios, and you can change the
setting using the built-in bios utility early in the boot. Bios provides
low level interpretation of the hard drive during booting, so with the
wrong bios setting a drive is unliklely to boot. The bios you have depends
on the age of your computer, your processor and version of Windows. After
Windows 7 a whole new bios became standard, and because I haven't worked
with it, I know nothing about it.
The root of
the problem (in a conversion from rotary to solid state drives) is that
solid state drives need a bios setting that will not wear them out with
too much rewriting, and this is very likely to be a different bios setting
from the one you will find active in your new computer with a rotary drive.
I ran into this problem big time with my 2012 era HP machine, its AMD processor
and Window 7. Much of this essay goes into great detail about my bios problems
and how I solved it.
I found if
I cloned a drive under one bios setting, then changed the bios setting
my newly cloned drive would not boot! With one bios setting I could boot
from my sata connected rotary drives and with a different bios setting
I could boot from my sata connected solid state drives. It was either/or
solid state or rotary. My solution was to change over to the bios setting
recommended for solid state drives and use only the (faster) solid state
drive for booting. Once I had one solid state drive partition up and booting,
then all I had to do is clone it to the the other three solid state partitions,
and they all would boot.
Turns out a choice of boot
drives is a function built into all versions of Window 7 (even Home Premium),
but good old Microsoft provides only the most rudimentary tools to access
it. The answer is to get the free utility EasyBCD 2.2 which provides easy
access to it. Using EasyBCD you can set which several of your four solid
state partitions, and in what order, you want to show up as drive selections
during the boot process. To boot from a clone now becomes almost trivial,
when the drive select screen come up during boot, just scroll down and
select the clone of choice. At least this is how it works in my Windows
7 system. Does booting in Window8 and Window 10 work the same way? I have
no freaking idea.
I left one
rotary hard drive mounted internally on sata with a clone on it made under
the rotary bios setting. Under my solid state bios setting it shows up
in my file system and works fine for saving and reading files. I can run
programs from it too, it just won't boot. For big data storage it's probably
a little faster than my USB 3 drives since it is directly plugged into
sata on the motherboard, but it's an oddball size and has an extra clone
of my (old) programs and key data, so I just let it sit. I use my triple
redundant USB3 drives for all my big data storage. Of course, the rotary
drive that comes with a new computer can be removed and as a bare drive
installed in an external eSata or USB 3 case, but it will still be an oddball
size and run a little slower. The only advantage I would see in doing this
is to remove some heat from inside the desktop, which, of course, it should
have been thermally engineered to handle.
New Hardware
Here's the
hardware I bought, about $120, to add dual boot capability. It's a little
more than necessary, but I wanted the option to try mounting the clone
drive both inside and outside the case. Finding both options worked I later
decided to do both by buying one more drive. This will give me a two clone,
triple boot system with one clone inside (using power switch) and the other
clone outside (in enclosure connected via added PC esata port).
It's important
when the two drives are online that the main and clone drives don't get
mixed up. I still working on this, but one way that works pretty well is
to buy drives of different capacity, so at a glancy you can tell them apart
on the disk configuration page. With the right clone software (Casper 8
does this) a 1 Tbyte main drive can be cloned to a smaller 500 Gbyte clone
drive as long as the main drive is less than half full. Anther way is identify
which drive is active is to make their desktops a little different, which
requires a little touch up after each cloning, because the cloning will
make them identical. I do this too.
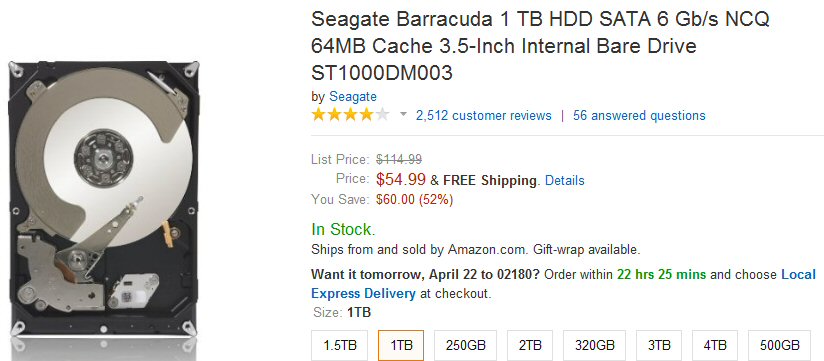
Bare modern 3.5" sata 3 internal drives (500 Gbyte
$51, 2 Tbyte $85 )
('bare' meaning no mounting screws or cables)
No cables or mounting hardware here, but not needed
if drive is to replace an existing hard drive
or is to be mounted in an external enclosure.

Litle more expensive 3.5" aluminum good quality enclosure
with esata and USB 3 ports, (quiet) fan, power and
fan switches, external 12V, 2A power brick.
Allows a bare (internal style) sata hard drive to
be used as a fast external drive.
Works well and low speed fan is inaudiable.
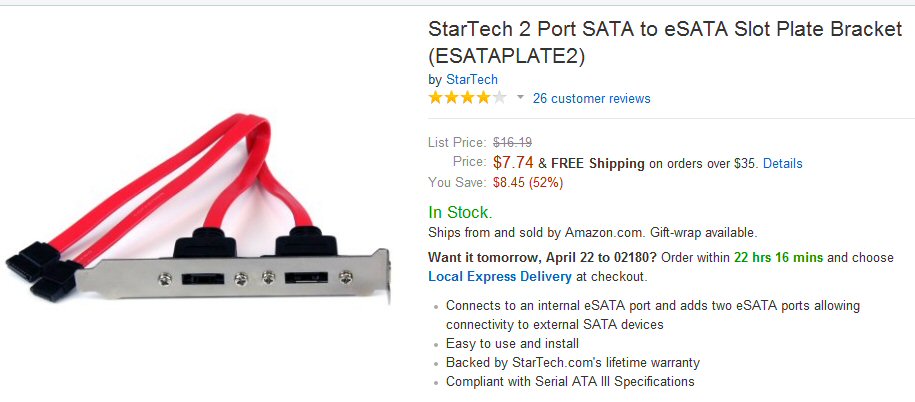
Cheap (and dirty) way to add to esata ports to PC
(motherboard sata ports brought out with no buffering!)
I've tried it with 1 meter external esata cable, and
it works.
(Its cables easily reached to sata connectors near
the front of the motherboard.)
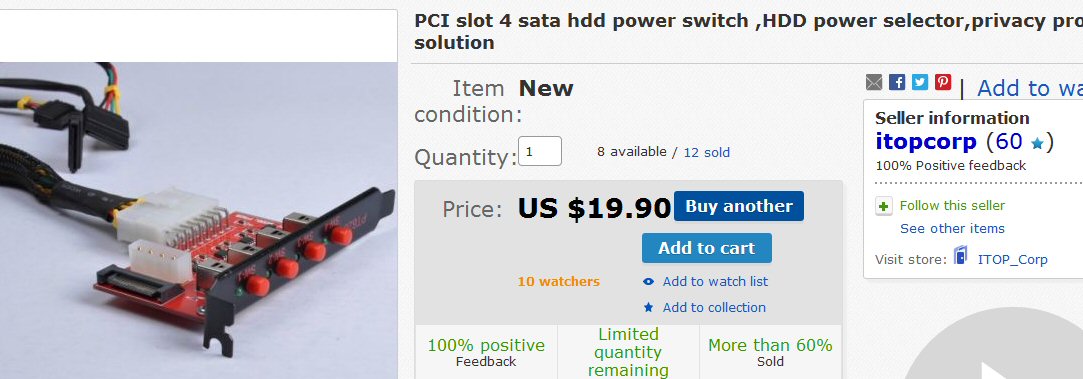
Four switches to power internal drives on/off without
opening the case (found on Ebay)
Backup to dual boot. A hard drive without power goes
offline even though its data cable remains plugged into sata.
Probably optional, just extra insurance, a hardware
way to isolate a defective hard drive. (not yet arrived)
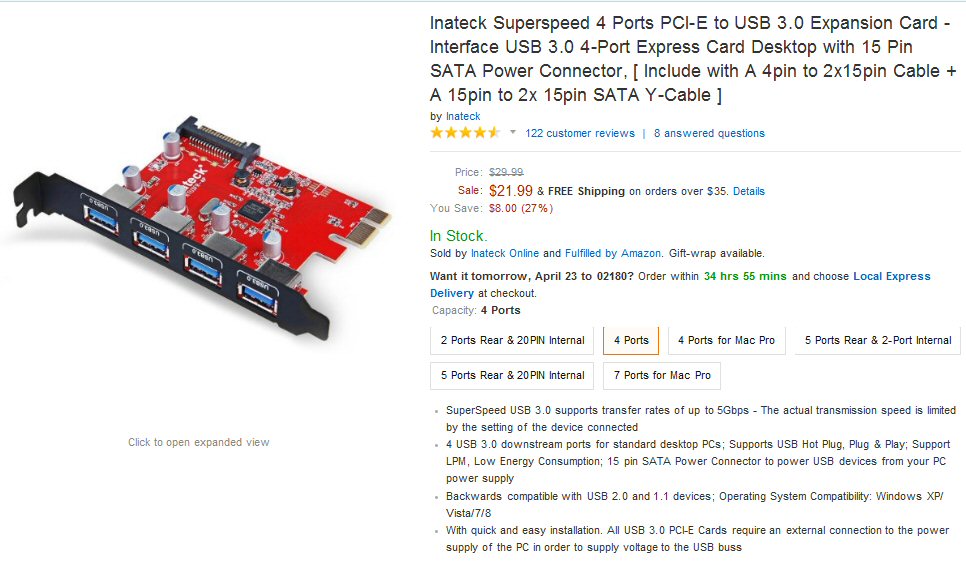
Highly rated, inexpensive card I bought to add four
USB 3 ports. Works!
This is a PCI-E x1 card and will work in any PCI-E
slot (x1 to x16).
(USB 3 can speed up full sector scans of hard drives
by x3 or more vs USB 2, 6 hr vs 21 hr)
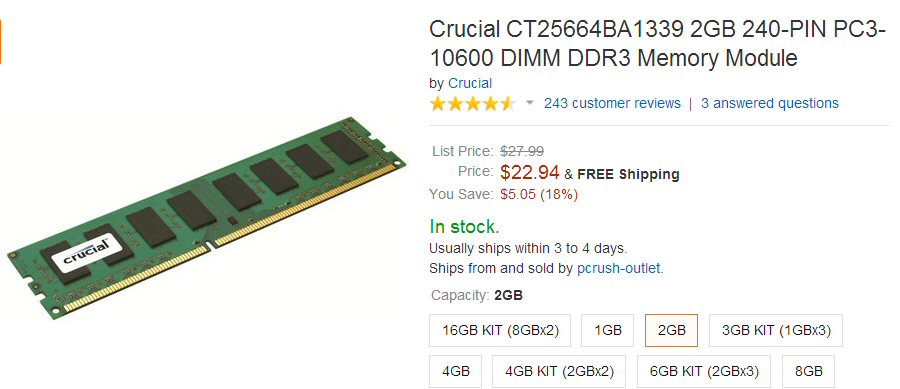
Ordered one of these memory cards to upgrade ram from
4 GB to 6 GB
Plugged in and just worked, but I don't really notice
any speed improvement.
(unrelated to clone backup, but, hey, the computer
case was open)
Later bought
these flash related items. My initial idea was to use the Crucial (Micron)
240 Gbyte SSD drive as main drive running a clone. However, when I found
the Crucial SSD (for some reason) is only visible to windows 7 when
the bios be set to AHCII, I concluded this was not going to work. My SSD
doesn't just works better with the bios be set to AHCI, it requires
the bios be set to AHCI (well not RAID) to even work under Windows 7. The
bios sata setting tells the computer in a deep way (partition boundaries)
how a disk drive is laid out. My clones were created when the bios was
set to RAID. I find that now changing the bios from RAID to AHCI prevents
my clones from booting, so no way out. I can either boot my clones from
HHDs or boot a newly installed Windows 7 from the SSD.
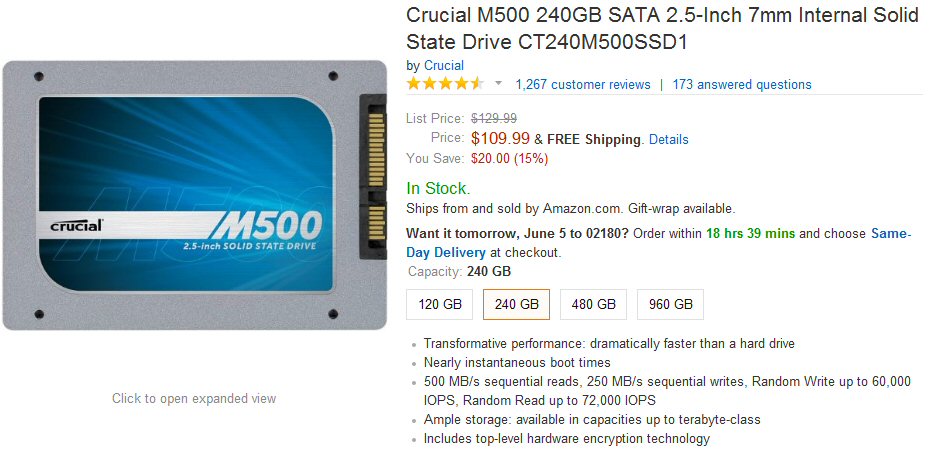
240 Gbyte SSD divided into two equal partitions.
Required the bios be set to AHCI.
Lower half is my main drive and upper half a clone
backup.
(Casper 8 can update the clone in 1 min)
Once I was
figured out my SSD was not going to work as my main clone drive, I didn't
see the need to mount it internally, so I bought a 2.5 inch enclosure for
it which supports USB 3 and esata. This will allow me to use it as a fast
data drive, and by switching to AHCI I can experiment with it booting a
clean copy of Windows 7 I installed on it from my xxxx.iso Windows 7 disk.

I run the SSD from this 2.5" enclosure connected via
an esata cable.
(second cable to USB port provides power)
(update Sept 2015)
For over a
year and a half my main drive has been the (above) Crucial M500 240 Gbyte
SSD mounted in the (above) Satechi enclosure. It just sits next to my desktop
and is connected via an eSata and USB cable (for power) to rear connectors.
It is partitioned into two 120 Gbyte partitions (named: SSD lower and SSD
upper) that I use as my main drive and main clone. This protects me well
from software problems, but to protect me from a hardware failure of the
SSD, I recently bought a second Crucial M500 240 Gbyte SSD (price now down
to $85). The Satechi enclosure is no longer available (though it appears
to be sold under a different name for $30). To mount my new SSD backup
drive I bought the 2.5" eSata enclosure below. The fact that it is older
and USB 2 makes no difference to me, since I use the USB port only for
power. The SSD screwed firmly to the pc board inside. Adding this backup
SDD (named SSD-2) to my boot options in EasyBCD allows me to boot from
either of my SSD drives.
For a 100 dollar
additional investment I now have two SSD partitioned drives giving me both
software and hardware protection. I run my OS drive lean with most of my
data on large capacity USB drives. I've long had two 2 TB USB drives, one
the clone of the other, but recently when one of them started to act up,
I bought a 3rd 2 TB USB drive: opting for a small 5,400 RPM USB 3 drive
powered through its USB 3 cable. So now I have three devices (two SSDs
and 5,400 rpm USB hard drive) powered by USB ports and even though I have
an expansion quad USB 3 card, I'm beginning to get short of USB ports.
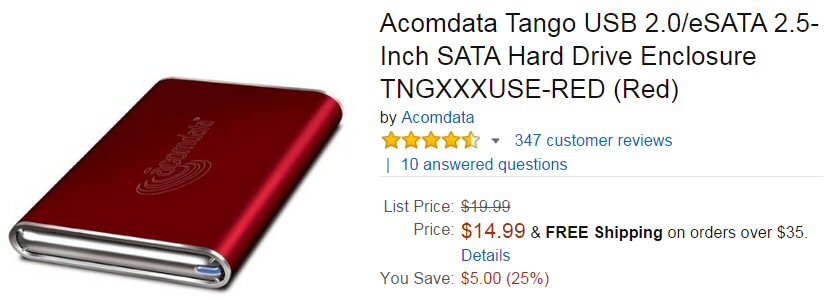
I run my backup SSD (SSD-2) from this 2.5" enclosure
connected via an esata cable.
(second cable to USB port provides power) (Sept 2015)
Small, low power USB powered 2 Tb, 5,400 rpm, USB
3 drive for data backup (Sept 2015)
I bought this
inexpensive 64 Gbyte USB flash thumb drive to put a clone on. If I understand
flash, as a removable media it should be possible to make it bootable single
partition, and at 64 Gbytes it's barely big enough to hold a clone. High
speed flash tends to be very expensive and this is a cheap one, so I suspect
it is going to crawl, but if it works at all, it doesn't really matter,
since its main purpose is to be a working, bootable clone that I can store
offsite. I searched around to get the best speed I could for reasonable
money, and it's got pretty good specs: "up to 95MB/s read and 60MB/s write",
so we will see what happens.
My only experience
with bootable flash taught me how slow flash memory can really be. I had
an old 1 Gbyte compact flash camera card lying around. I put a Windows
recovery environment on it and following online instructions entered the
low level commands to make it bootable. It works, but it just crawls, virtually
unusable, probably x10-20 times slower than booting the same recovery media
from a DVD.
(update)
After using
this PNY flash stick for a while, I am very pleased with it, a lot of speed
and capacity for not much money. It is fast enough to be used as a bootable
Windows repair environment flash, and it handled a full install of Windows
8 (3.9 Gbyte) with good speed. 64 Gbyte for only $27. I paid $13 for an
8 Gbyte x133 speed compact flash card (for camera), and in a head to head
test loading the Windows PE files the PNY was x17.5 faster (24 sec vs 7
min) against the expensive, small capacity x133 speed card! Since all bootable
recovery/install files will fit on a 4 Gbyte flash drive, most of a bootable
64 Gbyte PNY is empty. This spare capacity can be nicely used to hold a
full 'image' backup of the OS (with room left over for a few key data directories).
A reasonably fast, relatively inexpensive 64 Gbyte
flash drive to play with.
Currently it holds the bootable Casper environment
needed to recover a Casper 'image' backup,
which is far superior to Windows image backup.
Later bought another one ($25) to use as a bootable
Win7 USB repair drive.
While I don't
have a specific task in mind for this (very) fast SanDisk flash stick,
I ordered it. I have found that (bootable) USB flash sticks are useful.
I've installed Windows 8.1 three times from a PNY flash stick, so it would
be fun to compare the install time from a really fast flash stick like
this. It should go well with the two 64 Gbyte PNY sticks I own. It's probably
too small to hold an image, but might fit a lean clone. Another use might
be the bootable Casper image recovery environment (now on PNY). It's all
plastic, but has a nice spring action.
I ran a head-to-head
speed test of my new 16 Gbyte SanDisk vs my 64 Gbyte PNY. One at a time
with both plugged into my USB 3 port card, I copied (Explorer paste) my
home page folder consistings of thousands of small files both ways. I got
a surprising result. For a baseline I copied the folder from one part of
my SSD to another. This took only 10 sec. The SanDisk specs indicate it
should be considerably faster than the PNY, and it is on writing, writing
the directory in 37% (71 vs 191 sec) of the time it took to write it to
the PNY. Copy from flash to SSD, which is a read of the flash was faster
than write, as expected, but not expected was that the reading from the
SanDisk took longer than the PNY. Not a big difference, but still it was
25 sec vs 18 sec. Here are the measured copy times (5,326 mixed files,
890 Mbytes):
SSD => flash
Crucial SSD 10 sec
SanDisk
71 sec
PNY
191 sec
flash => SSD
Crucial SSD 10 sec
PNY
18 sec
SanDisk
25 sec
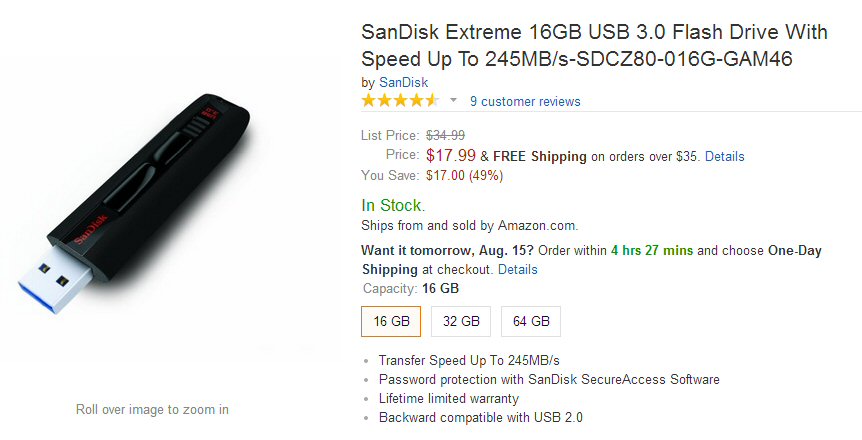
Smaller than PNY, but should be even faster
Yikes I discovered
that this flash stick reports to the OS that it is 'fixed' and not 'removable',
that means it cannot be used as a bootable device for Windows 7! Here's
my Amazon review:
SanDisk specification is grossly misleading
--- Not bootable (9/11/14)
I am really
unhappy with the deceptive way this flash stick is described by SanDisk.
Windows 7 only supports booting from USB devices that are 'removable',
and this flash stick has a bit set telling the OS it is a 'fixed' drive.
What possible reason, except for incompetence, can there be for SanDisk
to not specify this parameter?
I had put this
product in my Wish list a while back when there were only a handful of
reviews and no mention of it being a 'fixed disk'. Last week I moved it
from the wish list to the cart without rereading the reviews. I feel I
have been blindsided by a deceptive and incompetent company since my main
purpose in buying it was to use it as a bootable device in Windows 7.
To add insult
to injury a SanDisk representative added a smarmy comment to one of the
unhappy reviews saying, oh yea we changed it from 'removable' to 'fixed'
without offering any explanation of why the spec didn't change. He then
continues, there is a way to make it bootable, but we aren't going to tell
you how to do it! Can you believe such a response? I take this as a company
that has no respect for its customers.
I ran some
head-to-head speed tests copying a folder (890 Mbytes, 5,300 mixed files)
between my Crucial M500 SSD and this SanDisk flash and a fast PHY Turbo
USB 3, which is substantially cheaper than the SanDisk. Both flash sticks
were connected via a USB 3 port (on a plug in card). While all three of
these flash products are fast, the folder copy time varied by a factor
of 19! Baseline was the copy time for the SSD writing the folder to itself:
10 sec. Writing the folder from SSD to flash sticks: 71 sec (SanDisk) and
191 sec (PNY). Writing folder from flash sticks to SSD: 25 sec (SanDisk)
and 18 sec (PNY). In other words in reading the cheaper PNY was faster
than the SanDisk, but in writing the SanDisk was nearly three times faster
than the PNY.
Flash drive speed
tests (12/1/15)
I did my own
flash speed tests on the 16 Gb Sandisk Extreme USB 3 flash drive. I compared
how long it took to write a single, large (13 Gb) video file to it vs various
baselines. My current desktop includes two 240 GB solid state drives
(identical Crucial M500) connected to my motherboard's sata bus (via passive
extenders) each SSD drive partitioned into two 120 Gb drives.
Baselines
SSD lower to SSD-2 lower
203 Mb/sec (copying between two physical
SSD drive)
SSD lower to SSD upper
99 Mb/sec (copying between partions
of a single SSD drive)
J to SSD lower c:\root
75 Mb/sec (copying from USB 3 hard
drive to SSD drive)
Write to flash
SSD lower to 64 Gb PNY flash (USB 3)
66 Mb/sec (copying from SSD c:\root
to 64 Gb PNY flash in USB 3 port)
SSD lower to 16 GB Sandisk flash (USB 3) 60 Mb/sec
(copying from SSD c:\root to 16 Gb SanDisk flash in USB 3 port)
J to 16 Gb Sandisk flash (USB 3)
33 Mb/sec (copying from USB 3 hard
drive to Sandisk Extreme flash in USB 3 port)
SSD lower to 64 Gb PNY flash (USB 2)
23 Mb/sec (copying from SSD c:\root
to 64 Gb PNY flash in USB 2 port)
Read from flash
16 GB Sandisk flash (USB 3) to SSD lower 94 Mb/sec
(copying from 16 Gb SanDisk flash in USB 3 port to SSD c:\root)
64 GB PNY flash (USB 3) to SSD lower
73 Mb/sec (copying from 64 Gb
PNY flash in USB 3 port to SSD c:\root)
The speeds
above are what Windows 7 'copy' reported near the end of the copy. They
seem consistent with copy time which varied from about 1 to 10 minutes.
The true speed of the 16 GB Sandisk Extreme USB 3 flash are best indicated
by the read and write between it and the SSD, which because of its internal
architecture is faster than a flash thumb drive. The test results here
were 94 Mb/sec (SanDisk read) and 60 Mb/sec (SanDisk write). This is fast,
but still a long way from the manuf claimed 245 Mb/sec transfer rates.
In this single large file copy test I found the write time to the PNY 64
Gb flash about the same as to the Sandisk Extreme 16 Gb flash. This was
very different from my earlier test with thousands of small files where
I found the write time to the PNY was 2.5 times slower than the Sandisk.
A write test to PNY in a USB 2 port showed it x3 slower than in a USB 3
port (23 Mb/sec vs 66 Mb/sec).
There was no
problem playing the video file (video capture of HD broadcast of 2.5 hr
PBS play "Act One") directly from the flash drive. Why this works was obvious
when I divided the 13 Gb .ts file size by its 2.5 hrs length. When playing
the video, the flash is only being read at 1.4 Mb/sec.
Prior
to the tests I had figured the fastest baseline would be to copy the 13
Gb file from the lower to upper partition of the same SSD. Wrong!
A copy from one SSD drive to the other SSD drive was almost exactly twice
as fast (203 Mb/sec vs 99 Mb/sec). Why this should be is not clear to me.
Copying between partitions on the same SSD drive does mean the SSD is repeatedly
switching between read and write, whereas copying using two SSDs drives
means one SSD is always reading and the other SSD always writing. A factor
of two difference makes it tempting to assume that the read and write are
concurrent, but I doubt that Window's 7 OS 'copy' command is that sophisticated.
I suspect it may a case of buffering which when the SSD is switching between
read and write get repeatedly flushed.
-----------------------------
I later bought
an 8 Gbyte camera card rated at x133 speed (replacing a x80 speed)
and did a head to head speed comparision with the PNY USB flash stick above
by timing the loading the Windows PE environment files. While PNY is somewhat
slower than loading from a HDD, it is perfectly usable. In constrast loading
just crawls using the x133 speed Transcend card hardly any faster than
my (speed unrated) 1 Gbyte flash. Later timing with a watch I found this
x133 speed card to be x17.5 slower than the PNY above (7 min vs 24 sec)!
(For reference the Windows PE files will load from my SSD in 2-3 seconds
and from HDD in 5-15 sec (est).)
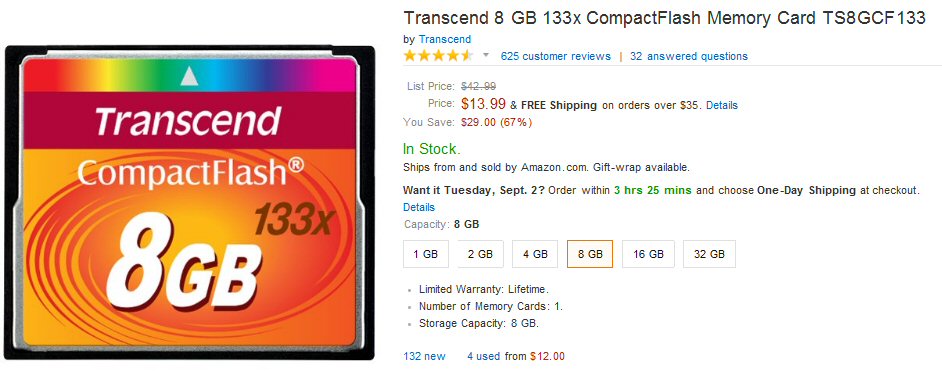
x133 speed compact memory card
fast enought for camera, but far, far too slow to
use as boot drive
Spare copy
of Windows 7 (with key) that will allow me to put Windows 7 in the future
on a new machine. This is a hedge against Microsoft no longer selling either
Windows 7 computers or disks, both of which are already (July 2014) seriously
curtailed and may not make it to 2015.
An OEM version of Windows 7, the only flavor still
sold.
I bought it for its unique Windows Home Premium COA
product key, which can activate either the x64 or x32 bit version.
My plan is to archive this key and the downloaded
xxx.iso x64 bit Window 7 burned to DVD, so I can continue to run Windows
7 in the future on a new machine.
This DVD, which I don't plan to use, I suspect is
identical to the Digital River xxx.iso downloads (3.2 Gbyte).
(A week earlier Amazon was selling this x32 Home Premium
for $79.)
(Note the vendor here is 24SevenBargain. Yet just
a few hours earlier when I placed my Amazon order, the default vendor was
Majestic Quality.)
From the history
I have read Microsoft has gone back and forth on whether its license provisions
allow an OEM version to be used by someone who builds his own computer.
One devastating article included quotes from Microsoft saying both that
it was allowed and not allowed! The Amazon page for this versions includes
below, which I guess means it can be, because it can be used by 'system
builders', which of course is a tad vague and not defined. Typical Microsoft.
"
(This) OEM software is intended for system builders and small OEMs (Original
Equipment Manufacturers) who manufacture computer systems and pre-install
OEM system builder software onto those systems. The product does not come
with free direct support from Microsoft. Additionally, this single license
will not allow for a change to a different model motherboard once installed."
Five hard drive 'tank backup' system
Here is my
current five hard drive 'tank backup' system. Inside, two new hard drives:
main (c:\), clone #1 (f:\). Outside, three hard drives: clone #2 (h:\)
via esate, and 2Tbyte data drive (j:\) and its 2 Tbyte clone (k:\) via
USB. In the disk configuration page the system is booted off disk 0 c:\.
Note the system partions of disk 1 (f:\) and disk 2 (h:\) are also marked
'active', which means they are bootable.
Notice all
three OS disks have different capacity, which on this page makes it easy
to tell them apart. (A right click for properties on left side will bring
up disk model #). Disk 0 is 1 Tbyte but shows c:\ as 700 Gbyte because
it was the cloned from the original sick 750 Gbyte drive. Disk 1 is a 500
Gbyte used as clone #1 Some clone software won't allow cloning to a smaller
drive, but Casper 8 does as long as the used bytes are less than the close
size. Disk 2 is the original 750 Gbyte drive removed from inside. It is
still functional, but not to be trusted because it keeps developing bad
blocks. I will eventually replace this with a new drive to be clone #2.
Note a real
weakness of this 'Disk Management' page (part of Windows 7) is you can't
tell whether drives are inside or outside or via what links they are connected!
In this case Disks 0 and 1 are inside mounted in the drive bay connected
via sata to motherboard. Disk 2 is a sata drive in an outside enclosure
with esata and USB 3 ports and during this capture was connected via USB
3. Disks 3 and 4 are my 2 Tbyte data drive and its clone, both are connected
here via USB 2.

Backup tutorial -- three ways to use a 2nd drive as
a backup
There are
essentially three ways to use a 2nd drive as a backup. One is 'raid', support
for which is built into my motherboard. Let's forget this. It doesn't do
what I want. Raid 1 keeps a 2nd (backup) drive 'mirror imaging' your main
drive at ALL times. This is fine if the main drive has a hardware failure,
say it suddenly won't spin up, but in my case my hard drive slowly went
bad, developed bad blocks and Windows got corrupted with blue screen crashes.
If this happens you will find your mirror image raid drive is useless because
it will have a corrupted copy of the OS too.
The other two
ways are to 'image' your main hard drive and to 'clone' it. In an image
backup everything on the your main drive is squashed into a SINGLE huge
file (really one file/partition, 50 Gbytes or more) often compressed, but
it need not be. This can work, it has for me, but it can fail too, and
it has failed for me too. The problem is a sick computer needs to find
the image, and Windows running on its repair DVD didn't find my image,
it did not recognize the USB drive where the image was. Also a single bad
byte in the huge image file and the restore fails, it's inherently delicate.
A 'clone' drive
backup is very different from an 'image' backup. The clone drive has all
your programs, data and setting EXACTLY like on your main drive, and it's
updatable with Explorer and bootable too. You should do a new clone only
when your system is working OK. I will probably mount a my #1 clone drive
inside my machine since it's neat and with short cables connecting it to
the motherboard it should be as reliable as with any internal hard drive,
the only caveat being there will be a little more heat in the drive bay,
but that should be OK, the computer is designed to take a 2nd drive and
it's fan cooled.
Essentially
I will end up with a computer with two hard drives either of which can
run the machine, and I can switch between them in seconds at boot or by
switching their power on/off. With both drives plugged into (high speed)
sata connectors on the motherboard I found it takes only 20 min to copy
the full 50 Gbyte of my main drive to the clone drive. So cloning is not
an overnight thing, can easily be done anytime, and works in background
too. For extra reliability I may buy another sata drive ($50) to use as
clone #2. This drive I will like keep in an external enclosure connected
via an esata cable. It's a trivial matter to expand the dual boot to add
a 3rd boot option. Having two clones would allow some flexibility for experimentation
and make upgrade to new drives easier. In this case I would end up with
five hard drives on my machine: main drive, clone #1, clone #2, USB data
drive #1, backup USB data drive #2. When I buy a new computer, these drives
could be migrated to the new PC, three of them easily since they are external.
Run main hard drive lean
I have learned from
my recent troubles that in the future I should run my main drive lean.
I let my old drive balloon up to 700 Gbyte, most of it video files of recorded
TV shows since my computer is my DVR. I've now moved my video recordings
to an external 2 Tbyte data drive where they belongs This makes backing
up my main hard drive with my OS and programs much quicker and more reliable.
It will keep my clone time to 20 min, and I don't need high capacity drives
for my main drive or clone drives.
Use clone software to back up data drives too
I just realized
my clone software will come in handy for backing up my data on my two external
USB data drives too. I will make one of my 2 Tbyte USB data drives the
clone of the other. I planned to do this manually, but find I hardly ever
to it because it takes too much time over USB 2 (three overnights) and
using Windows file copy is a pain, because there are a few system files
it won't copy, so I have to manually exclude them. I haven't tried this
yet with my clone software, but since by its very nature it copies everything
I think it should work. And with data drives I don't mind scheduling backups
because no OS or programs to be concerned about, so it can be automated.
===================================================================================
Running chronicle of my adventure to rescue my system
and develop a robust backup
This section
is a running daily chronicle of my weeks of work develop a robust backup
for Windows, starting with my failed attempts to repair Windows on my single
hard drive system with no backup. Using my engineering training I kept
reading, thinking about where I wanted to go, and running tests. Day after
day I plodded along, trying out new software, ordering new hardware, recovering
from failures, and inevitably wasting a lot of time going down blind alleys,
the worst being trying to get Windows to boot from a USB hard drive. (I
kept reading posters saying they thought was possible, but no one ever
showed how to do it.) I kept paper notes as I went along and at the end
of the day would write up the most interesting stuff, so this log, while
long.... is far from complete record.
I started off
knowing little about the flavors of Windows, little about Windows recovery,
nothing about booting, nothing about how drives communicate, nothing about
partitioning, nothing about clones or image backup, nothing about dual
booting. These are now things I know a lot about. I wanted to write this
all up while it was fresh so I could remember it, so no wonder this essay
is long, and it took a long time. I also thought it worth writing about
because the final result is little known and really slick.
-----------------------
Boot
failure, system crashes (2/24/14) (3/5/14) (4/16/17)
Without (much)
warning on a routine Restart my computer refused to boot. After about two
hours and dozens of power down reboots, I finally got it to successfully
boot, and in the process I learned a few things. However, I was not out
of the woods, clearly my machine was unstable because in the next couple
of weeks I had several surprise crashes (blue screen of death with auto-reboot).
There was no indication that the cause of this was a virus. I had had no
virus attacks in many months. It didn't come on suddenly, and none of my
many virus scanners ever found anything.
History prior to boot crash
Prior to the crash
for the last couple of months or so my computer had been a little wonky,
but still usable. The main weirdness was a strange delay of several minutes
after boot before some programs would run, but after this delay it would
run pretty well. Chrome browser would always run quickly, but other browsers,
photo display programs, even Microsoft utilities like Recycle bin or System
Restore would not open for a few minutes when clicked. When I would open
device manager, there they would be (running), so I would have to click
and 'end process' to clear the decks. But in a few minutes the delayed
programs would suddenly open. It was like something was running, but I
couldn't figure out what. Rkill always reported nothing running, and scan
utilities found nothing. I have not a had a virus attack in months.
There were
other weirdnesses too. When I requested a Power Down (or Restart) the system
would often hang while exiting. It would just sit(for minutes) waiting
for (non existent) programs to close, forcing me to hold the power button
down. And my favorite video player KMPlayer had problems. It played most
files OK, but when I clicked to open certain (recorded) files it would
massively crash KMPlayer to the extent that I often couldn't get to system
manager (using Ctrl Alt Del interrupt) to shut it down.
USB drive problem?
There are also hints
that one of my two backup USB drives (2 Tbyte #2) may be causing trouble.
While files on it are generally accessible, Disk Check on it will not run
to completion. Also on powerup I occassionally see an auto-run window for
this drive pop up, which it should not. I have yet to address this issue.
It's my 2nd backup drive, so I should probably take it off line, clean
it (reformat it?) and then recopy stuff from backup #1 to it.
After running
chkdsk once or twice, I clicked the scan for bad sector option (takes lot
longer to run), but I think this was important in that it detects and fixes
more problems. After running chkdsk this way a couple of time, I could
tell it was working because many wonky weirdneses disappeared. For example
startup was cleaner and windows would exit too without hanging. Fingers
crossed that crashes are a thing of the past, but this will take some time.
Not booting after blue screen of death (4/16/17
update)
I had a blue
screen of death and then found Windows would not reboot. Solution was to
run Startup Reparis that I got to (eventually) using F11 Recovery on the
opening HP screen. After a few minutes, it said it had attemped repairs
and has a button that tells you what it did. There were a bunch of
disk tests, all OK, and then it reported I didn't have a valid disk partion
in my disk partion table and it had fixed it. Sure enough that was the
problem, because the next time it booted.
Boot details
Symptoms
Windows would
begin the boot process (spinning logo comes up) but would soon drop me
into a text box with two options: Start Windows Repair (Recommended) or
Start Windows normally. The 2nd choice (Restart Windows normally) would
always fail and just return me to this same screen.
As a first
step I unplugged all USB devices (including two USB hard drives,
USB TV tuner and USB scanner) and left them unplugged while I worked the
problem. I have seen in the past that a bad USB device, usually a USB hard
drives could cause boot failure. Didn't fix the boot problem this time.
The 1st choice
would show 'loading files' and then in a couple of seconds bring up a (blank)
'sunrise' graphic with no text of any kind. I waited 5 to 10 minutes a
few times and nothing ever changed, just this blank hires screen sometimes
with a cursor. This was Windows screen I don't ever remember seeing before.
The only way to exit the sunrise screen was hold down the power button,
wherein the process repeated and I ended up back at this screen again.
After repeated attempts, I was getting nowhere. It sure acted a hang at
the sunrise scree with no way to get to the Recovery utilities. (Ctrl Alt
Del did nothing)
However,
I later suspect that Windows Repair might have been running in this
'sunrise' screen without giving any indication it was running or that anything
at all was happening. (Typical Microsoft!)
During various
boots I tried F11, F9 to get to safe mode, system restore, diagnostics,
anything to break out of the loop. One time (somehow) PC Doctor diagnostics
came up and all hardware tests were passed. A dead end, still no boot,
could not get to safe mode or system restore, or disk recovery screens,
always ended 'hung' at the sunrise screen.
Progress -- Windows Recovery Disk
Doing a little
research with my tablet found mention of using Windows Recovery Disk to
access Windows Recovery menu. I had made such a disk 15 months ago and
it was leaning up against my desktop machine. Rebooted with the recovery
disk in the DVD drive, and this got me to the Windows Recovery menu.
But I was dismayed
to see System Restore, which I was thought might save me was blanked out.
I have diligent for the last year at every boot to make sure I always had
several restore points, adding new ones when good old Window7 deleted them,
but here just when I might need it, it looked like I probably had no restore
points! (yup, when I recovered I found no restore points, and I know I
had had several only the previous day. So the latest, failed, boot attempt
must have wiped them out! While this utility has saved from many viruses,
it has a distressing tendency to fail just when you need it.)
I ran the windows
diagnostic (again) from the Windows Recovery menu and this time it now
(twice) reported a disk failure, whereas a few minutes earlier the hard
drives had passed all its tests. (another bogus report?)
More Progress
I finally
got on the road to recovery running Startup Repair from the Windows Recovery
menu accessed via the Windows Recovery Disk. This time instead of a blank
'sunrise' screen I got a normal Startup Repair box with a moving activity
bar and a little bit of diagnostics.
StartUp Repair
I now think runs two utilities: sfc.exe (System file checker) to
repair system files (from backup on D drive), and it now told me
it was checking and fixing my hard drive, almost for sure running chkdsk
c:\ (advising that this could take over an hour). From reading this essay
I found that Startup Repair and take 15 to 30 minutes to run (but this
may be without the chkdsk utility). After running a while, it told me it
was repairing my disk errors, which a detail box reported 'System: volume
on disk is corrupt", but later reported it had 'successfully completed',
so I presumed fixed it.
Progress?
I am now getting
hopeful Startup Repair had probably run the two most important boot fix
utilities available on windows: System file checker to fix key windows
files, and chkdsk to fix various hard drive errors. When in 30 min or so
Startup Repair told me it was done, and did I want to reboot? Yes, of course,
and guess what? The boot failed and again I ended up right back at the
blank 'sunrise' screen I had been in an hour earlier! But I have read and
now know experience that running repair utilities more than once is sometimes
necessary.
My last chance
With no other options
available, back at the sunrise screen 'hang' I just left the PC alone hoping
Startup Repair might be running in the background (I now believe it was),
and I knew this could easily take 30 min to run. So I went to read a book,
and sure enough in 20 min or so the screen began to change, and now having
run System Repair utilities twice over the last hour, the system
booted normally.
Post boot failure clean up
Windows7 has
two very useful repair utilities: System file checker (sfc /scannow) and
Check Disk (chkdsk). The former fixes (replaces) damaged system files (froma
cache on d: drive) and the latter fixes hard drive (linking) errors. Running
these multiple times can fix errors a single pass misses. Even though they
were both run (twice I think) by Windows during the 2 hr boot recovery
marathon, my plan was to run them again (once or twice) the next morning.
Check Disk
--- 'chkdsk' is a Microsoft disk utility that has been around since the
days of DOS. The Windows version takes 10-15 minutes to run and when run
manually it gives running account of progress. It cannot be run when Windows
is open, you 'schedule' it to run the next time windows starts. The procedure
is this: open a directory, go to 'c' root, right click and select 'Properties.
In Properties click 'Tools', under '(disk) Error Checking' select 'Check
Now', verify (default) option to 'automatically fix file system errors'
is clicked, then click yes to schedule it to run on next start.
System file
checker --- This is tricky to run (see elsewhere in this essay for details),
but can be run in about 10 min from within Windows. Briefly it requires
opening a Command window (in Accessories) with a right click to 'Run as
Administrator'. Then in default dir type 'sfc /scannow'. It provides a
running account of the % processed.
Next day I
scheduled a 'chkdsk', powered down and it ran on power up (missed its final
message). Then I ran sfc. For the first time System File Checker did not
run to completion. It paused at 45% completed, and after a couple of minutes
exited with message "Windows Resource Protection' could not perform the
requested operation'. First time I have ever seen it do this. I ran it
a second time and same thing, stopped and exited at 45%. Still the system
is now continuing to boot OK. Later after running the check disk progrram,
system file checker ran to 100%, once saying all OK, once saying there
was a error it couldn't fix.
Window repair
There's several
repair tools for Windows 7. Two are built-in and safe and easy to
use: 'Chkdsk' scans the hard drive and can repair file links and
remove bad disk sectors. 'System file checker' can repair Windows files.
It does this using the archive version of Windows on the d:\ drive. Windows
files on the c:\drive are compared to the archive Windows files on d:\.
How exactly the program does this is not explained by Microsoft.
My guess is that it more than a simple file compare, that some sort of
hash tag (or what ever the jargon is) is used to assess which version of
the file is intact and which is in error.
Driver reinstall (3/25/14 update)
There's another
aspect to Windows that go wrong that I did not appreciate until later.
After the reinstall, and especially after I installed Acronis True Image
backup software (free with new WD USB hard drive), I had all kinds of problem
with Explorer. Directories would stop working, I would see memory usage
of Explorer climb to near 90,000, and when powering off Windows would give
message it was waiting for Exlorer to respond. Even without these crippling
problems responds of the machine was sluggish. System File Checker always
reports no problems.
I found I was
able to fix the Exploer/directory problems by reinstalling USB drivers.
Saw this recommendation in a Windows fix article. In Device Manager click
USB Root Hub, Uninstall. There are six Root Hubs, one I presume for each
of my six USB ports. What happens is that in a minute or so Windows on
its own reinstalls the driver, popping up the usual box it does when USB
drivers are installed. This fixes the explorer problem for a while, but
it keeps coming back.
I suspect the
root cause of this Explorer problem is Acronis backup software which I
just installed a couple of days ago. Acronis buries itself deep into the
system. It has created two virtual drivees that show up in Device Manager.
And Acronis does not appear to be working right, it crawls, but
it does barely work, and it recovered sucessfully Freecoder program directory
from my Windows image backup. I later tried to use it to recover some video
files, but only recovered three and while their length looked right, none
of them would play. I am trying now to uninstall Acronic, but uninstall
appears to hang. I going to try from safe mode.
A much
bigger, more difficult repair is a 'repair install'. This is a replacement
of all the Windows files on c:\ and d:\ drives from an archive DVD that
can be made by the user from a (free) downloadable complete version of
Windows 7 provided (sort of) by Microsoft. On paper this looks attractive
as the claim is it can replace all your Windows files while leaving your
desktop, programs, and data files untouched (some drivers may get lost
and need to be reinstalled). While on paper this looks attractive, however,
it does take a lot of hours, my one experience with it was not good. The
repair install hung half way through leaving me with a totally mangled
OS.
'chkdsk'
and 'sfc /scannow'
To try and stabilize
my system I did two things. One, I uninstalled a few programs that I could
see were running a lot of background programs (Skype) or were annoying
and no longer seemed useful (Malwarebytes). Two, I repeatedly ran
Windows two key (safe) self repair programs: 'chkdsk' and 'sfc /scannow'.
'Chkdsk' first on 'c' and 'd' drives, then 'sfc /scannow'. I believe these
are the two programs that Windows repair disk program 'Repair Windows'
calls, and I believe they are safe to run at any time.
chkdsk
check disk and repair and recover bad sectors
sfc /scannow
check replace damaged system files using 'd' drive system file archive
'Chkdsk' (check
disk) checks the disk files and importantly can do some some recovery and
repair
of
bad disk segments. This program has been around since DOS days. It can
check the (small) 'd' drive in a few minutes, but a full check of the 'c'
drive (click ,'scan for bad sectors' box) takes several hours. I first
ran this during the day where I could monitor what files it was fixing.
I found a half dozen files with bad sectors. Running it at night leaves
no fix info on screen. I don't know if it is logged, but it probably is.
Access 'chkdsk'
(preferred)
In directory right click 'c' or 'd' drive, Properties, Tools, Check disk
for Errors. For the 'c' drive it will respond it cannot check the disk
with Windows running, but suggests you schedule a disk check on the next
power up.
(alternate)
I read chkdsk can also be run from the Command Prompt (as administrator).
I have not run it this way, but I verfied 'chkdsk /?' works with the default
directory. (For c: drive it should respond with (y/n) to schedule it to
run on nect powerup.)
chkdsk /f /r c:
/f is fix error, /r is locate bad sectors and recover information
'Sfc' (system
file check) checks system files (and registry too it says) on 'c' drive
against an archive of system files on 'd' drive, and importantly it can
do repairs of bad system files by replacing them from clean versions
on the 'd' drive. Clearly you want the 'd' drive as clean as possible before
running this program. When I started working this stabilization work, 'sfc'
would only run to 45% and then exit, but after running 'chkdsk' on the
'd' drive 'sfc' ran to completion. This program takes only 10-15 minutes
to run and updates the % as it runs.
Access 'sfc /scannow'
From within
Windows, Start, Accessories, Command Prompt (right click Command Prompt
and choose ' Run as Administrator' (important). In the default directory
just type 'sfc /scannow' (enter). (note space)
There exist other
windows repair programs too, like a program to check and repair the master
boot partition ('MBx' ?), but I read this is dangerous and for the specialist
who knows all about disk partitions (which is not me). There's also 'msconfig'
that allows configuring which programs can run at startup, but I didn't
use this either as it looks complicated and I suspect could easily cause
harm.)
More advanced Windows7 repair tools
It looks like
the best place to find indepth repair tools is YouTube. The videos can
walk through a lot of detail steps a lot quicker than written text. I only
did a quick look on YouTube, but I found more utilities. One is boot repair
utility, you can do something called re-registering your DLLs, the last
and most difficult and most capable is a reinstall of Windows that doesn't
wipe your disk.
Msconfig
Type Msconfig
in search box. A video on advanced trouble shooting points out this provides
a lot of safe boot choices (logging, etc) that can be used to diagnose
boot and startup problem.
Pure Leads
I took a quick
look and found something called 'PureLeads' that starts at boot up that
I don't rememeber and smells like some sort of advertising crap. (has a
bunch of .exe files all dated seven weeks ago, 1/23/14) Sure enough a google
search shows this to be adware, and from the date it showed up it might
be responsible for the strange slow down I find at boot. I just uninstalled
it, check to see if it stays uninstalled.
Repair re-install of Windows7 (preserving programs)
Turns out that you can do a 'repair' reinstall of Windows 7 that preserves
(apparently) not only your data buy your programs! It's an install
without
reformatting.
It seems like it just puts a new set of windows programs on the disk. It
requires Windows7 (original) install DVD disks (not the recovery disk),
Windows 25 digit CD code (on sticker side of computer and recoverable from
registry with free utility from Magical Jelly Bean). The re-install must
be done from Windows desktop. Select the option 'Upgrade'.
Does 'Upgrade' function as 'repair'?
From the screen below
you can see what the video calls a 'repair' re-install Microsoft seems
to have included this Windows installation option to allow users to 'upgrade'
Windows. Does it really do what the video claims? I suspect it probably
does, but there are three underlying assumptions:
1) Allows the same version of windows to be re-installed (with online
updates)
(This is what the video claims to show.)
2) Replaces all Windows files
3) Replaces the d:\drive archive version of Windows
Microsoft forum on upgrade windows repair
Here's what
looks like a Microsoft (sponsored) forum that explains how and when to
use Windows upgrade to repair windows (preserving data and programs). On
a quick scan it pretty much says what the video says. This site has a very
detailed roadmap with warning and restrictions. It warns this is a big
effort with risk. Stuff like device drivers can be lost. What is very poorly
described is what disks exactly you need to make this work. I bought
some disks from HP (marked recovery, but store people tell me will install
Windows 7 on a new drive), but I can't tell from these vague descriptions
whether these disks an be used or not (exept to try it). My disks may or
may not work.
Upgrade/repair Windows disks
There are
two basic types of Windows disk: recover and install. The former can be
created by the computer and only provides access to recover and repair
tools. It does not have the full Windows on it, hence cannot be used to
install or repair. I am beginning to suspect that all Windows installation
disks have an upgrade option, which can be used for repair, even if the
say the opposite! Install disks can come with or without keys, they can
be resticted to just one computer or a specific computer. The set I bought
from HP ($12) is for just my HP model (with no key), but my old key should
work.
** Disks may not
be needed! The Windows site below has links to downloadable file (and a
boot too) that it says can be used to do a repair install.
http://www.sevenforums.com/tutorials/3413-repair-install.html
** $95 Windows
7 Home Premium install DVD with SP1 (with key) sold by Amazon (plain wrapper)
linked from above site, that say they are only for installing on blank
drives (users who built their own computers buy it), however they have
many other uses. Upgrade from Vista (preserving programs said reviewer).
Few people buy them just to get a Windows key (to activate the xxxx.iso
DVD install) and don't use the disks. Several reviewers report using this
Windows 7 DVD to erase Windows 8 and replace it with Window 7.
This later
use is very interesting. With this DVD in hand in the future you should
be able to buy any Windows 8 computer retail and pop in this DVD. At boot
it will not only replace Windows 8 with Windows 7, but it will (in a stroke)
eliminate all the crap software that infects all retail computers. While
as of March 2014 you can still buy computers with Windows 7 installed,
this is going to stop at some point. Microsoft has announced sale of Windows
7 computers would cease in fall 2014 (two years since Windows 8 come out),
but has now retracted that date and there is no firm date. Still at this
time getting a new computer with Window 7 from a manuf is getting hard.
First, you probably need to order a new computer online as you are unlikely
to find a Windows 7 computer in stores. Two hardware choice for some reason
is limited. I checked the HP site. I expected that Windows 7 would be an
option on any computer sold, but its not. Three computers are offered with
Windows 7 (only) and all the others, including the cheapest are only sold
with Windows 8.
http://www.youtube.com/watch?v=RC_5eb9wTfk
'Repair Install to Fix Windows 7 Without Reformatting by Britec'
http://www.sevenforums.com/tutorials/3413-repair-install.html
http://www.heidoc.net/joomla/technology-science/microsoft/14-windows-7-direct-download-links#
Links into Digital River Windows repository
http://windows.microsoft.com/en-us/windows/installing-reinstalling-windows#1TC=windows-7
http://windows.microsoft.com/en-us/windows/installing-reinstalling-windows#1TC=windows-7
official Window Upgrade install info
http://www.amazon.com/Windows-Premium-System-Builder-Packaging/dp/B00H09BB16/ref=pd_cp_sw_0
http://www.amazon.com/gp/product/B004Q0PT3I/ref=as_li_tf_tl?ie=UTF8&camp=211189&creative=373489&creativeASIN=B004Q0PT3I&link_code=as3&tag=thestartrekmidip
The tricky
thing I see from the video is Sevice Packs. If you have Service Pack 1
installed then the code on the CDs probably won't match what's on the computer.
A potential big problem, but the video does show you exactly how to find
and uninstall the Service pack, so it is doable. (Using the video below
as a guide I do not have Service Pack 1 installed. I have windows auto
upgrade turned off). So there's another up grade I could do, but it would
complicate (probably) a recovery with the disks I have. As part of the
install, he selects go online to update, so it may very well be that the
repair install will include Service Pack #1.
By going to
User Accounts (type 'user' in Start search box) I found out that I am the
admistrator of my computer.This is shown by a big sunflower box upper right
on the User Accounts page with text "(my name), Administrator". Below is
how to log into Windows as administrator (required for upgrade/repair install)
right click Command Prompt: Run as administrator
type: net user administrator /active:yes
activate
net user administrator /active:no
de-activate
There are several YouTube videos on this. I like this
one which goes through the process step by step:
http://www.youtube.com/watch?v=RC_5eb9wTfk
'Repair Install to Fix Windows 7 Without Reformatting by Britec'
Here's the
key Windows 7 screen from the video above, select 'Upgrade'. Note this
option says explictly says you can keep your "files, setting and programs"!
my screen capture of the two repair install DVD options:
no disk wipe (top), with disk wipe (bot)
This repair DVD made from downloaded (Microsoft) xxxx.iso
file.
** 'Custom' option of same xxx.iso DVD will do a CLEAN
(no bloat), fast (30 min) install of Windows 7 on blank hard drive
Image backup file
Before he
starts he makes an (image) backup (crucial in case the install fails) to
an external drive. Types 'backup' in Start search window and selects program
'Backup and Restore', on this window click 'Create a System Image'. From
the little I know an image backup is apparently a copy of all your data
and programs (with setting) on the disk (you need as much space on USB
drive free as you have on the computer's hard drive as my test shows virtually
no compression!), so (apparently) Restore can then take this file and expand
it putting you machine exactly back to where it was when the image
was made (in other words everything saved since then will be erased).
-- System image
is not only useful for a (complete) backup, but it be used to move everything
to a new hard drive (which needs to be same size or bigger than original
drive)
-- Re-imaging
a disk drive takes minutes compared to hours to reinsal Windows.
-- "system
image can be several gigabytes or more" This is a joke... these files
are huge!
Image file(s) are huge!
It takes 10-15
min for the system image program to setup and check disk space on external
drives. It tells you how much disk space you need before you start. There
is for all practical purposes no compression!! I need 671 Gbytes free.
You have three save options: c: (system) 661 Gbyes, d: (HP_Recovery) 10
Gbyes, and 'System' (30 Gbytes), but for an image to back up the drive
seems pretty obvious you need to save everything. (I do in fact have room,
because both my 2 Tbytes USB drives have 1.2 Tbyte free (about twice what
is needed.)
Doing an image backup
After gaining
a little understanding about image files, having plenty of space on my
2Tbyte USB drives, I decided to make an image of my (whole) hard drive.
This is the c:\ drive and Windows archive d:\ drive, which means selecting
all three choices: (user) programs + data, system and system backup. (Correction,
all three options are checked by default and cannot be unchecked, in other
words the only choice is to image the whole drive) My understanding it
this is a 100% copy of the entire drive (at least every sector in
use), and an image restore will just copy it back (is rest of drive wiped??).
This image
backup is not of a clean stable Windows setup, because I am still having
occasional blue screen crashes, though I have been booting reliably for
last few days. But if I suddently find I can't boot, it would be very useful
because it would allow me to get access to my programs. The procedure for
this is to boot from Windows recovery disk and select Image restore.
c:\
drive
Windows + program + data
703 Gbyres (714 (655) Gbyres total
hard drive used)
d:\ drive
Windows archive backup
11 Gbyres
USB 2 Tbyte drive
1.19 Tbytes free (prior)
565 Gbyte free (post)
625 Gbyes image disk space = (1,190 - 565)
USB directory
WindowsImageBackup
Properties: size: 653 GBytes, Read Only
Image files
xxxxxxxx.vhd (41 Gbytes)
'vhd' = virtual hard drive
xxxxxyyy.vhd (685 Gbytes)
Yup, (virtually)
no compression! (The option to image backup to DVD's is a joke with
modern high capacity drives.) You need free space on your USB drive that
exceeds the space used on your local hard drive. (I inquired about doing
a 2nd image backup to the same USB drive and am told there is not enough
space, and this is before I get to choose what to back up!). Don't know
how long the backup took because I did it overnight, but I presume it was
hours.
I read in a
forum you can look at the contests of the .vhd backup files, so I right
click Open and Windows tells me it doesn't know what program to use to
open a file it just wrote! (More Windows stupidity or lying.) I googled
how to view the contents and followed instructions in Computer Management,
Disk Management to 'Attach VHD'. What it did was make an L: (tiny 36 Mbytes,
system) and (M: 655 Gbyres, OS) drives that I can open with explorer to
see directories, but generally cannot access files. (I don't like this
because I don't really understand what these drives are (they do not indicate
anywhere they are the .vhd file contents!).
Don't like what I see
The directory
listings I see in the 'vhd attached' m:\ drive worry me. It is only a partial
listing and the directory with most of my personal files (Speed) is missing.
Also
where as most directories cannot be opened a few can and files can be accessed,
for example 'Comcast download of my corrupted homepage.' The program Turbo
Tax even runs (and opens my return) on the m:\ drive. This is all very
strange and not reassuring that if I ever need to use this image file as
a backup that everything is there.
Bootrec.exe
This is very
specialized and looks like it should only be used by experts. It will repair
boot sectors on Window7. Below is a Microsoft tutorial showing how to run
it. They suggest you run this after running 'Repair Computer'.
Basically it's run from Command Prompt option that you select from the
recovery CD. It only seems to do one thing: it fixes a damaged boot
sector by writing a new one.
http://support.microsoft.com/kb/927392
Microsoft tutorial on how to use Bootrec.exe
http://www.youtube.com/watch?v=RC_5eb9wTfk
Bootrec.exe tool ---- boot fix (for Vista!)
Windows reinstall
and disk options (3/14)
I tried all
three Windows 7 repair tools to try and fix my unstable system, the two
safe ones: disk repair (chkdsk), Windows file fix using d:\ archive (sfc
/scannow), and the more difficult and risky repair approach: 'Windows repair
install' using a DVD made from downloaded (Microsoft) Windows 7 .iso file.
After repeated
use of the first two (safe) repair tools failed to fix Windows, I proceeded
on to the repair install. I made an image backup of my whole 750 Gbyte
drive (90% full) saved to a USB drive, downloaded the (free) Windows 7
.iso file, downloaded and installed (free) PowerISO and used it to make
repair install DVD, took 3 trys to get an error free write of the 3.2 Gbyte
file to the DVD. And all this got me nowhere, the repair install hung halfway
through (during a restart) leaving me with a scrambled hard drive. I tried
to go back, but Windows Image restore was unable to find the USB drive
(unbelievable!) leaving me with no option but to pull out my HP recovery
disks and do a clean install of Window 7, meaning a disk wipe, irenstall
of Windows 7 in c:\ and d:\ archive plus all the crap software that HP
loads onto its retail computers.
In a clean
install all my programs and much of my data was lost. I did have file copies
of my most critical data saved on a USB drive. As it happens I have long
had two USB drives, so had a 2nd external backup, but during this few weeks
disk check utilities reported my 2nd USB drive had serious problems. I
reformatted it, but it still had errors (it's toast, won't spin up properly).
While I have ordered a replacement USB drive, it is not here yet, so for
now my file backup is pretty thin with much of my data stored only on a
single external hard drive.
** Types of
Windows 7 disks
The world
of Window 7 repair/recover/install disks is confusing zoo. This is a combination
of two things, Microsoft puts in all kinds of restriction on disk use to
maximize the dollars they can extract from the world, and much worse their
description of the disks is very poor and confusing. They never detail
what the disks do, how they differ from other disks, and what restrictions
there are on their use.. Also Microsoft is not above lying here, for example
the disks for repair install Microsoft always calls 'upgrade' disks,
but there is no upgrade when you put back the original OS. With a lot of
digging I figured out the basics of world of Windows 7 install and recovery
disks.
1) Recover
disk, which typically a user has his own computer write (though they can
be bought on Amazon for $15 or so). Very useful disk and (nearly) free,
but it only provides access to Windows repair tools and Windows
image restore. It does not contain the Windows OS, so obviously
it can not be used to reinstall the OS.
2a) Recovery
disks
bought
(see below) from computer manuf, in my case a set of
five CD disks bought from HP. Like most computers bought retail (Staples)
my HP computer came with no disks, but I found out two years ago (from
Staples repair techs) that you can buy a set of disks from HP that can
re-install the entire Windows 7 OS on your computer. In effect you can
buy the disks HP should have thrown in, but doesn't. This is a cheap way
to buy a set of Windows disks, I paid $12 (+ $5 shipping) ordered online
from HP support. Initially Staples was going to sell me the exact same
disks for about $50! The big limitation of these cheap Windows disks is
that (at least those from HP) is that they can only be used to put Windows
back on the exact model number HP computer you buy them for. In
other words you have to order Windows recovery disks for HP model xxxx,
the model you own, and (almost for sure) the disks check the hardware and
will only run on that model. These disks also put back all the bloat software
(Norton, games, etc) that HP had installed on the computer when it was
new and uninstalling all this crap takes hours (and involves some risk).
Description: cheap set of disks that can install entire Windows 7 OS (plus
HP bloat software) bought from computer manuf
Limitations:
-- Can only be used on boot
-- Always wipes the entire drive
-- Only will install on a particular model HP computer (specified at disk
purchase). No Window key needed.
-- 'Image' restore of factory installation. (would not proceed on new SSD
because it was smaller than original drive)
2b)
(update 3/18/14) Burn a set of (full) recovery DVDs. On the
HP site I was surprised to find an alternate (or replacement) way to get
a (full) set of Recovery disks. I bought my recovery CDs online in 2012,
but looking at the HP site recently it says HP Windows 7 computers can
write (one time) their own full set of recovery DVDs, see 'Recovery Disk
Creation'. This is not just the single recovery disk that provides access
to recovery tools. This set of DVDs (typically three) can be used to restore
even a corrupted hard drive, so this is the entire OS (plus bloat software),
and while it doesn't say so it must run at boot. Almost for sure these
homemade burned disks are the same as what HP sells. As with the purchased
disks they can
only be used to reinstall the OS on one specific
computer model which, of course, is the model on which they are burned.
Clearly the PC needs to be in good health when they are created, at a minimum
the d:\partition must be uncorrupted and the PC stable enough to do the
burning.
Totally confusing names and poor descriptions
The horrible
confusion of Windows backup and installation disks is evident on the HP
support site. It is as clear as mud what the difference is between the
(short) Recovery disk, which you burn (or buy) that just provides access
to Windows repair tools and image backup, and a (full) set of Recovery
DVDs that you either burn (or buy) that can install the whole OS on a corrupted
(or new) blank drive (in same computer). They are both called Recovery
disks. Gees!
The location of
the 'Recovery Disk Creation' page is below. I checked and it is there on
my machine with its newly reinstalled Windows 7, and it will run telling
me it needs 3 DVDs (video shows 4.7 Gbyte disks) with a burn time of 30
min/DVD. The software gives no specs, but HP site says they recommend DVD+R
disk, which is what I have. (Why I wonder does this take three DVD's when
I know the repair install software is 3.2 Gbyte and fits on a single 4.7
Gbyte DVD?)
Description: (nearly) free set of disks that can install entire Windows
7 OS (plus HP bloat software) burned by PC (when it is healthy)
Burn with HP 'Recovery Disk Creation' program: Start, All Programs, Recovery
Manager, Recovery Disk Creation
Limitations:
-- Three DVD+Rs needed (30 min burn time/DVD when computer healthy)
-- Can only be used on boot
-- Always wipes the entire drive
-- Only will install on a particular model HP computer (model which burns
the DVDs). No Window key needed.
Here's an HP video explaining how to have the computer
write out its own full set of recover DVDs: 'Welcome to Recover Media Creation'
http://h10025.www1.hp.com/ewfrf/wc/document?docname=c01867124&lc=en&cc=us&dlc=en&product=5399832
Looking around on
the HP site so far I haven't found out how to buy a set of recovery disks.
Is it possible they don't sell them any more and the only source of these
full recovery disks is to burn them yourself? The video says contact HP
if you need to buy the disks, but if they sell them they don't make it
easy to find the support page.
3) Microsoft
makes available free online the entire Windows 7 OS (even upgraded
with SP1) in the form of a single 3.2 Gbyte file. This option is not very
well known (at least I had never heard of it) The file is xxxx.iso format,
which I have seen described as sort of raw DVD format, which can be burned
to a (single) 4.8 Gbyte DVD. It takes a special program to do this. I used
PowerISO (free), and it is a relatively simple procedure except it took
three trys to get a disk with no bad bytes, so three of my blank DVD's
got used up.
At first when
I learned about this free OS file it made no sense to me. Why would Microsoft
be giving away the Windows 7 OS, which is still for sale on Amazon for
$100? The answer is that this disk will not run at boot (I verified
this). It can only be run from
within
Windows, and it needs a Microsoft
key (not supplied) to activate it, so it cannot be used to
put Windows on a new (blank) hard drive. (NOT true, see below) It's intended
to allow Windows users to install an 'upgrade' version of windows (if you
have a key presumably), and (not made clear by Microsoft) is that it can
also reinstall the same
operation system, which in the YouTube world
is called a 'repair install'. In this case you reuse the Microsoft key
on the side of the computer (or it can be extracted by a tool called Keyfinder,
from Magical Jellybean). A repair install disk has two options (see attached
screen capture), it can either first wipe the disk or this step can be
skipped preserving your programs and data.
Description: free, download file, burn to DVD with entire OS using your
built-in DVD drive
Limitations:
-- Can only be run from Windows desktop (will not run at boot) (see
update below)
-- Needs a Windows key to activate it (not a problem for a repair install
as original Windows key an be reused)
Clean Windows 7 install from boot with xxxx.iso
disk is possible! (update 6/3/14)
After writing
above that the xxx.iso DVD would not install Windows 7 from boot, I was
able to get it to install a clean version of Windows 7 from BOOT on my
new SSD (solid state drive)! I had a new SSD that Windows just would not
'see' though it showed up in bios. Not remembering that these xxxx.iso
disk could not work from boot, I just popped one in to see what would happen.
The SSD was not blank as I had cloned Windows onto it in USB mode. First
time nothing much happened, though (somehow) I could tell it was seeing
the SSD.
Knowing SSDs
work best with AHCI mode, I changed the bios sata setting from 'RAID' to
'AHCI' and that did it. The xxxx.iso disk I had burned then proceeded (in
30 min or so) from boot to install ('Custom' option) a bare bones Windows
7 (with SP1) on the SSD! As part of the install process I had to enter
my Windows 7 ID number, but I did not allow online activation. Without
activation Windows 7 will run for 30 days!
4) OEM windows.
Amazon is selling Windows 7 OS for $98, full OS on (single) DVD (with SP1)
supplied with a Windows key. The target customer is people building
their own computer system. Amazon reviewers call this OEM windows. It will
install Windows 7 on any blank hard drive. Reviewers say it then becomes
'locked to the hardware'. Presumably what this means is that it can only
be used one time to install to any blank hard drive, and from that
point on it will only reinstall to that motherboard, becoming locked to
it the same way the HP recovery disks are. In effect after one install
(to a blank hard drive) it becomes the recovery disks for that one computer.
Window 7 insurance
** Investing $100
now to buy this Window 7 OEM DVD (while it is still available) may be good
insurance to keep using Windows 7 in future. It allows you to buy a retail
Windows 8 computer, pop in the DVD and power up, and Windows 8 with all
the bloat software installed by the vendor will be gone replaced by a bloat-free
version of Windows7! (confirmed by several Amazon reviewer who have done
this). People are reporting boot times with this DVD of 3 to 7 seconds!
Of course you also may be missing a couple of useful (and necessary) utilities,
like DVD write software, but I bet these utilities can be downloaded.
Try Windows 8 first
A purchase of a
Windows 8 machine with a backup Window 7 OEM DVD allows you to try out
Windows 8. Like it, keep it, don't like it pop in the Windows 7 OEM DVD.
Since new machines typically come with more ram and USB 3, Windows 7 should
run better than older hardware. I checked to see if Windows 7 is compatible
with USB and replies from 2011 were it had no native USB 3.0 support, but
USB drivers could be installed and work fine.
Warning on Windows 8 => Windows 7
This article
from PC mag walks through replacing Windows 8 and shows its not so simple,
especially for a laptop. It identifies three problems. The biggest seems
to be Windows 7 drivers. New hardware will need Windows 7 drivers,
which need to be tracked down and might not exist. The article advises
preparing a memory stick with drivers with the install OS disk. Another
tricky problem is bios. A Windows 8 machine is likely to have a
new UEFI bios. They show going into Windows 8 to switch the bios back to
'legacy bios' needed to get Windows 7 disk to boot. A still further complication
is that in the install process you need to clean out hard disk partitions
of
Windows 8 by separately formating each and then combining the free space.
After reading this article, buying a new Windows 7 machine looks a lot
easier, the problem being they could disappear by the fall of 2014.
http://www.pcmag.com/article2/0,2817,2417361,00.asp
This game can
be extended. I verified that Window 8, like Windows 7, can write (full)
recovery media (to DVD or memory stick), so if Windows 7 does not work
out, pop in the Windows 8 media and reinstall it. I looked up Microsoft
documentation online to verify that Windows 8 could write full recovery
media, and (surprise!) the official Microsoft documentation is vague and
confusing on what the disks do. Nowhere does it say the disk 'reinstall'
Windows 8, it says the disks 'refresh' and 'reset' Windows 8. It is, however,
clear that it writes the full OS because as part of the process, it asks
you if you want to delete the d:\ partition (to free up disk space).
And I guess
the process can be done in reverse too (at least for a while). Buy a retail
machine with Windows 7 and a retail or OEM copy of Windows 8 ($100 to $110).
I was surprised that at my local Staples in Mar 2014 a year and a half
after the release of Windows 8 two of the six desktops on display came
with Windows 7.
Description: $95 (week later its $98) OEM disks with full OS supplied with
a key. Can install OS one time to a blank hard disk and can only reinstall
to same computer. It can be used to replace Windows 8 with Window 7 and
at the same time remove all the bloat crap new retails machines come with.
Limitations:
-- Expensive, no support
-- Runs only at boot, wipes disk
-- Can be used to add Windows to one new computer, later acting
as recovery disks for just that computer
5) Retail Windows.
Not sure exactly how (or if) this is different from OEM disks. It may just
be that the only real difference is that retail Windows comes with customer
support from Microsoft., whereas when you buy a computer from say HP, they
are expected to provide the support. Windows 7 retail disks are no longer
for sale, Microsoft apparently enforces this. Amazon puts up a banner to
this effect, and you cannot even find it on Ebay, which talks of Microsoft
restrictions. The reason it is no longer for sale is that Microsoft is
gradually closing the door on Windows 7 to force users to Windows 8.
---------------------------------------------------------------------
My 'repair install' advanture (3/14)
I had spent mucho
hours over many days trying to repair Windows and was getting pretty fed
up, so I popped in the DVD I made from the .iso file and began a repair
install (following the YouTube repair install process). I didn't do more
backups of my files (a mistake!) thinking if needed I could always reverse
the disk wipe. The homemade DVD worked OK and the install went along fine
until (as part of the process) it did a restart, and there it hung (even
though my unstable Windows had been booting reliably lately). Now I had
a half installed set of windows files.
Ok, image restore
to the rescue, this is why I made the image backup file a few days earlier.
It is supposedly a copy of the whole disk (maybe just the c:\ partition)
containing not only Windows files, but all user programs and data. So I
put in my recovery disk to access the image backup and guess what, freaking
Microsoft image restore can't find my USB drive which has the backup file,
even though I only have one USB drive connected and only one image backup
on the external drive. When I pull out my tablet and research this, I see
this is s common complaint, the drive with the backup file can't be found.
Apparently image backup and restore is another poorly written Microsoft
utility that if you don't do a kabucki dance beforehand and know all the
secret tricks it won't run.
On YouTube
a repair install looked pretty sweet, replace Windows files while keeping
your programs desktop and data, but in practice I found it is a different
story. Trying to run this install on a shaky version of windows is apparently
very risky.
Missing 'trick' for USB image restore? (update
4/2/14)
Maybe the images
below show the missing 'trick' needed to make a Windows image restore from
an image on a USB drive work. My image restore failed when (stupid) Windows
could not find the USB drive where the image was stored, thus forcing on
me a month of drudge work to reinstall everything. I see USB drive not
found drive is a common complaint, on the other hand I see articles where
authors say Windows image and restore, while not fancy, is solid. If the
latter is true, there has to be some 'trap' to avoid, or non-obvious 'trick',
to make it work. (Pros who know how to a complex procedure works often
do not realized that there are traps to warn about or tricks to explain.)
As
I read between the line below, it looks like the 'trick', or if you will
the waiting 'trap' to avoid, involves either when the USB drive should
be connected and/or hitting refresh at the right point to get it recognized.
Their recipe, which presumably works, is to start the the recovery process
with the USB drive not connected. They connect the USB drive only
when the 'select a system image' screen (left below) comes up, and they
are pretty clear about this! In the next screen (right below) they hit
refresh to get it recognized.
Like all recipes
it's not clear what happens if you deviate from it, but it might very well
be that the process is delicate and these two steps need to be done just
this way to get the USB drive recognized. (Sound like Microsoft to me!)
I know I didn't do it this way. I started the recovery process with the
USB drive already connected, which seems totally logical to me. I don't
remember if I hit refresh.
 .
. 
(source -- http://oakdome.com/k5/tutorials/windows-7-disk-imaging/restore-windows-7-from-backup.php)
I do a clean install with HP recover disks
Now with a
scrambled hard drive and image restore not working I had no choice but
to do a clean install. I verified that the homemade DVD would not do this,
System Recovery option is grayed out. So I pulled out my HP recover disks.
They start at boot, do a disk wipe and put the OS back on, (plus of course
all the crap software that HP loads onto its retail machines). These disks
ran OK (tedious since you need to hand feed them), but I ended up with
Windows like when I first bought the computer. First thing I made another
effort to run image restore, this time from within stable Windows. I figured
now there should be no problem finding the USB drive, after all it was
showing up in Explorer, I could see the image file there. Think again!
Even from within Windows with explorer seeing the USB drive the image recovery
program can't see it! Go figure, incompetent Microsoft in action. It occurred
to me that I might have one more byte of the apple, that later some recovery
of my data files might be possible if I could find a utility that
could pry open Windows image file that was still sitting on my USB drive.
Now came the
'fun' 20-30 hour several day job of de-crapify the computer of HP bloat
and recovering and setting up all my old programs. I was guided by a screen
shot of my desktop I recently took of my unstable computer using the camera
in my (blackberry) tablet. I wish I had taken more photos like a picture
of my toolbar customization of Opera browser, where I had added a lot of
custom buttons. Some pictures of explorer file listing would have been
useful, like the startup directory. But before I started working on the
programs, I decided to update Windows. I had been through this process
a few day earlier, because before I could run the repair install (with
built-in SP1), I had to upgrade my shaky OS to SP1, so I knew it was many
hours. Windows told me it had like a 100 critical updates and only after
all these were installed did it bring up SP1 and it was installed. (A couple
of days later it is telling me it has found about 50 more updates to install,
all critical of course.) I was careful running sfc (no errors), chkdsk,
and at the end defragging the disk (it normally runs auto on a monthly
schedule).
Recovery time update
Yea, a few
days to get back 80%, so you are online, email works, the printer works.
This is relatively easy stuff where the programs can be downloaded or pulled
from disk and critically where the programs don't require too much
set up. I made my image backup on Mar 8 and it is now March 25 and I am
still only about 80% recovered.
My recovery
is long and hard, because I don't have a vanilla machine. I have a lot
of hardware and custom software on my machine including TV tuner, USB scanner,
two 2 Tbyte USB drives, wireless printer/scanner combo. The TV tuner that
allows the watching of TV live and records TV programs to disk. It takes
some time to rescan channels and set them in the order I like, but at least
this is straightforward, I have done it many times before, so I know just
what to do. The Cannon wired/wireless printer/scanner MX452 was a bitch
to install when it was new, and was a bitch to reinstall.
During this
backup effort running hardware checks I found one of my two WD 2 Tbyte
drives was failing, so I bought a new WD 2 Tbyte drive, and spent mucho
hours cleaning up the files on the good 2 Tbyte backup drive to speed copying
them to the new 2 Tbyte drive. Even with this prep work it took three overnight
sessions (10+ hours) to copy 600 Gybes from one USB drive to the other.
The new WD
'My book' 2 Tbyte USB drive came with a free (lite) version of Acronis
(True Image) backup software. Installing Acronis totally crashed my machine
installing it (or so I thought), and I had to resort to System Restore
to regain control. It installed 2nd time, but does not run normally, it
just crawls, but still I found it has a use. Even crawling it is able to
open the 600 Gbyte Windows disk image file that I made on Mar 8 before
the new install, and unlike Windows, Acronis can extract files from this
image backup! I pulled out the Freecorder (4 or 5) program directory, no
longer available for download, and amazingly it runs. Freecorder 5 (or
4?) had been my workhorse program for capturing streaming video. It's an
example of a highly customized program. When I originally got it, it provided
video capture only as a toolbar in some browser. Playing with its .exe
files I had figured out how to run it stand alone from the desktop and
set it up (somehow) to capture Opera downloaded video. As recovered with
Acronis, it is only capturing IE video, but I will see if I can fix this.
I use the (old)
Opera browser because it can be so highly customized and has built-in email.
I have it customized with a bunch of custom buttons all of which I have
to search out again and reinstalled. (The button that with one click turns
javascript on/off is extremely useful to get around paywalls.) In the crash
I lost all my Opea bookmarks, my email contact list, and my custom skin.
At least I can build my contact list up by opening old emails stored on
my server, but my bookmark list is gone, and custom skins are not supported
on Opera version 12 I installed.
I had keyboard
control of sound, which I found very useful. This
Let me list the remaining issues:
Boot is not normal
When my desktop
appears some programs run, and for many, many minutes (up to 15
minutes!) some don't run. When I click on these, there is the whirring
wait cursor for a few seconds and then nothing happens, no cursor the program
does not start. Yet when I check Device Manager, I see the process has
started. I had this problem before the clean install, and if anything it
is now worse. I have no idea what's going on. I keep looking at processing
running, especially update services, and shutting them down, but no joy.
During this extended wait time there will often be a couple of USB like
system low frequency tones, but what they indicate I have no idea. Chrome
usually starts immediately, but browser Opera will not, System Restore
will not. I can open and work with local files.
I have devised
a test. Click on System Restore. When its screen (finally) pops up, I know
the boot sequence is finally done, and everything will run normally. I
need some sort of boot tracking program, but this will probably be very
techy and a huge time burner. I know there is a list of boot process in
Windows, but no times attached and I don't seen anything. Another test
I should do is pull off all my USB devices and time the boot as I add them
back one by one.
Progress --- drivers (Update 3/27/14))
I now think
the strange, minutes of delay it takes after my desktop appears for things
to start up normally is related to drivers, probably USB drivers. I have
been able to get very snappy performance, which unfortunately doesn't hold,
by 'Unstalling' driver (USB and I think Disk drive driver) and letting
Windows reinstall them. I had seen it recommended to Uninstall drivers
to fix them. What I find happens is that after Uninstall just wait, Windows
on its own will reinstall them.
* Windows driver reinstall --- Can take 5 to
10 minutes and need to turn on 2nd screen to see what is happening.
'Advanced USB Port Monitor' utility
I got a (free trial) utility to monitor
USB ports: 'Advanced USB Port Monitor' from AGG Software. This helped a
little and shows there was some flakiness with card reader (USB) port.
This port would flip back and forth in names and between not working (red)
to working. The strange noises I had been hearing during the delay are
USB type sounds. It shows which USB devices are on which USB ports, and
this allowed to map my USB ports physically. It is able to monitor port
activity, but I didn't really explore that.
USB port mapping
This utility tells
me two USB hubs (#3 and #6) are used for my computer's six USB 2.0 ports.
The mapping of the six USB 2 ports into the two hubs is rather odd. The
two, top rear USB ports are hub #6 (ports #1, #2) and presently my two
2 Tbyte USB backup drives are plugged in here. The built-in front panel
card reader shows up in hub #6 too (as port #6). The remaining four USB
2 ports are hub #3 (ports #1 and #2 front, #3, #4 on 2nd row in rear).
This is where my printer (rear), TV turner and scanner go. Hub #7, which
I think is USB 1.0, at bottom, rear is used for keyboard and mouse.
The card reader
is still enabled, but I rarely use this port, so I would probably be better
off just disabling it permanently. I have a card reader cable for my camera
cards. The only use I ever made of the built-in card reader is to load
files on the tiny card in my Nook tablet. It fits into an adaptor, which
I have long left in the computer slot. I thought the adoptor would be invisible
with no card plugged into it, but I now find that when I plug in the empty
adaptor it turns on a tiny led next to it. So maybe there is an issue here
with leaving the adoptor in the card port. I am sure I could buy another
card reader cable for this small adaptor.
Windows updates never ending
And Windows updates
continue, almost daily, an unrelenting annoyance. I did over a 100 after
the install, with SP1 not offered. After that SP1 was offered, so did 2nd
round of updates to get SP1. Couple of days later I am told there are 50
more updates waiting, every one of them like the previous 110, labeled
'critical', so I do a 3rd round of updates. To enable this process I had
set Windows updates to automatic, didn't seem to work when I tried to manually
search for updates.
A week or so
later when I boot my machine, the desktop does not appear, just a screen
saying 'Do not turn off your computer configuring Windows'. Is this a Windows
update? Maybe, who knows, it doesn't say that. How long is this going to
take? Who knows, no progress bar. This goes on and on, the screen shows
no action except for an oscillating '.' After15 minutes of this I am beginning
to suspect whatever is happening has hung, but finally after 20 min or
so the desktop appears. What a process Microsoft doesn't ask, doesn't warn,
just takes over your machine! A few hours later I am informed more
critical updates are available, it's just one, so I install it. That was
last night, I just booted this morning and guess what, the'Windows updates
available' on the taskbar is flashing again.
KMPlayer and VLC player
I have hassled
mucho hours with KMPlayer trying to get it to work right including downloading
and installing it three times! I have long used it, but can not get the
new version, and now a year old archive version to work like it did before.
It has several problems. Here are three:
The defaults
are weird. One of the reasons I use it, is that it is flexible and allows
old video, TV shows etc, to be better viewed because it has simple keyboard
commands to adjust sharpness and light/darkness. But by default they don't
work, and it totally unclear how to enable them. I downloaded a year old
version last night and again they weren't working. All of a sudden without
my doing anything specifically they started to work!
Blue screen crash ! (2/26/14)
Big problem is that
the video and audio drift (quickly) are out of sync, at least playing old
SD TV shows. The video lags the audio. I have tried changing the bewildering
array of video controls with no sucess. And last night the screen started
acting weird and 30 minutes later (not using KMPlayer) I had a blue screen
crash of the computer!! Yikes, after a clean install and three weeks work.
I have my fingers crossed that my playing with the video controls, which
causes the KMPlayer screen to go weird, might have triggered this crash.
I immediately uninstalled KMPlayer (including preferrances) and downloaded
this time a year old archive version. VLC plays the same files OK with
its defaults, but not with the same clarity (no sharpness filter).
Screen capture
A minor, but annoying,
problem with KMPlay that I never had before is that the screen capture
width (viewed 'full size' in my favorite viewer ADCSee ver 7) is
not the same as the video on screen. The width of the screen capture is
a little wider. (I suspect the capture may be the actual size of the original
SD program and viewing version is narrow, but it is hard to be sure. Both
versions of KMPlayer do this. I am using exactly the same ADCSee program
I have always used, no upgrade here. Maybe it's something to do with how
I have my monitor screen resolution set up. I have played with all the
KMPlayer screen options, of which there are many.
VLC viewer
has the opposite problem. It's screen capture by design seems to be poor.
It's screen captures in all three formats (.png, .jpeg, .tiff) are smaller
and with clearly less resolution that the video on screen. I need to expand
a capture by 140% for it to match the original screen view. After tweaking
all the screen capture options of both players I find the KMPlayer capture
(even with its width issue) is of much higher quality that VLC, so I would
like to get the KMPlayer to work. Maybe try an even older version, which
I do see in the archive list.
Re-installing
my programs
As I got into downloading
new versions of my programs I found I was picking up a lot of tracking
and popup software that piggy backs on downloads (pureLeads and xxxCandy),
even though I was careful on selecting sites and always choosing custom
install option. So I early downloaded my array of proven virus tools (Malwarebytes,
etc) and ran them frequently to comb out the crap that is unavoidably picked
up when downloading a lot of stuff. I was dreading three tasks, which I
knew had been a bitch when I first did them: Cannon printer/scanner setup,
keyboard script based volume control, and video capture software. The latter
I had converted from a browser add on to a stand alone, which worked very
well and was a work house utility. I also loved my keyboard volume control,
but it depended on scripts which I know almost nothing about and didn't
even remember the name or file type.
Vol control
from keyboard --- Volume scripts turned out to be based on AutoHotKey.
After some work I think I have figured out how this works. Only need two
files are needed AutoHotKey.exe and vol_mute.ahk script file. AutoHotKey
seems to be dying (some links are dead, but I found the executable). Here
are the tricks:
a) AutoHotKey can be put in any directory
b) file associate .ahk (script) files with AutoHotKey.exe
c) Put vol_mute.ahk script file (few lines of text) in startup directory
Where the hell is the startup directory?
The startup
directory is hard to find. If you put startup (or startup folder) in the
Start search box, Windows 7 pretends it doesn't know what you are talking
about. That's right Windows 7 cannot find it own startup folder(s)! This
folder is buried about ten layers deep! Yikes, and there are two
startup folders (confirmed below):
All Users startup folder should be
c:\ProgramData\Microsoft\Windows\Start Menu\Programs\Startup
Your personal startup folder should be
c:\Users\<user name>\AppData\Roaming\Microsoft\Windows\Start Menu\Programs\Startup
File association needs a trick
On a clean
Windows 7 install there is a problem associating file type .ahk to AutoHotKey.exe,
because file type .ahk is not known to Windows. It is not in the
file type list, and there is no obvious way to add a new filetype. There
a trick to adding a new file type: right click desktop and add a New text
document, rename it to xxxx.ahk, open it with notepad. Opening this new
file type with a Windows program adds it the file type list, then go to
the file association page and assign it AutoHotKey.exe.
Vol_mute .ahk (AutoHotKey) script
This .ahk (AutoHotKey)
script works for controlling volume from keyboard. I have the script file
(vol_mute.ahk) in my All Users startup folder. I put the program (autohotkey.exe)
plus a folder with info in a folder 'AutoHotKey' in c:\. Below is the whole
script. It is just a Notepad text file with file type changed from .txt
to .ahk. It mutes sound using upper right corner Pause/Break key, and Alt
PgUp and Alt PgDn keys raise and lower the master volume.
; AutoHotKey xxx.ahk script
; ! <=> Alt
!PgUp::Send, {Volume_Up}
return
!PgDn::Send, {Volume_Down}
return
Break::Send, {Volume_Mute}
return
(new)
ScrollLock::Send, {Volume_Mute}
return
The AutoHotKey
volume script above, which I threw together using various references and
trial and error, works pretty good, better than before, with only the occasional
Mute squirrlieness. I suspect some of this is Windows bugs in how the media
keyboard commands are interpreted. I experimented increasing the volume
steps, like {Volume_Up 2}, and find it unreliable. It will work on some
screens and when hotkeys are function keys, but (for some crazy reason)
the numbers are ignored with PgUp and PgDn are used! The single volume
step used above is 12 steps for half volume with the volume ramping if
the keys are kept depressed. (script above is a little verbose --- my tests
show the comma after send may not be needed. Some sample scripts don't
use 'return', but when I didn't use it the 2nd and 3rd hotkeys did not
get pickup.)
I need to do
something to improve the original script, because I find that while the
original code above works OK for videos, and generally for the TV tuner,
sometimes the TV tuner sound gets muted and no matter what I do I can't
get it to unmute. The key I have long used for Mute on/off is the Break
key (corner key), and I now suspect this is where the problem lies. It
is called 'Break' for a reason. In the early day of computing, when nearly
everyone was writing software, it was used to stop code (break out of infinite
loops), so my guess is this is some sort of interrupt key, i.e. not a normal
keyboard key. The key next to it is ScrollLock, and this key is virtually
never used either, so I added the bottom lines above to allow this key
to also mute and (more importantly) unmute the sound. Initial tests are
encouraging.
Opera browser
--- Knowing that Opera within last year had radically changed into basically
a Chrome clone losing all the customization that made it so unique, I downloaded
the last version of Opera before the gap (12.16). I've got most of my custom
buttons back, but I hate the look of it. Turns out that I must have been
running Opera11.5, since beginning with Opera 12.0 (for some inexplicable
reason) skins were dropped and replaced by (useless) themes. I either need
to live with this or go through the whole customization process again with
11.5 that I can skin to get back where I was. (Yikes, I got and installed
Opera 11.5 (11.64 is latest). and when I went to get a skin, I found the
Opera (skin) portal was closed about a week earlier (early Mar 2014)! Looks
like its version 12 for a while, and while I love its customized toolbar
that allows me to quickly turn javascrip on/off (great for getting around
some paywalls), with no support from Opera it is becoming increasingly
incompatible with some sites. For a while (with Opera 11.5) I haven't been
able to send
send Hotmail email, now with Opera 12 I find that I
can't even read my Hotmail email.
Video capture
--- Here I have run into a real roadblock. The program I was using and
loved I finally figured out was called Freecorder 4 (for some reason my
shortcut was named FCvideo, which did not come up in Google). It ran unobtrusively
in background recording all video (except YouTube). The company (Applian)
is still around, but it has withdrawn the free version 4. Can't find it
archived anywhere, all download sources link to the vendor. Sampled version
8 and it stinks. Need to look for new video capture software.
Home network
--- I have three computers on my home network (Windows 7 desktop, old XP
desktop (wired) and old Vista portable (wireless)), but it came up a kludge
and remains a kludge. Windows 7 should be able to set up a home network
easily but I found this not to be the case. I wanted to copy over some
old programs that I knew from earlier work need not be installed.
One in particular was a key program that I use to support my homepage,
the html editor, Netscape 4.8 composer. I knew in the past it had been
archived online, but I wanted to just copy it over. It should have been
on my backup USB drive, but it wasn't (big mistake), but I found copies
on the other two computers.
For the life
of me I could not get Windows 7 to see the XP (maybe something needs to
be run on the XP) though it found the Vista portable, and the Vista could
see the XP. I found I had only very limited file sharing between the Window
7 and the Vista portable because of permissions. I would set the Window
7 c:\drive to share with everyone having full control, but Vista claimed
Windows 7 would not allow files to be saved. Madening! By trial and error
I found the Vista could write files to the Windows 7 c:\user\public
folder, so this allowed me to copy over Netscape 4.8 to my newly setup
Windows 7, where after being moved to a proper home, it ran fine.
KMPlayer setup -- KMPlayer
has long been my standard video player, but it is a nightmare to set up.
It's defaults are terrible, for example none of the video controls worked
(sharpen, lighten, darken), which is one of the reason I use this video
player. I am pretty familiar with its (seemingly) hundreds of options,
but after spending hours playing it still isn't working as well as my old
version did. I (finally) got the video controls working by clicking the
very last choice: on 'Configuration Management' page check 'Start KMPlayer
with default preset.' What this does I have no idea, but with it checked
sharpen and lighten/darken work. Another (core) problem was with default
setting the sync between audio and video was way off (seconds) and
would not sync up. I finally solved (well not really sync still slips)
this one too by noticing that after a sync command, the video began to
slip more and more behind the audio. It was like the video processing could
not keep up. Clicking off some (???) video processing fixed this problem.
A 3rd problem, still unsolved, is that frame captures are mostly blurry,
what capture gets is not what shows on the screen. I can't seem to fix
this. Very frustrating.
** KMPlayer recover tips
One of KMPlayer's
maddening quirks is that you will inadvertently hit some keyboard command
and things get screwed up. (For example last night some keystroke around
'd' caused the screen to go black while the video continued to play.) And
recovery is a bitch, because a simple restart doesn't work. I tried
restarted, same problem (it had stored the setting). I even tried copying
over the entire KMPlayer folder from my clone, same problem (it must store
it's settings in some library). I tried looking for a recently changed
file, but no obvious candidate. Yikes!!
A web search
come up with these commands which got me going again. #1 (reset) fixed
my dark screen, while preserving my capture preferences, but I found that
all the video control (like light/dark), which is why I like KMPlayer,
were not working. #2 enabled the video controls. #3 is an export/import
of KMPlayer settings that I am going to try.
1) 'Reset Current
Preset' --- Opening F2 screen (lower left corner)
2) Reseting
Current Preset kills light/dark etc. To enable video controls you need
to enable "KMP Video-Transform-Filter"
Preferences (F2) > Video-Processing > [General] tab
"Always use" (works!)
3) Export presets --- Opening F2 screen (on bottom)
One the other
hand VLC videop layer came up 'out of the box' (so to speak) playing video
files fine with its default settings.
Create restore
point (script file) --- With my old Windows 7 over the last two years regularly
deleting restore points it was essential that I have an easy way to create
restore points (I had made over 250 in two years). This is another
script file/shortcut that I had found online and didn't understand, or
know anything about, but I found it. It is [CreateRestorePoint.vbs], which
is a .vbs script file. It can go anywhere, the desktop shortcut just has
to point to it.
inSSIDer ---
This was a very nice, free WiFi strength monitoring program, very useful
in hotels, but it's no longer available from its creator as a free utility,
so I thought it was gone, There is a new version, but it is not cheap.
But I got it back. I found older, free version, inSSIDer 2.0 on my Vista
portable, and when I copied it over, it just worked. Uninstalling the trial
version should get rid of an annoying upgrade popup from MetaGeek, its
creator.
Upgrade losses
I had always
run Windows 7 with updates off, which might explain why I was so vulnerable
to FBI Stop viruses, which attacks totally stopped months ago for unknown
reasons. But with this clean install I decided to let Windows upgrade do
its thing, with 100+ 'critical' upgrades listed + SP1 (service pack 1)
followed by another 60 critical upgrades. After the first hundred and SP1
no problems, but I just did the latest batch of 60 upgrades and yikes my
desktop is messed up. First I found the toolbar at the top, OK and easy
fix to move it back down to the bottom, but where are my widgets: clock
and two local temperature monitor, all three of which I use constantly.
No widgets
--- Not only were my three widgets gone after the lasted Windows upgrade,
but when I right click the desktop and select widgets nothing happens.
What? When I google this I find in 2012, Microsoft learning about a security
hole in widgets decided not to fix the hole, but just to shut down widgets.
Yup, one of the features of Windows 7 has been (unceremoniously) removed
because it was cheaper to just eliminate it than to fix it! Typical Microsoft.
They are still selling Windows 7 for $100 no less, but are unwilling to
properly maintain it. Another loss, the right side of my desktop is bare,
so I need to search for replacement clock and weather quasi-gadgets to
replace what I lost.
Clocx --- This
free utility is a pretty good replacement for the clock and calendar (http://www.clocx.net).
I am using clock face : ane44, which is a basic analog clock, very similar
to the gadget clock. This is one of hundreds of clock faces built in! However,
because it is a program and not a gadget, Windows key D causes it to disappear,
so when you go to look at the time it's not there.
Useful Windows tools
'Administrative
Tools' --- Typing 'Administrative Tools' in the search box bring up a bunch
of useful pages: control boot, shut down services, check out and change
partitions on hard drives. You can get here also: Control Panel, System
and Security, Administrative Tools (After deleting all the Acronis services
I could find, I find three Acronis services here, one of which is running
at boot.)
Disk Cloning
I have been
reading about cloning vs backups. Looks like pros often use cloning. Daily
or weekly they image copy their whole hard drive onto a hard drive similar
to their inside hard drive. When their drive craps out, they physically
remove it and plug in the clone. In 15 minutes they can be up and running.
Recovery from the re-install has taken most of a month. Need to learn more.
-- ** Youtube
video says WD advised a guy to attach new (internal) Sata drive to USB
port via 'Sata to USB cable' and use clone software to copy the internal
hard drive to it. This is interesting because I bought a 1 Tbyte Sata drive
and Sata to USB cable a couple of years ago (at my last crash) and never
used them. I would need to search out clone software and try this. This
could be interesting. Would be fairly easy to make backup, but would required
opening case to put in the cloned drive.
-- Bytecc
duplicator (Amazon $40). This is box with two slots for Sata drives.
Plug in source and target, push button. Cheap and simple. OK if planing
to upgrade or replace a good drive, but not sure how useful. However,
one use might be to make a 2nd backup clone from a primary clone.
-- ESata cable
--- Reviews report that a Sata drive connected internally via this cable
(3 ft or 6 ft) allows the external drive to work like the c:\ drive with
Windows 7. Sata hard drive docking stations cost only $25.
-- Why did
Windows image fail? (Recover program could not see the
USB drive)
-- The problem with
popping in an infrequently cloned whole c: drive, of course, is that all
your recent data files need to found, which could be a huge pain. Cloning
probably works much better if files are reorganized. One thought that comes
to mind is all critical data files could be kept off the internal drive,
but this only makes sense if the primary USB drive is backed up regularly
to the secondary USB drive. The key is probably to have software that regularly
backs up all critical data files nightly to an external drive, so if a
clone goes in the old data directories can just be overwritten by the backed
up directories.
I see experts talking about more extensive rearrangement that separates
data, programs, and windows into different partition. But I suspect in
practice this is tricky and it a lot more techy than I want to get.
-- Check to
see if my bios will allow a boot from USB drive. (Yes. 'Esc' brings up
boot menu at power up and both my USB drives are listed.) If so, then Clonezilla
disk will make a clone to a USB drive than can be used to boot and recover.
-- Several
user recommend for cloing Macrium Reflect 5 Pro (http://www.macrium.com/)
and they have a free version
Clone experiments (3/31/14)
A while back
when I had my first Windows crash, I had bought a 1 Tbyte internal SATA
drive plus a USB adaptor cable for it, thinking I would try and recover
some files. When my computer (mysteriously) came back to life and booted,
I let them sit unopened.
My new 1 Tbyte drive is
Seagate Barracuda 1 TB HDD SATA 6 Gb/s NCQ 64MB Cache 3.5-Inch Internal
Bare Drive ST1000DM003
$58 Amazon, 2,000 reviews (another source of info) One reviewer cloned
his primary drive to this one (1 hr), just moved the Sata cable, and the
machine booted from this new drive.
http://www.amazon.com/Seagate-Barracuda-3-5-Inch-Internal-ST1000DM003/dp/B005T3GRNW/ref=pd_rhf_se_s_cp_46_JTVF?ie=UTF8&refRID=0PZX1W3QE0TF9RRTC443
Internal 1Tbyte Seagate sata drive connected via USB
converter
Well today I opened
up the hard drive and USB converter boxes. After puzzling for a few minutes,
I figured out how to connect the cables (unlike any of the figures on the
box!) and got it working. Opening Windows Disk configuration it was visable,
shown 'uninitialized', but was not visible in Explorer. In Disk configuration
after a web search selected copy Master Boot Record? (MBR?), which is what
you want for drives 2 Tbyte or less, and then format, assigned letter (F:\)
and that did it. It now showed up in Explorer with correct size, and I
copied over a file to verify it was working.
"I
have spent many (many!) hours studying backup strategies, and of course
there are many depending on one's needs. The most elusive of all however
(detailed by hundreds of posts from myself and others on these forums)
has always been the simplest of all - the Bootable HDD Clone Disk (BCD
henceforth)." (forum posting) This guy went on to say he wanted to boot
without using ANY recovery media or environment. Amen! And that he couldn't
find any software that said they do this.
What I want
is multible bootable drives I can select from the bios order. See zero
info on this!!
Casper 8 clone software
(http://www.fssdev.com/)
"Instantly-Bootable
Backups: For rapid recovery, Casper maintains a complete, immediately-bootable
backup replacement for a Windows system drive. In the event of hard disk
failure or disk corruption, a Casper bootable backup can be used immediately
as either a temporary or permanent replacement for the original hard disk."
(Casper 8 description)
Look into this.
It is $50, but they have a 30 day free trial! (downloaded it and used it
to clone (copy) internal drive)
(update)
I have now
tried several (free) clone packages and the one I like the best so far
I Casper 8. I think I may buy it. One nice feature it has that others don't
have is that after it first writes a clone, it can 'differentially' update
it meaning it scans both drives and only writes the sectors that have changed.
This differential backup takes about an hour and can run in background
while computer is being used. The latter is possible because clone software
uses some sort of volume sampler that Microsoft has built into Windows
7. Some posters are skeptical that you can reliably clone from
within working Windows, but this is probably a solved problem. No article
on cloning mentions this as an issue.
Bootable HDD Clone Disk
From my online
reading I find there are a bewildering ways to use two hard drive, but
seems to me to the guy above has got it right. To avoid the nightmare of
reinstalling all my programs (a months work!) what I think I want is the
second drive to be a clone of the first. It needs to be bootable, and in
case of a problem with my primary drive can't I just at power up (using
Esc) just change the boot sequence and boot up on the clone?
Not Raid 1
I think my
computer supports Raid and at first this seemed like the way to go. Choosing
'Raid 1' automatically has the 2nd drive mirror the first. Ok, this
protects from a sudden physical failure of the primary drive, but it would
not have protected me from the problem I just had where over a week or
two Windows got unstable and I began to have blue screen crashed. Seems
to me in a mirror configuration, I will just have unstable windows (c:\
and probably d:\) on both drives.
What makes sense
to me now would be to periodic clones of primary disk to clone disk,
but only when Windows is healthy on the primary.
Clone primary drive on internal via USB
First test is to
clone my primary (system, c:\ and d:\ partitions) to the 1 Tbyte internal
now running via USB. I am going to try (free) Macrium Reflect for this.
(Took a look at Seagate disk clone and didn't like it). Whether or how
to make it bootable will require some research and trial and error. I'm
thinking after the clone I will just try and see if it boots from it. I
can already see the new 1 Tbyte drive in the boot sequence, where it is
now 6th and last.
I probably
should make an image file too on 2Tbyte drive #2, which has lots of room.
Test of Casper 8 clone (copy) (3/31/14)
I download
a 30 day trial version of Casper 8 and used it to 'copy' overnight the
entire contents of the internal 700 Gbyte drive to my 1 Tbyte internal
drive hooked up to a USB port (via an adaptor). It reports the copying
took 2 hr, 20 min (100 Gbytes used) and the copy looks perfect. I made
a minor change and did a recopy. Casper says they use Smart Technology
and only recopy what has changed, nevertheless the incremental update copy
took 1 hr, 10 min half the time of the full copy. (It spends a lot of time
comparing the disks first.) However, amazingly the smart re-copy works
in the background while Windows is being used. How it does this I don't
know.
I specifiied
during the Copy that the extra drive space on the new drive (250 Gybe nominal)
not be used (not the recommended option, which is to spread the copy over
the new larger disk). Seems to me this is important if I need to copy the
clone back to the original drive. However, Casper does claim that they
can copy a larger disk back to a smaller. I like the clone (Casper calls
it 'Copy'). I think this is the way to go for backups. It needs another
drive, a dedicated drive, but so what.
Is the clone bootable?
Now the 64
dollar question, Is the clone bootable? Surprisingly this is very hard
to tell. I can select the clone USB from the boot menu, and boot goes OK,
but I don't really know if it is booting from the USB drive or not! Searching
online did not reveal any clear cut way to tell. I tried with a paper tube
to listen to the disk head, but this test was inconclusive, I head head
noise with both boot options. I can think of one way to tell, but I haven't
tried it yet because I am worried things will get screwed up. The test
is to pull out the USB during the boot process, probably pulling it quickly
would be the safest.
Damn, there's
a very good chance I am not booting off the clone. I pulled the
clone and plugged in 2 Tbyte #2, which is clearly not a bootable drive.
I selected the 2Tbyte drive at power up and Windows booted normally, so
this test shows Windows will clearly boot from its internal drive if a
non-bootable drive is selected from the boot sequence.
For the clone
to be bootable it needs a 'bootable master boot record' or 'active
partition'. Below is the option Casper says to use to make the clone bootable:
'Copy an entire hard disk'. This is not 100% clear. I chose copy and the
three partitions of the internal drive were default check marked, so is
this copy the entire hard disk?
After copying my Windows system drive to a
new drive, I cannot boot from the copy. Why not? (Casper Q&A)
-- The most
common reason for this problem is the absence of a 'bootable master boot
record' or 'active partition' on the target disk. When using the 'Copy
a specific drive' method to copy one drive to another, Casper does not
replace the master boot record or change the active partition status on
the target disk.
-- In order
to ensure the target disk contains a valid master boot record and the appropriate
partition is marked active, it is necessary to use the 'Copy an entire
hard disk' method. Alternatively, Casper Explorer may be used to apply
a genuine Windows master boot record and change the active partition status
on the target disk. (?? don't see this)
(later comment)
'Sometimes
we write the MBR (master boot record) and sometimes we don't'. It's confusing,
hair splitting stuff this this that make figuring out cloning so difficult.
So why when you go throught clone steps on Casper is there no mention of
this? And I think it's wrong. My experience is that any Casper clone of
a c:\ partition to a bootable media will boot, so I suspect they write
the MBR every time. The fact is that adding a MBR is something that can
be done later, many utilities (including EasyBCD) can do it, and without
disturbing the contents of the clone. The Windows disk configuration page
can if needed mark a partition active (though this seems to happen automatically).
-- For additional
information related to resolving boot problems, see the help topic entitled
'Resolving Boot Problems' under the 'Troubleshooting' section in the Casper
help file. For help with replacing a master boot record or changing the
active partition on a hard disk, see the help topics 'Repair' or 'replace
a master boot record and Mark a partition active' under the Disk Management
section of Working with Casper Explorer in the Casper help file.
I do read in forums
that posters with two bootable drives (usually with two different versions
of Windows), say they can switch between them by changing the boot order
in the bios. However, I sustect there is another bios entry (F10). The
one I get with Esc only has a list of drive, nothing else.
F10 accesses the main bios screens (Esc selects boot
order)
My 1 Tbyte shows up in the CDRom group (as #2 in the group) which as priority,
so from this I would think it would boot. Tried to make it #1 in the CDRom
group, but can't. But I can see from Disk Configuration that all booting
looks like it is being done from internal drive. The two Seagate drives
are easily told apart by looking at the total size. The boot partiion is
marked and in every case its on the internal drive. I need to check if
my USB 1 Tbyte drive is bootable, because if it is I would think I would
have booted from it by now.
Shows my machine has Sata on mother board, which means the new drive can
probably plug in.
Bootable clone drive?
I now suspect
that when I select it at boot I am (or might be) in fact booting from the
clone 1 Tbyte drive. When I boot from inside drive selected and pull the
USB plug at boot (did it twice) and nothhing happens, machine boots normally.
But when I selected boot from USB USB 1 Tbyte clone and pull the USB plug
(when Windows spirallng four colors appear), the boot freezes! Of course,
the real definitive test is opening the case and disconnecting the 700
Gybte internal Seagate drive. But it leaves open the question if windows
goes bad must I open the case and remove it. An interesting test
might be to disable some Windows file (how?) on the internal drive and
see if Windows runs OK from clone.
** Need to open case to disable drive with 'bad windows'
Unfortunately
even if the clone boot loader is working I can see that the Windows running
is from the internal drive. Two ways I see this. One, I ran a simple test
to screw up Windows by shutting off desktop icons ('Right click on desktop
- View - uncheck show desktop icons'). When I turn icons off and simply
reboot, they stay off. Unfortunately when I select the USB 1 Tbyte to boot
from they stay off too! Also I downloaded a new utility since I made (and
updated) clone (EasyBCD), there it is in the c:\ drive, but it is missing
in the clone F:\ drive. So my expectation is that if I unplug internal
drive sata cable and I really am booting from clone, which will be obvious,
what I now see as F:\ (with no EasyBCD) will become the c:\drive.
Macrium
help files explained that there can't be two c:\ drives in Windows, implying
that the clone files will show up initially as a higher letter (F:\ in
my case), but that when the internal drive is removed (unplug the Sata
cable), that drive letters will 'settle down' with the clone probably showing
up as c:\ and if it doesn't c:\ could be assigned on Windows disk configuration
page. I ran a test adding an image to c:\ drive on the clone, and even
after booting from it shows up on the F:\ drive. Does this imply that Windows
is running of the internal Windows files and that it is required to pull
the internal Sata cable. Not sure. This needs to be tested I need a bad
windows!
Boot sequence --- F10 'Setup' and Esc 'Boot Menu'
To boot from
a USB drive it must be set higher in the boot sequence priority than the
internal drive. There are two bios sequences built into the bios of my
HP computer, and the hot keys flash (so fast as to be barely readable)
on screen at power up: F10 'Setup' and Esc 'Boot Menu'. I was originally
confused by this because it seemed like both allowed the boot sequence
to be set, but the order was different! I found an article that explained
what is going on.
F10 (Setup)
is the full bios set of screens like Windows computer have had for years.
These bios setting are stored in CMOS, so using these bios screens to make
a temperary change in boot sequence means changing it. and then later changing
it back. To make repairs easier newer bioses have another hotkey that offers
a one time (in ram) way to change the boot sequence, which in my HP is
called 'Boot Menu' and is brought up with the (corner) Esc key. This must
mean the Boot (Esc) sequence is an override of the CMOS boot seqence. Still
it is a little confusing. I find the Boot (Esc) list always seems to show
the internal hard drive first, but in the CMOS sequence the disk
drive group, which includes the internal drive, come after the CD/DVD options.
Maybe this is affected by having no bootable CD/DVD in the drive.
My supposendly
bootable clone 1 Tbyte when connected up (and powered) prior to boot does
show up in both lists. So the way to set it as the boot drive is (very
likely) to select it using the Boot (Esc) sequence. Earlier when I did
this and pulled the USB plug during boot, the boot froze, so I may have
been booting from the USB driver. Nevertheless, I haven't yet been able
to get the setting of windows on the USB drive to show up at boot.
Bios setting
(F10) show the boot sequences. Boot sources are in groups and groups sequence
too. First group is CD/DVD drive and in this group I find the 1 Tbytes
USB drive. Next comes the hard drive group. There were three drives here,
the internal Seagate 700 Gbyte and the two 2 Tbyte USB drives. I found
the internal Seagate drive was not #1 in this group. It was listed
after one of the USB drive. This might be an important reason why with
USB stuff connected boot is 2-3 min vs 1 min. I moved the internal drive
to the #1 position in the drive group.
Disk structure
From Wikipedia
(System partition and boot partition). Microsoft defines these terms essentially
reversed compared to all other operating systems. Microsoft defines the
terms as follows:
*
The system partition is a primary (hidden) partition that contains
the boot loader, a piece of software responsible for booting the OS. This
partition holds the boot sector and is marked active. [This is only 30
Mybes on a 100 Mbyte partition with no letter. It has the boot loader and
boot sector (probably MBR -- master boot record)]
* The boot partition
is the disk partition that contains the operating system folder, known
as system root [This is the c:\ partition and contains the OS files as
well as programs and data.]
(later comment)
You would
think from above that a 'system partition' is required for Windows to boot,
but that is not right. Most of my clones are of only the c:\ drive (OS,
programs and data), and they boot fine. In fact from forum discussions
no one really seems to know what the system partition does.
Wikipedia (MBR
article) explains that for partitioned media, like disk drives, there must
be
an MBR (Master Boot Record) at the very beginning of a physical
hard drive, because it contains information about how the disk is partitioned.
It has code known (confusingly) as the 'boot loader' that apparently does
little more than pass control to the first sector on the requested
partition. Here is the real OS loader known variously as the "partition
(or volume) boot sector or partition (or volume) boot record".
In other words
boot process starts with the first sector on a physical disk, called
MBR, because it knows where the partitions boundaries are and what logical
letters is assigned to each partition. The MBR soon passes control to the
first
sector of the requested partition, 'partition boot sector', which really
loads the OS.
Starting with
Windows 7 Windows Setup creates a separate System partition that is not
given an identifier and therefore is hidden. The boot partition is still
given "C:" as its identifier. Note the d:\ recovery partition, which has
the backup copy of the OS is 10 Gbyte in size, so obviously the running
OS has to be on the c:\ partition, because the (hidden) System partion
is only 100 Mybtes and 70% of that is free.
Active partitions (4/3/14)
I saw one
quick reference in an article that you needed to go into disk configuration
and mark a partition 'active' for a drive to boot. Then on a Microsoft
site I found this:
Mark a partition as active
Marking a
partition as active is an advanced task that should only be performed
by advanced users (and only by administrator). Marking a partition as active
on a basic disk means that the computer will use the loader on that
partition to start the operating system. There can be only one active
partition per physical hard disk. You can't make a logical drive
(i.e a partition assigned a letter like c:\ or f:\) or an extended partition
active. Only a primary partition can be made active. [100 Mbyte System
partition with no letter has the boot loader and boot sector. For this
physical hard drive to boot its System partition needs to be marked 'active'
to allow its loader to load.]
** If you have
multiple hard disks installed on your computer, it's possible for each
(physical) hard disk to have a System partition set as active. The active
partition on the first hard disk that your computer's BIOS detects is the
one that will start the computer.
Below is the Disk
Management screen showing the partitions of the four hard drives connected
to my computer. Disk 0 is the internal 700 Gbyte drive. Disk 1 is the 1
Tbyte USB drive (sata drive via USB converter) that is a clone of Disk
0 (using Casper 8) , so its partitions mirror Disk 0 as a result of the
cloning. I have manually set the System partition of the clone (Disk
1) to 'active' (so it can boot). Disk 3 and Disk 4 are 2 Tbyte USB data
backup drives with a single partition. (It is still unclear if I am able
to boot from my clone Disk 1 USB drive or not.)
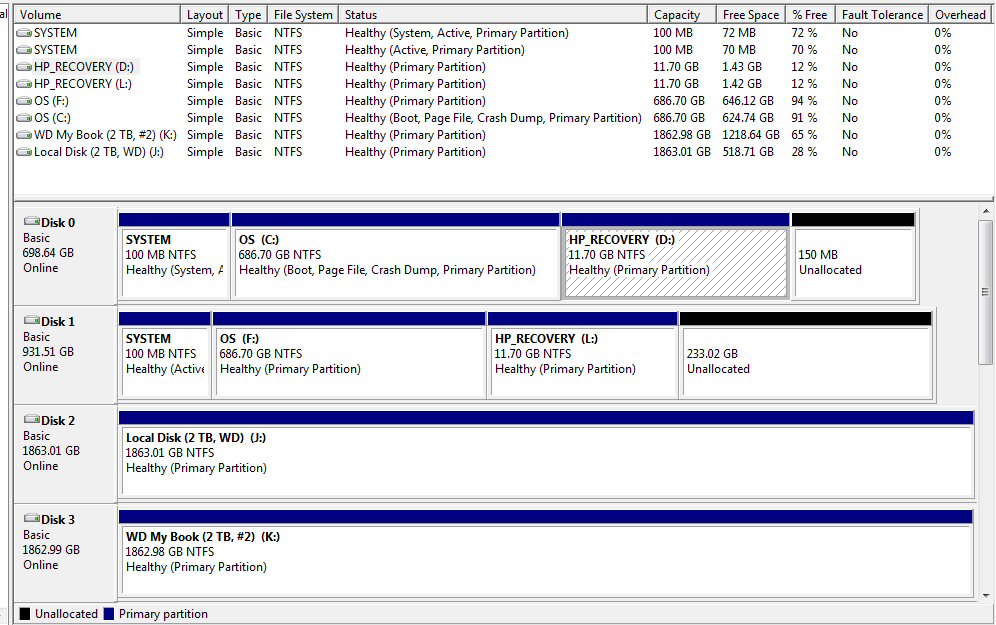
Windows 7 with four physical hard drives, internal
plus three USB hard drives
Disk 0 --- Internal 700 Gbyte (sata) drive
Disk 1 --- 1 Tbyte sata 'clone' drive connected via
USB (bootable status unclear)
Disk 2 and Disk 3 are 2 TbyteUSB drives used for data
backup
OK, this could
be progress. Using disk configuration I see that it is System (100 Mbyte
partition) of the internal drive is marked 'active'. The internal c:\ drive
is marked 'boot, page file, crash dump, primary partion', but it is not
marked 'active'. The 'System' partition of the clone has been up to now
not
active, but now it is. Just had to right click it and select make active.
This all fits with Microsoft documentation above. Now if I change the boot
sequence I may be able to boot from the clone (with the internal Seagate
still connected). To separate the original c:\ and its f:\clone,
I have added a 2nd (copy) figure to the c:\ internal drive. If that double
image directory ends up as f:\ then I will have booted from the USB clone
and its version of c:\ will be c:\.
EasyBCD
Guys with
two operating systems installed need an easier way to chose between them
at boot, so for them there are utilities that pop up a system selector
(with timeout) during boot. I downloaded a popular freeone mentioned on
forums: EasyBCD utility (NeoSmart Technologies). (A poster says EasyBCD
is a shell around the Windows command-line tool BCDEdit, which I suspect
is right.) Took a while to figure out, but now it asks if I want to boot
from the F:\ drive with 10 sec timer that defaults to internal drive. Based
on my tests it looks like this utility probably overrides the Boot Menu
choice, since it come up afterward. This utility says it looks for the
same boot loader file on (external ) F:\ that it looks for on c:\. I have
verified the file is there on F:\, but when I select it, I immediately
get a message it can't boot from there. Don't understand what is going
on.
OK,
I think I figured this out. I have bypassed this hurdle and MsConfig is
telling me I have booted from the USB clone drive. While the clone software
(here Casper 8) has put the boot loader onto the USB clone drive's 100
Mbyte System partition, it's not yet ready to boot. A check of the clone
partitions with Disk Configuration shows its System partition is not marked
'active', like the disk 0 internal drive. To (in effect) activate the clone
drive to make it bootable, you needed to mark the clone's System partition
as active. This is done using Disk Configuration screen and right clicking
the disk 1 clone System partition. After I did this, the can't boot from
there halt went away.
When I looked
at the boot screens of 'msconfig', I think I can see how EasyBCD works.
It's appears to be a utility to modify the boot setting of msconfig.exe.
The boot options and names I entered into EasyBCD I now see reflected in
the boot options of msconfig, which was a surprise!
 .
.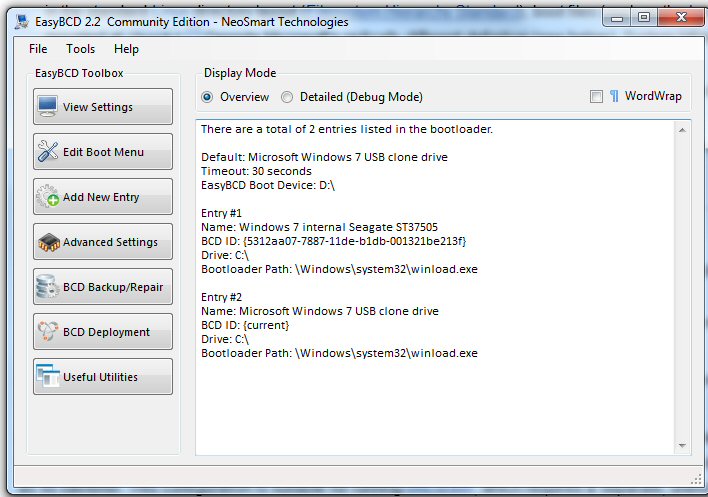
How added Entry #2 for the clone to the EasyBCD boot
menu
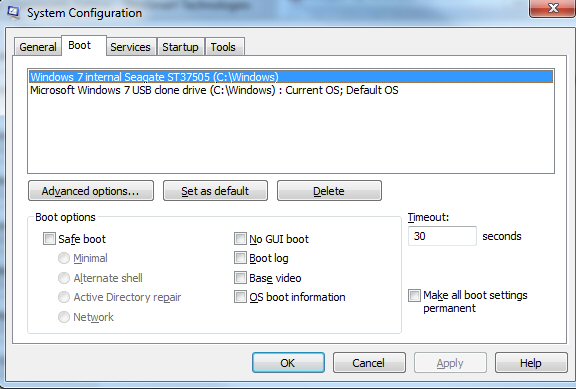 .
. 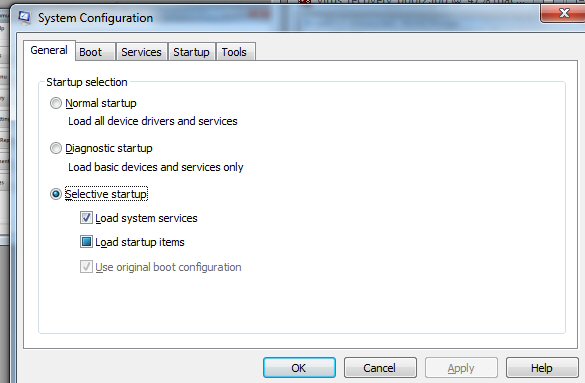
MsConfig.exe --- Boot screen show the two entries
(with my names) of EasyBCD boot options.
Note it shows the 'current OS' is the OS of the USB
clone drive (success I think)
Bcdedit command line tool
Saw that a
poster cured his failure to boot by using the built-in Window command line
tool bcdedit. EasyBCD is probably just a Windows program that makes the
setting of it much less pairful than trying to use the built-in, low level,
command line entries. So I explored a little with bcdedit and found, mirable
dictu, in one screen it will show me the boot properties of all
of my boot devices, which I don't think is available from within Windows
itself.
Here's the
output to the command: bcdedit /enum. I am running on my main 1 Tbyte
main drive, and below it also shows f:\, which is internal clone #1, and
h:\ which is a (temp) clone #2 on a clean partition of my old sick drive
in an external enclosure here connected via esata.
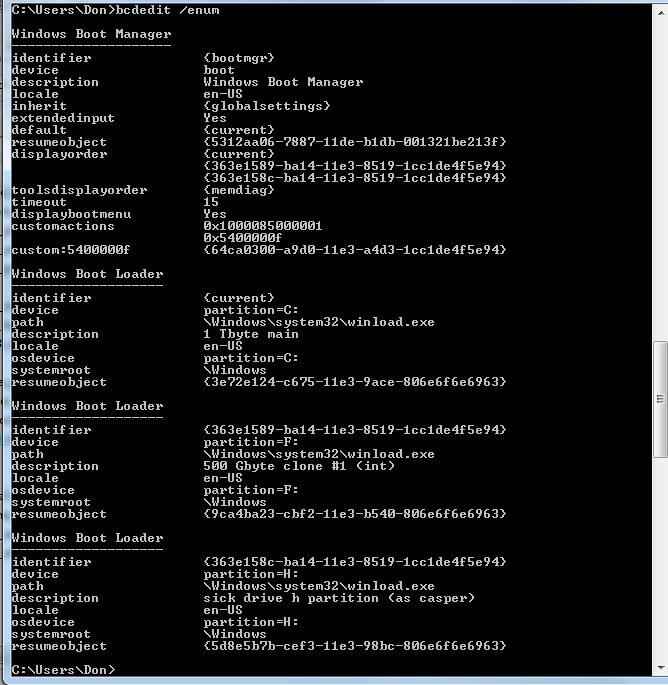
screen capture of my system 4/29/14
I may have
learned something from above. Explorer shows I have clones on i:\ and z:\
partitions of my sick esata drive too, but they don't display above. That
would seem to indicate they are not bootabable, OR maybe these are only
those disks entered using EasyBCD. When I checked EasyBCD, it had just
the three drive shown above, so not sure that bcdedit tells me anymore
than EasyBCD.
Where has quad boot gone?
As a test, I used
EasyBCD to add the z:\ partition. I did not write any BCD or choose the
option to make disks bootable. After this I tested my various boot options
and found only c:\ and f:\ would boot, but no boot z:\ and h:\ via esata
with the usual no boot screen. Why? Who knows. Note that the h:\ entry
in bcdedit looks identical to the others that boot, so no help there. On
the disk configuration screen I found i:\ and z:\ were not active, so I
changed that. No joy. I used EasyBCD to make the z:\ drive bootable. Still
no joy. I tried sick i:\ drive that had hours earlier had been cloned by
AOMEI and it booted.
Looking over
my notes I have a theory. The day before I had tried to get h:\ and z:\
on sick drive to boot via USB and it almost gets there with 'Starting Windows'
and whirling color coming up, but it reverts back to HP splash screen at
beginning of boot. The 3rd clone on the same sick drive was made later
(by AOMEI) and it boots. My theory is the bootable clones made by Casper
8 were somehow messed up when I tried to boot via USB. A test for this
would be to update z:\ clone, and yup it boots.
Esata boot formula
Playing around
with the external esata drive has a way of 'breaking' its boot, i.e. killing
the ability of its clone partitions to boot. The procedure that seems to
work get esata partitions booting again is this:
1) Do fresh clones (Casper 8 or AOMEI) to esata drive partitions
2) Delete the old entries for these partitions in EasyBCD and add the them
back.
Visual BCD Editor
Visual BCD
Editor (http://www.boyans.net/) is
a free utility that shows complete BCD contents in a structured way: "system"
BCD or another BCD residing on any drive/disk. With VBCD editor you can
edit every element, path, loader and easily create new loaders for other
drives/disks.
USB clone drive now booting (4/3/14)
I am coming
to believe that finally, after two to three days work, I have make a USB
clone drive that now can, and has as I write, booted my computer. The version
of Windows OS on the clone drive is running the computer. And this
was done without pulling the internal hard drive cable or physically
disconnecting it in any way. Note that above left the boot screen of MsConfig
says exactly this: 'current OS' is my entry is the USB clone drive.
This what I
did to get the clone backup drive working to allow recover is Windows 8
on the internal drive gets sick or crashes:
1) Clone internal 700 Gbyte drive (using Casper 8) to 1 Tbyte drive connected
to USB port (via sata to USB converter)
2) Manually mark the USB clone's (disk 1) 100 Mbyte System partition as
'active'
3) (optional, I hope) Utility 'Control EasyBCD' for dual boot select between
internal OS or clone OS, and to verify which OS is running
My misunderstanding?
I had assumed
that
if the clone OS booted, then its version of the c:\ directory (normally
f:\ drive) would show up as c:\, but it doesn't, it is still the f:\ drive,
which is why for a long time I have not thought it was booting. Is this
OK? Well it is not a clean transfer of control. I guess I can go into the
f:\ directory and run programs off the clone. The problem I see is that
all the shortcuts on the desktop still point at the c:\ drive which (by
test) looks to be the internal drive and could be sick. So this is my current
understanding:
How to use a clone drive
Ok, I have
an external USB clone drive that seems to work. At least using the utility
Easy BCD I can boot from it, and presumably with more testing I can verify
that I can boot with it by changing the bios drive order. What can I do
with it? Is it only useful as a replacement drive, which requires
opening the case and physically moving cables? This may be no big deal
on a well lit lab bench, but is a real hassle at home when the drive is
on the floor sitting in a tangle of wires and not well lit. No, there's
another use, a very important use: Data Recovery! An Apple article on cloning
mentioned data recovery and this use had not occurred to me.
Data recovery with a clone drive
I had been
thinking that the only old use of a clone drive was as a replacement
for a bad (internal) Windows or bad internal hard drive. There would be
the hassle that all the user data files would be old (as of the date of
the clone), so they would need to be replaced later from backup media (if
such newer files exist, which they probably don't). I now think this is
the wrong way to think about it.
Updating the clone
Most articles
speak of a clone as as 'snapshot in time', and when it is swapped in for
the original all your programs and data revert to the date the clone was
made. But this is misleading. I am pretty sure data files on the clone
can be updated while it is external using Windows Explorer, and it will
still work properly when swapped in. (Yup) The it is not a gem that can't
be changed. When the clone drive is connected via USB, its version of c:\
directory shows up as the f:\ directory. To Explorer the clone drive is
just another external drive that can be read from or written to. I don't
see why there would be a problem writing new data files on the clone. Explorer
is not going to overwrite its system files!
Use a clone to check out new software
(update) At the
time I added this to the above paragraph: 'Changing programs on the clone,
however, is a totally different matter and I suspect should be avoided
unless you are an expert.' I now don't see any fundamental problem
in installing or uninstalling programs on a clone, though I have not specifically
tried it. All the programs and links are in the clone partition. Off course,
all such changes are wiped out on a re-clone, but this suggests an interesting
use for a clone drive. Use it to try out new software! In fact from comments
I see on forums I think this is exactly what pros who evaluate software
do. It could also be a useful screen for whether freeware is bringing in
viruses or advertising crap.
This is an
argument for having a 'working clone', which can be updated frequently
(without much thought), as opposed to 'archive clone', which is archived
less frequently and integrity checks.
Data recovery
With the perspective
that updating clone data files is OK, the first objective should be to
try and copy the latest version of data files from the internal drive to
the clone so when it is swapped in, you will really be back to normal.
The clone is probably already connected to the computer via USB so just
leave it there and leave the internal drive connected too. In other words
physically do nothing (easiest option). Power up changing the boot order
sequence to boot from the clone. The OS running is now Windows files from
the clone drive. From a few tidbids I picked up I think (not having tried
this yet) what Explorer will do is this:
a) Internal disk drive working --- Explorer's c:\ drive will be the
original c:\ drive files read from the internal drive. The older snapshot
of c:\ files on the clone drive will show up in Explorer as a higher letter,
in my case as the f:\ directory.
b) Internal disk drive not working --- Explorer's c:\ drive will be the
snapshot of the c:\ files as of the date the clone was made (or last updated).
Desktop puzzle
However the above scenario omits a crucial detail the desktop. My
tests show that what appears is the original desktop, not the clone date
desktop, which I find surprising. What happens if original desktop is messed
up, doesn't appear, is blank? In fact when I run a test shutting off the
desktop icons (right click desktop backgroun, view, uncleck 'show desktop
icons') and boot from the clone the desktop comes up BLANK. This could
easily happen with a sick Windows, so how then do you run Explorer from
the clone to recover data files from the internal drive? (see below 'Get
to Explorer')
You can't really
run the computer, at least not cleanly, from the clone if the old desktop
comes up. All its shortcuts point to the c:\ drive, which if the internal
drive is functional will be programs on the internal drive. Can you run
programs off the internal drive from Windows running off the clone? I just
don't know, but it sounds risky. I suspect the right procedure is just
try and recover data files, maybe copy over some programs, and then swap
in the internal clone for the ailing internal drive.
Get to Explorer
Here's an
option that might work if you boot from clone and no desktop. Try ctrl-alt-del
to get to Task Manager, under file, new task (run), type 'Explorer'.
(There is also a browse button here that opens Explorer.) When I do this
with a healthy internal drive, Explorer starts and I can see the internal
c:\ drive and clone f:\ drive, so I could do data recovery to the clone.
Unfortunately I can't verify that the Explorer I am runing is really from
the clone's version of Windows, that it would start if Explorer broken
on internal drive Windows.
Explorer c:\ files from which physical drive?
I was initially
puzzled when I booted from the USB clone with the internal hard drive still
in place and working that the clone's version of c:\ files show
up as the f:\ drive, but thinking about this it's probably the most logical
thing for Explorer to do. It makes it clear during data recovery what to
copy to what. If Explorer did the opposite and showed the booting clone's
(old) c:\ files as c:\ and the (newer) internal c:\ files as f:\ it would
be horrible confusing.
My understanding
now is that Explorer will display as c:\ files those from its internal
drive (if present). The files from all external drives, even if the computer
booted from an external drive, will show up as other letters. (If there
are two internal drives, both connected by sata cables I don't know what
happens. There must be some way of designating one as primary and one as
secondary.
Boot time tests
As part of
my check out of the Casper 8 (bootable?) backup, I did boot timing tests.
I suspected boot time was affected by USB devices, so to start I pulled
all USB devices out (drives, printer, and TV tuner). The boot time was
the same with the internal drive and also with the external USB drive selected,
though I don't know yet it is really booting. The plan should be to add
the USB devices back and again time the boot, start with each USB device
alone, then together. I later found in the drive group the internal Seagate
drive was after one of the 2 Tbyte USB drivers, so I fixed that. Boot time:
No USB devices
50 - 55 sec
All USB devides
1 min, 15 - 30 sec
(after setting internal hard drive #1 in HDD group)
With the rearragment
of the boot seequence (F10) (and Easy BCD boot loader in), boot is quite
fast and the weird delay is gone, Restore starts in a few seconds.
Opening HP desktop case
For first
time since I owned this HP Windows 7 computer I opened it up. Not a fun
job, since it sits on floor wedged between my old XP machine and a power
supply for my old HP scanner and with a USB Cannon scanner sitting on top.
Had to move the top scanner and PS. Pulling off the side panel was easy
once you know how. Remove one screw (rear, center, left) grab the sort
of handle next to it and pull back a little (to clear a holding tab) and
the right side panel (as seen from front) just lifts off. I then just tipped
the computer on its side so I didn't have to remove the outside cables,
and it should be fairly easy to close up again.
Fans
First surprise is
I find two (maybe three) large fans inside. I have always considered the
HP whisper quiet, this is one reason I buy HP. Occassionally I hear high
fan noise, so the fans must be variable speed and normally run slow and
quiet. Even with the cover off I can see them running, yet I can barely
hear them. One fan sits on top of the CPU heatsink on the motherboard,
a slightly larger fan cools the case mounted on the lower rear air grate.
I suspect there is a 3rd fan on the grate top rear grate to cool the power
supply, but it is would be inside the PS box and is not visible.
Sata
Yup as expected
the internal Seagate hard drive is a sata type. It has the same two cables
(power cable and sata data cable) that connect up like my external 1 Tbyte
sata drive. The power supply cable is four wire (yel, black, red, black)
that comes from power supply bring in +5V and +12V. The internal sata (serial)
data cable is just like the sata cable that came with kit, a flat small
red cable with distinctive corner shaped polarizing lockings, and it goes
to the motherboard.
**
Yikes, I just found out my cludgy kit power wiring to the clone drive is
very marginal. When I just touch the cable, I get a USB connect sound and
leds flash. The power connector never did seat correctly and is clearly
very marginal!!
Pulling the sata cable
Pulling the
sata (data) cable from the internal hard drive to the motherboard doen't
look easy (no surprise here). Unfortunately with the case open and the
computer laying on its side the outside, visible drive connector is power
supply cable (same orientation as my 1 Tbyte clone drive). The drive sata
connector is inside the power supply connector and not visable with the
limtied line of sight I have with the computer lying on the floor in poor
lighting. Disconnecting and connecting it would be blind, by feel. Disconnecting
the hard drive sata cable at the mother board does not look attractive
either. At least it is visible, but it's on the motherboard and getting
a hand in there to grip it without disturbing the adjacent optical drive
sata cable doesn't look easy, but it is on the outside and might be possible.
So far haven't tried disconnecting the sata cable. I need to figure out
how to make this process simpler to make a clone backup stategy really
work.
One thought
is to buy sata expansion cables on Amazon and put them in and leave them
in. With a longer sata cable containing a connector the clone drive can
much more easily be quickly swapped in and/or the internal drive can be
disconnected and the clone run via USB. I first thought of looping the
sata cable outside the case, so I would not need to open it to quickly
get the computer functional, but this doesn't look practical. For one thing
it means the case side panel cannot be reattached. For another a critical
cable would be outside and subject to damage, and the sata cable is pretty
stiff so it will require a large outside loop. Forget about this.
An inside sata
loop with connector can work. It really only requires that the right side
of the computer be accessible. I know now how to pop off the right side
panel. It would be a good idea to also have on hand a plug-in power brick
(or enclosure) to power the clone disk drive (2A +5V and +12V) and allow
a long sata cable to be connected. This should allow the computer to run
normally since it would have as usual a single drive connected via sata,
but without the hassle of mounting the drive physically in the drive bay.
I have a hard drive brick now, it was part of the kit I bought, but the
power connector is poor and the connection marginal. (Don't know if it
can be fixed.)
Clone drive tests
I can find
nowhere (hours of searching) any discussion of whether or not a USB clone
drive can be changed, except of course by a differential clone update by
the same clone software that created it. I suspect it can be changed a
lot and would still work as a clone. Could it not for exmple have its user
data files updated by Explorer? I don't see why not. I am going to run
some tests.
* F:\windows\explorer.exe
---- Running this brings up Explorer. (I added a shortcut to this f:\drive
explorer on the desktop)
* Copied
above explorer.exe and put it in f:\ root and it runs. Renamed it the f:\
root 'explorer-fulton.exe' and it runs.
* Copied
5 Gbyte video (1 hr Doc Martin) to f:\ drive. It runs in KmPlayer, explorer
on f:\ still runs and a .png image I added post clone is OK.
Conclusion
so far programs on the clone run, and writting files to the clone does
not seem to adversly affect it. A newly added video plays and other images
and programs on f:\ do not seem to have been affected. Nothing vital seems
to have been overwritten. This does not surprise me. It should have a normal
Windows files structure and when written to by Explorer new files should
go into blank sectors.
Could a 2nd drive be mounted inside?
Probably,
though I am not sure this is helpful. I can see where the sata cable from
hard drive plugs into into the mother board. There's a 2nd sata cable (from
the optical drive) plugged in next to it, and adjacent to these two there
appears to be an open sata connector. It is adjacent to the other two,
same size and same corner polarizing. However, getting in there to plug
in a 3rd sata cable looks to be a bitch! There are open power supply cables
bundled up. The complex metal cage with a couple of levers on the side
where the hard drive is mounted (top) has extra space below, but I would
need to find a video or HP article to figure out how to open this up. No
longer are drives just screwed into a simple cage.
Trying to do Windows image backup of clean system (4/4/14)
With a newly
installed version of Windows 7 installed and (now) running well I decided
to give Windows image another try. Also as I wrote above, maybe now
I know the trick to get a USB drive to be recognized. I got smarter and
have made backup of my internal drive easier by not storing captured TV
shows on it. These files are huge and had earlier filled up most of my
700 Gbyte drive. My c:\ drive now has about 50 Gbyres, so the image file
size this time about 1/10th of the 640 Gbyres of the previous image and
correspondingly should take only about 1/10th the time to write.
I shut everything
down, disconnect the clone USB (because the power connector is loose),
restarted and began the clone, and didn't further touch the machine. I
check it after 10 min and it was about 40% done and chugging along, so
it looked like it was only going to take 20-30 minutes. So I go to bed
only to find next morning a big red bar with message 'image failed' , 'device
is not ready. That's it! No click here for details, no log, doesn't recommend
deleting the partially written image file, doesn't even tell you its name
or size so you can be find and delete it, no recommendation to check the
hard drive for errors, nothing! This is Microsoft to a tee. They don't
give a shit. This is not an obscure tech tool, this is the primary image
backup intended to be used by everybody, and this is the help you get when
things go wrong, totally user unfriendly. When I checked, I found this
useless backup file wasting 45 Gbytes of space on my backup #2 USB drive.
Deleted it. I'm going to try it again.
2nd try
Well tried it again
and failed again. I saved it to same 2Tbyte #2 My Book USB drive, this
time during day so I could watch. This time before I started I further
slimmed down c:\ removing 8 Gbytes worth of captured TV shows. Started
at 3:03 pm (it makes a restore point at this time when it starts), OK at
3:20 pm still going, but when I looked at 3:36 pm the file size at 45 Gybtes
was not changing, and a few seconds later I see the message screen go from
green 70% green to 100% red with same error message: image failed, device
not ready. Both times it writes 45 Gbytes to my new My Book 2 Tbyte drive
and stops reporting the USB drive is 'not ready'. (Update --- I found out
45 Gbyte file size is a FAKE. When the image backup starts this size is
immediately shown, it's the expected final size and does not change as
the file is being written.)
Yikes more
backup problems! As usual it's complicated. Is there something wrong with
my new 2Tbyte drive, or is this a problem with Window image backup? This
would be the biggest file ever written to USB WD #2, but I have had no
other indiations that there is any problem with it, and as part of my backup
work this drive has been error checked (by different programs) several
times and always passed.
I am going
to run chkdsk on the drives and do the Windows image backup one more time,
this time saving it to USB WD 2Tbyte drive #1, where the old 600 Gybe image
is of unstable Windows it. Ran two error checks on USB 2Tbyte #2 and no
errors found!
3rd try --- AMD Raid error seemed to trigger write
failure
Image backup
failed again, 3rd time. This time wrote to J;\ drive, WD 2 Tbyte #1. Failed
at same time, same error, but this time I noticed something, a strong clue
to where the problem is. Just about the time the backup failed (about 35
min in), in lower right corner a AMD RaidXpert Error flashed (and of course
disappeared in a few seconds). I have been seeing this error message pop
up occasionally since the new install, but nothing seemed wrong and I am
not using Raid (as far as I know), so I ignored it. At this point I know
nothing about Raid, so I have no clue as to how to fix it. Can't believe
I am using Raid since I have only one hard drive. I have run extensive
HP diagnostics on my whole system and it never reports an error. This says
AMD RaidXpert, so it smells like a deep error, like some CPU function is
switched on that shouldn't be.
PC magazine article on Windows 7 image backup
(2010)
Author says
positive stuff, then I find this: 'It's a little picky about doing image
restores' and he wouldn't use it. Oh, yes a ringing endorsement. Christ,
a backup program that doesn't reliably restore is worse than useless!
RAIDXpert (4/4/14)
Off on another
adventure deep into tech land. My new installation has a problem with AMD
RaidExpert that needs fixing. It is preventing Windows image backup from
writing a 50 Gbyte backup image file to either of my 2 Tbyte USB backup
drives. Surprisingly it shows up when I type 'raid' in the Windows search
box, but up comes a local AMD page that asks for an ID and password.
Online the suggestion is try: admin (lower case) for both ID and password,
and this WORKS. This page has a log list and all it shows are 'warnings'
for the internal Seagate 700 Gbyte drive. The only change I made on this
page is to shut down the notification. Not sure if this is smart as this
give me the clue as to what is wrong.
I can certainly
believe that Windows image is so delicate that it shuts down when it sees
a Raid 'warning', even though the warning is spurious.
Forum postings
"The
RAIDXpert is a remote RAID configuration tool, for changing the RAID level
of the RAID setup connected via SATA 3.0 Gbit/s ports (connected to SB600,
excluding extra SATA 3.0 Gbit/s ports through additional SATA chip on some
motherboard implementations), including RAID 0, RAID 1, and RAID 0+1."
(This seems to have no use to me. My machine doesn't even have USB 3 ports)
I'd just uninstall it says poster.
Little googling
shows this is crazy problem that a lot of HP owners are complaining about.
Raid is only for multiple drives, so it is clearly some sort of setup problem
HP (or Windows has). One poster said he had been getting five or six warning
like this a day for years and as far as he can tell they mean nothing.
I didn't see an expert answer, but there are two ways it can be shutdown
(see below).
1) Msconfig has a list of services. It is shown here running, but on this
page the service can be unchecked and stopped.
2) AMD RaidExpert is a program that can be uninstalled. There are other
more low level looking AMD programs on the list that I wouldn't dare touch.
I did the first
and stopped the service. This is the less risky than uninstall as it can
always be restarted.
RaidXpert forum
http://h30434.www3.hp.com/t5/Desktop-Hardware/AMD-RAIDXpert-Warning-Errors/td-p/342708
4rd image backup try --- fails again (4/414)
I thought
I had it. I thought shuttting down the AMD Raid service would clear this
error, but it made no freaking difference! The write failure occurred exactly
as the previous three times, about 35 min in with same error message that
'device is not ready'. I confirmed before I started that the RaidXpert
service, while still intalled, is not running.
I have another
idea. I downloaded a few days ago 'Advanced USB port monitor' program.
The drives I am writing to are on USB ports. Might it be affecting the
USB ports. The program is not running, but I see it listed (somewhere).
It may either have a service running or perhaps it has installed USB drivers
that are causing problems. I'll work this.
5th image try --- Going to Casper 8 ---- Another fail!
I am giving
Casper at try at writing an image backup file. I selected it do a standard
backup file. (The other option is its own version that it can incrementally
update.) Writing the image file to 2Tbyte drive #2. It is writing
the file now. Format is .vhd, so its probably a standard Windows image
file. Window, which if it ever gone more than 35 min, would probably have
taken a little less than an hour. It looks like Casper is a little slower,
33 Gbytes/hr, so probably an hour and a half or so to write 50 Gbytes.
Shit, this
is really serious. I thought I had a clean system now I find I can't write
47 Gbyte file to USB drives to do an image backup. Casper went for an hour
and 19 min writing 44.4 Gbyte on 2 Tbyte #2 (My Book) and then shutting
down on an I/O error. Unlike Windows it brings up a long list of suggestions
and links to diagnose the problem. The general tone is that this is a serious
disk problem.
The link to
the Windows [ Event Viewer, Custom views, Administrative Events] which
shows a long string of Errors. The errors during this copy are reported
as:
10:27:55
Filter Manager failed to attach to volume '\Device\HarddiskVolume16'.
10:27:55
Filter Manager failed to attach to volume '\Device\HarddiskVolume14'.
10:27:50
Disk -- The device, \Device\Harddisk0\DR0, has a bad block.
9:10:02
Disk -- The device, \Device\Harddisk0\DR0, has a bad block.
8:32:44
Disk -- The device, \Device\Harddisk0\DR0, has a bad block.
6:20:24
Disk -- The device, \Device\Harddisk0\DR0, has a bad block.
Ok, a strong
clue here. Each of the image copies failed with above Disk error (which
preceed the screen image fail message by just a few seconds), and Disk
0 is normally the internal drive (700 Gbyte Seagate). This would explain
why it doesn't matter which software is doing the backup, to which USB
drive being written, and why the failure occurs at about the same point.
There's a bad block on the internal Seagate that can't be read!
So what do I do now?
* (update
-- Nope, neither Windows (grayed out) nor Casper (geometery not supported)
allow the USB clone to be the source drive.
Make an image
backup from the f:\ clone! Took me a while to think of this, but if the
f:\ clone is OK (?), it is clearly different hardware so I should be able
to make an image clone from it. The only possible flaw in this ointment
is that I have been playing with it writing and deleting file from it using
Exploer. It is worth a try, however, I will need another hard drive to
test out the image.
6th image try (post chkdsk) -- Anothr fail
* (update --- ran
chkdsk on internal Seagate 700 Gbyte overnight, with check mark for 'scan
and try and recover bad block'. Windows image backup is running now, we
will see if it throws an error in 15 min. It did, chkdsk did not help.
One thought
is do a full sector disk scan with attempt at recovering bad sectors
using either chkdsk or maybe HP disk utility. This will need to run overnight
as it takes hours. (No hint in error messages as to which file has the
bad block.)
Another thought
is 1/3rd of the hard drive appears to be useless stuff, it did not get
copied to the clone, see JdiskReport. It could be the bad block is here.
Maybe this stuff can be moved or deleted.
* Much more
risky is first do an another disk clone to the 1 Tbyte drive (which I have
been modifying) and which of course my fail and will have some errors.
Then format and/or scan the Seagate internal to try and clean out the bad
sector.
** Less risky
but more difficult would be swap in the new clone (or existing clone as
a new clone may fail!) drive permanently and use the 700 Gybe as an outside
clone backup. This makes sense in that the old Seagate has a lot of hours
and hard use on it and it is probably smart with the case now open to swap
in a new drive.
** For a drive
swap to work I need to buy $100 worth of stuff:
-- buy another internal sate drive (important if I am going to retire or
can't trust the internal 700 Gbyte Seagate)
An important issue is sata speed (sata I. 1.5 G, sata II, 3 G, sata III,
6 G).
Bios shows sata 1. The Seagate Barruda I have is sata
III (6 G) backward compatible with sata II (3 G), but not sata I.
This is probably why it is not recognized, however, it can be slowed down
to sata I by adding a jumper.
-- buy one (or two) metal enclosures for single internal 3.5" sata drive.
These include a external power supply brick (12V) and a sata to USB translator,
so essentially for $20 it is the same two components now running the 1
Tybe Seagate on the floor, but in a metal box. Includes a power switch
but unfortunately no led activity light. Choices are USB 3 or 2, check
tthe the max drive capacity is at least 2 Tbytes.
-- No need, 18" sata cable came with 1 Tbyte Seagate drive
18" Sata cable so I can try a clone drive without mounting it inside (using
external power)
-- Nope, dual docking stations aren't good long term. Internal drives have
exposed PC boards, they need to be in an enclosure to keep the dust off.
Dual enclosures don't made sense either. All (two) of them spin down the
drives after 5 min of inactivity, and this cannot be turned off! The problem
is heat, even though some of them have fans. I read 7,200 RPM drive (like
new 1 Tbyte Seagate) put out more heat than the 5,400 RMP types.work either.
buy a dual sata dock (with cloning)
Researching how to image (or clone) with bad blocks
Here is Microsoft
guy responding to this question on a forum:
"System
image backup is resilient to bad sectors (we would not backup the bad sectors
but try to backup the rest). File backup is not. Can you run chkdsk on
the volume before attempting to backup? Ideally if bad sectors are determined
and marked before backup begins, backup would not try to read them and
hence it should succeed." (poster says he ran chkdsk and the backup still
failed) Other Microsoft experts say the opposite, "According to Minasi,
the image backup program in Windows 7 has no option to skip over bad sectors."
"System image
backup supports only backing up NTFS volumes. Note that this is not an
imaging solution like (Norton) Ghost. It is still a backup solution (we
create a shadow copy of the volume before backing up and backup
only the
used blocks from the source). Since the backup can be used
to restore back your system (Bare Metal Recovery), it is termed as system
image."
Image backup
failure details are in this log: %windir%\Logs\WindowsBackup\*.etl
Doubts on EasyBCD dual boot
Looking at the disk
error log the most errors and (all?) bad block error have been in last
few day, which is after I installed EasyBCD on 3/31/14. Maybe I should
uninstall it, or at least switch the msconfig boot option to normal.
Swapping in the clone (4/5/14)
Clone did
not boot --- message on screen is 'no operating system'.
Let me describe
my little misadventures in physically trying to swap in the clone. I am
working with the computer on its side on floor in a not well let area.
I have limited foot room, am bending over, and with my bifocals I cannot
see well what I am doing (too far away for close up lens, but too close
for distance lens).
First mistake:
HP sata connector are not like my 18" cable that came with new internal
drive, but I don't know this. My clone sata cable is simple straight in
plug (with corner polarizing key like all sata connectors), but the HP
sata connector I later find out have a little side latch that needs to
be pressed in to release the connector. I get it out, but I have pulled
and rocked the motherboard mounted connector awful hard.
The
drive sata connector is a top side mounted mothboard connector. Even though
things are still working I'm really worried that I might have affected
the reliability of the computer by loosening or damaging the electrical
connections between the connector and motherboard.
I plug in the
18" cable from the new 1 Tbyte lying on floor (powered by brick) to where
the DVD had been (not knowing this) and hit the power button. It boots,
everythig looks normal, I have very pleased the clone goes in so smoothly,
too smoothly. I soon realized that even changes made this morning and just
a few minutes ago when Windows updated are showing up. The clone is a week
or so old. And I get messages that a drive (clone) has been detected but
it needs to be formatted. This is weird.
Second mistake:
I now realized that I have pulled the wrong HP sata cable, the DVD cable,
and plugged in the clone there, so there were now two internal drives.
Somehow I just assumed the top cage with the fancy latches was the hard
drive and the box below was the DVD drive. Of course, if I had given it
two seconds thought it would have been clear this is wrong. The DVD opening
is at the top of the computer, the Seagate hard drive has to be the box
(marked Seagate!) in a cage at the bottom. So I pull the 2nd sata cable,
again way too hard, because I don't really know what to press or how to
press, and plug the 18" sata cable there.
Clone is now
connected to where the old drive was with both HP sata connectors loose.
I power up and now I get the message at the beginning of boot, 'no operating
system'. So I pull the clone cable out of the motherboard and put the internal
hard drive cable back where it was. I take the 18" cable and plug it into
the sata to USB converter, the other end alread connected to the drive.
I pray a little, and press the power button. The computer boots normally,
so the motherboard hard drive connector and hard drive cable are OK.
I should be
back to normal, but I am not. The two directories from the clone USB drive
are missing. This is where I am now. The only hardware differnece is that
I am using the 18" sata cable vs the 6" corner sata cable to connect the
1 Tbyte drive to the sata-USB converter. Is the 18" cable bad? It didn't
take any abuse, it was the HP cable and motherboard sata connectors that
took the abuse. I checked and the 18" cable is secure at both end. I changed
back the clone to the original 6" right angle cable and still no f:\ drive.
I am now worried that plugging in the drive as a 2nd drive has damaged
it. It apparently as a 2nd drive could not be read as I had a popup window
saying it needed to be formatted, which I of course cancelled.
Now back to
exact same configuration as this morning, still no f:\ drive, but when
I go into disk configuration screen there it is, all three partitions and
all healthy. What has happened is that the clone partitions have lost their
letter assignments. I suspect if I reassign them letters I will be back
to normal (yup), but it brings up the question does the clone need to be
set up before it goes in? It went in with assigned letter of f:\ and system
marked as active. I could select it as a dual boot and disk configuration
was telling me that the OS was running from the clone. It was my understanding
that the system when only a single drive is present would just assign letters
c:\ and d:\. So with this info it is likely the 18" cable is OK, but I
need to put it back to confirm it.
So what's the problem with the clone?
From a YouTube
video (hard drive won't boot) I picked up a couple of ideas: Least likely
is that I did not have the DVD plugged in the clone, but I think we can
rule this out, because the machine booted when I pulled the internal hard
drive in with the DVD sata cable still out and no problem. Much more worrying
is speed mismatch the the motherboard sata and the drive sata. There is
sata I (1.5 Ghz), sata II (3 Ghz), and sata III (6 Ghz). He said you can
plug in a sata II hard drive to a sata I motherboard and it will (or can)
not be recognized! In other words the question is can a new drive be too
fast for an older motherboard? Is sata backward compatible, for example
will a drive start at sata I speed and then upshift? Is there some way
to slow down a new, faster sata drive to be compatible with an older motherboard?
He goes on to praise the usefullness of sata-USB adoptor. One advantage
he says is fast sata drive that is not recognized when pugged into a sata
connector will work using sata-UBS adoptor.
I had forgotten
that my original hope was that I could just disconnect the internal hard
drive and boot from the USB clone. I haven't tried this. For this test
I can disconnect the sata connector at the internal drive, or even pull
the power conector from the internal drive.
Damn --- Disconnected
the power cable from internal drive and connected clone via USB. It will
not boot. Played with bios order putting it first and still no boot. It
system partiion is thera and marked 'active'. Don't understand. With the
internal hard drive inplace disk configuration tells me the OS has come
from the USB clone.
For starters
I have no idea what the sata speed is on my computer (p6510f). I have the
box for the Seagate Barracuda drive (bought 2012), and it is a 6Gbyes/sec
(sata 3) but says it is backward compatible with 3 Gbyte/sec (sata 2).
Unfortunately sata in the bios is shown as sata 1. However, the Barracuda
manual shows with a jumper plug (short outer two pins) it can be slowed
to sata 1 (1.5 Gbytes/sec). The drive can also be connected using
sata cards PCExxxx, but that's another ball game.
Idea about why clone not recognized
There are
two issues here:
1) Why didn't the computer boot from the clone via USB when power to internal
drive removed (sata in). (no idea)
2) Why was drive not found when when plugged in via sata (alone)
I now have
a theory for #2. There is a sata speed mismatch problem.
-- 1 Tbyte Seagate Barracuda drive I have is 6 Gb/sec (sata III) and backward
compatible to 3 Gb/sec (sata II). It can, however, be slowed to 1.5 Gbyte
(sata I) by putting on a jumper to a jumper block (now open).
-- HP p6510f spec on HP site shows its motherboard sata speed is 3 Gb/sec,
which is sata II. However, I discovered a bios setting for sata I with
options Enabled/Disabled. I found it enabled. This seems to indicate that
motherboard sata rate can be doubled to 3 Gb/sec. Why it is slowed is TBD.
I don't have the internal Seagate specs or the DVD specs. Either of these
might be sata 1, or it might just be slowed from more reliability.
-- Seagate ST3750528AS. HP spec: 7,200 rmp, 750 Gbyte, sata. Amazingly
this drive is still sold (Amazon): $105 for 750 Gbyte, but $68 for 1.5
Tbyte. It is in fact a sata 2 drive (3 Gb/sec) with 32 Mbyte cash. My (1
Tbyte clone drive is just a later model of the Seagate Baraccuda with double
transfer speed (sata III, 6 Gb/sec, 64 Mbyte cache?))
p6510f hardware
Six sata connectors
(hard drive, DVD, 4 empty)
Spec says internal sata connectors: sata 1, sata 2 (Does this mean
some are sata 1, some sata 2?) Yikes, no info on which are which!
This probably means sata 3 is not supported. (sata 3 drives auto downshift
to sata 2 speed)
Four memory
slots (2 occupied, 2 empty)
System info says I have 4 Gbytes installed, so I must have two 2 Gbyte
modules installed
Speed: PC3-10600 MB/sec
PC Tools gives (by far) the most detailed memory spec
2048 MB DDR3-SDRAM (1333 Mhz) (manuf 2010)
Micron Technology part # 16JTF25664AZ-1G4F1
Motherboard spec:
Four DDR3 DIMM (240-pin) sockets
Supports 1 GB, 2 GB, and 4 GB DDR3 DIMMs per socket
Memory upgrade info
Non-ECC memory only, unbuffered
*DDR3-1333 modules run at 1066 MHz if three or more modules are installed.
Up to 16 GB for 64 bit OS (4 x 4 Gb)
No info on what sizes can be mixed
Amazon sells a well reviewed memory modules from Crucial of this type
Crucial CT25664BA1339 2GB 240-PIN PC3-10600 DIMM DDR3 Memory Module
(23 + free shipping)
Four empty
expansion slots (one long, 3 very short)
One PCI Express x16 (Gen 2.0)
Three PCI-Express x1 (Gen 2.0)
One PCI Express x1 minicard socket (Gen 2.0)
Motherboard has
a Firewire (1394a) connector
Macrium 7th image test
I now have
run both chkdsk full scan and HP full scan on the internal Seagate drive.
(didn't see chkdsk result, but passed all HP tests). I am trying different
image software, some may be less sensitive to bad blocks. 7th test image
is being written with Macrium. (The disk included with the Seagate drive
has their cline software. Should look at that.) There is also the issue
of image format, it's possible this may make a difference. Macrium wanted
default to .xml, but I unclicked it. Has a type I don't recognize. It's
been going 25 min now and is half done (for all three partitions). System
partition quick and done, and how halfway through c:\ partition, d:\partition
is done last.
Excluded
"Data that
is recognized as deleted files and unused partition areas are not recorded
into the image. Windows pagefiles and hibernation file data are also excluded
from a Backup Disk Image because they contain temporary information which
is useless to keep and restore." (Macrium) Casper makes the same omision
when it clones. This cuts about 15 Gbytes from the image
So far, so good.
Macrium at 50 min is now 100% through the c:\ partition and 99% total and
still going, 96% through d:\ partition, just 1 more minute. Curiously K:\
#2 drive shows 0 bytes, unlike Casper where the write progress can be monitored.
Macrium Success (it doesn't shut down on bad block
errors)
Macrium image
report: Completed successfully in 53 min! I now find the image written
on My Book #2 as 58 Gbyte files with a strange type ('.mrimg'), clearly
this is a propriatry format, .mrimg probably stands for 'mr' (Macrium)
'img' (image).
Looks to me
like the Macrium is just ignoring the bad block disk errors that are shutting
down Windows and Casper. I see a bunch of bland block disk errors during
each of the Macrium images of the internal drive. Interestingly during
imaging of the clone (also to My Book #2) there are NO disk errors (there
are a few other errors, but no Disk errors). So it's pretty clear the 750
Gbyte drive has error that are not mapped out and that chkdsk can't fix.
This could be why Windows got unstable. It's a strong argument for swapping
in the clone permanently as prime internal drive.
k:\Macrium image OK 4-5-14\7th image test-00-00.mrimg
Having Macrium
do it again. Suceeded again. This time accepted default of .XML format.
I don't understand what they are doing. They ask me for a destination folder
(same folder on #2 My Book, then they recommend that the .xml files be
stored on c:\ drive (what?) (c:\user\don.'my documents\reflect\my backup.xml).
Looks like it is going to put another .mrimg file on #2 My book. Screen
says the .xml can be doubled clicked to run it. .xml are human readable
script files.
Unlike Casper
or Windows Macrium will image the clone (old 3-31-14), so I am doing that
now.
Here's the .xml header
<!--
-->
<!--
BDF v2.0.0 Image and backup definition file for Macrium Reflect v5.0 -->
<!--
-->
<!-- This file is a template XML to enable a Reflect backup or Image
to be initiated from VB Script or an -->
<!-- MSDOS batch file. -->
<!--
Simply modify this file if required and pass the file name as a parameter
to reflect.exe. -->
Next steps
Ok Macrium
has sucessfully done three images all to My Book #2: 2 of internal Seagate
(each 58 Gbyte) and 1 of clone (48 Gbyte) in propriatary Macrium format.
-- Change bios
sata setting: Disable Sata 1 (who knows if this affects all or only some
sata connectors)
Nope, no boot with internal drive when sata1 Disabled.
-- To see
if I can get clone recognized via sata it is probably conservative to just
plug it into an open connector. This is how Seagate recommends you go about
cloning a drive. Plug it in as 2nd drive and run Seagate disk with clone
software. (It's a bitch to get plugged in to the open connectors. Need
to map how they are keyed.
Clone and image progress (4/6/14)
I was getting
really worried all my hard work in last month renstalling Windows and all
my programs on my old internal hard disk was falling apart. I have been
really stymied in the last few days trying to make backup images. Seven
attempts in a row failed using Windows and Casper image backup to various
backup drives. They go 30-60 min and exit with error message 'device not
ready'. I can see with Windows event viewer several disk errors (bad block
on disk0) being reported, and this causes them to quit. Online I find experts
complaining that most image backup programs fail too easily when hitting
bad sectors, they almost none offer the option to skip over bad sectors.
What is especially galling is there was no hint from any of these programs
or event viewer where the bad blocks are, not even what disk they are on
(though common sense would say it's probably the source disk). Full disk
and repair scans with both Chkdsk and HP utility did not fix the bad blocks.
Also neither program would allow imaging of my first clone backup.
Progress -- Macrium image rides over bad blocks
Macrium image
appears to be more robust to bad blocks, it did not stop, and reported
success. It twice made an image of the internal 700 Gybe drive without
complaining, and it also allowed the first clone (via USB) to be imaged
and that went fine. With event viewer I could see a few disk errors had
been reported when imaging the internal 700 Gbyte drive, but no disk errors
reading off the new 1 Tbyte Seagate where the clone is.
More progress -- Casper clone identifies files with
bad blocks
More progress is
shown below. Finally information on what file contains the bad blocks!
With a Macrium image made of both the internal and clone drives last night
I had Casper reclone the internal drive (from scratch, not an differential
backup). It went to completion riding over bad blocks and in its report
it identifies as 'Exceptions' the file(s) it could not copy. Yea!
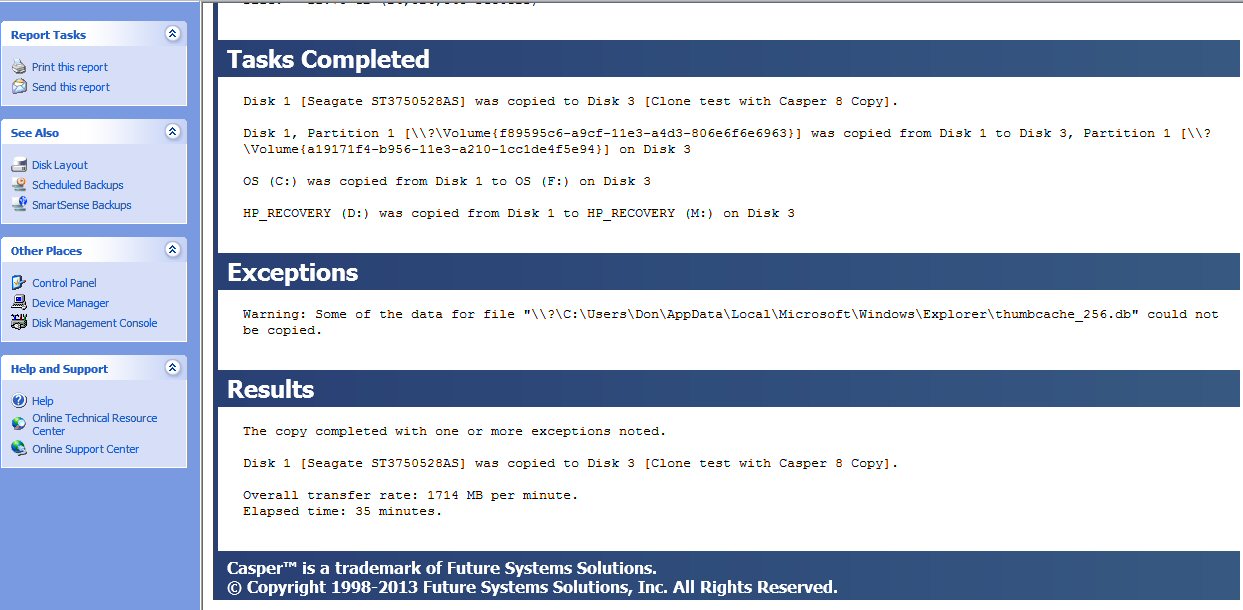
The file (above)
that Casper clone had trouble with is not an important file and can be
deleted. It is just a speedup cache of thumbnail images used to speedup
an Explorer directory in image mode with lots of picture images. Anyway
I copied the file first with Explorer, then deleted the original. This
should recover what is possible and have made the bad blocks unused.
More, more progress --- SeaTools for Dos 'repairs'
bad blocks
Hopefully
two nice tools from Seagate (only for Seagate drives) have cleaned up my
old Seagate hard drive. 'SeaTools for Window' long test verified that I
do indeed have bad blocks on my 700 Gybe internal drive. However, it can't
repair bad blocks from Windows and recommended I run SeaGate for DOS that
can. This required downloading an ISO file which is bootable and burning
it to DVD. (They said Windows 7 could do this, but I tried and it just
copied the ISO file to disk without expanding it! PowerISO did the job
nicely.) The DVD boots and loads the dos program into ram, the hard drive
is not being used can be worked on. Long test took five hours and it found
50 to 100 bad blocks. I selected 'repair all' and SeaTools for DOS then
reported post repair the long test had been PASSED. So hopefully the bad
blocks have been found and marked off. Windows boots up OK, post repair.
Next step run
a Windows image and another Casper clone. This should tell me if the old
Seagate drive has been cleaned up.
I put this
nice Seagate recovery DVD in my recovery packet. I may need to run it again
if the drive develops more bad sectors. It's also an indication I need
to figure out how to get the new Seagate swapped in as my regular internal
drive.
(Later comment)
With more
usage my opinion of the Seagate tools changed. Seagate for Window main
screen with multiple drives is clearly messed up, and it reports good drives
are bad. Seagate DOS tool, while it worked initially saving my ass by fixing
bod blocks long enough for me to get a clone, it later would crash on overnight
runs. A web search shows posters have been complaining for years about
Seagate tools.
Windows image succceds (4/7/14)
With bad blocks
removed by SeaGate Dos tool a Windows image to J:\ drive succeeded (1 hr).
A check of event viewer during the image write show no disk errors, unlike
before where there was always half dozen or so.
Unfortunately
the image will need to be deleted because my system is not clean. I may
have picked up a rootkit (maybe from PowerISO download) called: Sendori.
Maybe I should try a system restore, I don't think it can bring back the
bad blocks and I don't know how this will affect it. I've checked a lot
of my programs and most everything works, EXCEPT, Opera is throwing up
repeated security windows. I first though this was from the bad blocks
removed, but all the windows say illegal site certificates (for Comcast,
google, etc) are all signed by Sendori! A check online shows it is likely
a rootkit.
Sendori (or Alureon) rootkit symptoms
One poster said
to check disk configuration and if you can't see your disks you are not
infected. Well I have used this Windows asset repeatedly and the morning
it doesn't work, when I hit 'Computer management' it doesn't come up.
1) Open a COMMAND PROMPT with Windows-R: Write
cmd and press enter.
Open DISKPART: In a new line window write a command diskpart.
In a new prompt enter lis dis. Your computer is infected
with rootkit Alureon if it remains empty. If the disks display, it is not.
(They display)
2) From the Computer Management pane, launch DISK MANAGEMENT.
Everything is fine if it shows disks. If it does not
show disks, it means the system is infected with this rootkit. (didn't
show, now it does) http://answers.microsoft.com/en-us/protect/forum/protect_other-protect_scanning/how-to-remove-sendori-malware/a35e5c4b-63c5-4a59-abab-669a76717ed9
My Opera weirdnesses and the fix
On Mon morning the
Sendori' problem I had was with Opera. It was basically unuseable, because
with every site access or (5 min) Comcast mail check it would throw up
site security warning asking if I would approve or reject the site certificate
showing every site was signed by Senori. Very weird. Agent Ransack shows
at 3:22Am (4/7/14) when I installed Power ISO to burn the Seagate DOS utility
at the same exact time a crap package called PureLeads was installed too.
Both of these programs could be uninstalled, so before I went to System
Restore to roll back the system, I tried the uninstall. Surprisingly this
seems to have worked. No more site security warnings since, and the poster
test for Sendori (above) says no rootkit. Agent Ransack and two virus searches
come up clean., so it looks like I am rid of this recent pest.
Footnote: I
soon found I still had an Opera problem, most sites were OK, but
Google would not come up! I quickly fixed it. An hour earlier while trying
to trace down the site security warning, I had made a change to Opera security
setting. Apparently Google didn't like this and when I changed it back
Google was happy and Opera was OK. I have zero understanding of browser
security, this is deep in weeds. In Opera preferences, advanced, security,
security protocols the default is check mark on the first two (of four):
Enable SSL 3 and Enable TLS 1 (TLS 1.1 and TLS 1.2 are not checked). When
I removed the check mark on TLS 1, Google would not load, when I put it
back everything was OK.
Finally a stable system? --- Yikes, more bad blocks!
Thinking I
finally had a stable sytem, bad disk blocks marked, and recently downloaded
pests clear out. But when I went to make a Window image Mon morning, I
had an un happy surprise, it failed. Same as before 'device not ready'
and the event viewer showed the same back block disk error. Clearly my
old Seagate 700 Gbyte drive is not in good shape and is failing. Less than
a day have a five hour low level Seagate DOS scan and passing, it has new
bad blocks. It may be the reason Windows went bad a month ago.
So I had Casper
do an update to my clone drive (via USB) knowing that would both give me
a backup and would identify the file with the bad block(s). It found bad
blocks only in this one file: C:\Users\Don\AppData\Local\Opera\Opera x64\vps\0009\wb.vx"
(who knows what this does). I am having Macrium, which will skip over bad
blocks do another image backup. Well not this time, it went about an hour
and aborted reporting bad blocks (in c:\ partition).
How to manage two hard drives
To me the
obvious best thing to do for a robust system is have a clone drive (or
two) that can be easily switched in. By easily I don't mean opening
the case and physically swapping drive cables on the motherboard!
What I want is two drives inside, where I can electrically pick which one
is active or primary. Note a Raid configuration, but two separate drive
where I can decide when to do a clone of the primary. Where I could ideally
electrically, maybe with a dual boot, swap in the clone for the primary.
I have been reading about computers with two drives and don't find this,
which I find totally amazing. One poster to a forum asked for something
like I want and one reply suggested hard drive external in a 'tray' or
external drives connected via esata. What is esata?
Esata solution?
I had noticed
esata connectors on some of the enclosures for internal drives on Amazon,
but did not know what it was for. Clearly from the name it must be related
to 'sata' which is the universal serial data cable used to connect hard
drives and DVD players to the motherboard. Wikipedia (esata) has this:
SATA
is a computer bus interface for connecting host bus adapters to mass storage
devices such as hard disk drives and optical drives. eSATA is a SATA connector
accessible from outside the computer, to provide a signal (but not
power) connection for external storage devices.
eSATAp combines
the functionality of an eSATA and a USB port, and a source of power in
a single connector. eSATAp can supply power at 5 V and 12 V.
On a desktop
computer the port is simply a connector, usually mounted on a bracket at
the back accessible from outside the machine, connected to motherboard
sources of SATA, USB, and power at 5 V and 12 V. No change is required
to drivers, registry or BIOS settings and the USB support is independent
of the SATA connection.
eSATAp throughput
is necessarily the same as SATA, and USB throughput is that of the USB
version supported by the port (typically USB 3.0 or 2.0). eSATAp ports
(bracket versions) can run at a theoretical maximum of 6 Gbit/s (bits per
sec) and are backwards compatible with devices such as eSATA 3 Gbit/s (SATA
Revision 2) and also at 1.5 Gbit/s (SATA Revision 1).
Well that sounds
promising. But what kind of speed can it have with two connectors in the
path? The sata cable clock rates are really, really high, sata 3 (6 Gb/sec)
uses a 6 Gbyte clock frequency with a period of 166 psec! (confirmed
this from an Altera IC spec). Wikipedia show esata data rates the same
as sata rates. (Really) Esata uses a combo connector that functions both
as an Esata and USB connector. Also interesting. It's new, only 2008, and
sort of a bastard child as neither the USB nor Sata standards people have
really adopted it. It is however, being built into some new computer, including
major builder HP, and it is on some external enclosures for sata drive.
So on a quick
look I find this. A quasi-standard has developed, supported in some of
the inexpensive hard drive enclosures on Amazon, to port the sata to outside
the computer. HP is reportedly including esata in some new machines. Since
my machine has no esata port, it would require adding a card. Of course,
I could add probably add a card to get USB 3 too, and it has almost the
same speed as sata 3. Maybe combo cards are available. An Amazon search
shows cards for 30-40 are available, but available too for 6-7 are simple
brackets. These are nothing more than a back panel bracket with one (or
two) sata connectors that internally connect to cables that just plug into
sata connector on motherboard (I have three open). In other words it just
in a neat way brings the sata port to the outside of the computer, where
a cable can then be connected to an esata connector on an external hard
drive enclosure. While it would allow drives to be connected and disconnected
by hand from outside, it would be somewhat inconvenient in that it due
to short cable lenghts it would be a connection at the back of the PC.
Most Amazon
reviewers report the esata brackets work. They can hook up external drives,
they show up in bios and work OK. One reviewer suggested it was better
to use a sata 2 hard drive externally (twice the clock period compared
to sata 3), and this makes sense to me. This bracket is just a neater version
of the expansion sata cables I was going to hang out of the drive. The
problem I see is length. The max sata cable length (sans connector) is
1 meter and to run the cable from the hard drive in the front all the way
out the back and to the front of the motherboard where the sata connectors
are all located could easily (with slack) exceed 1 m. (Maybe I could find
a power bracket and route my internal har drive through an open bracket
and back in. The externally I could kill the power to the internal hard
drive.)
Here's from
Wikipedia are the (theoretical speeds):
SATA Rev1:
1.5 Gbit/s,
SATA Rev2:
3 Gbit/s,
SATA Rev3:
6 Gbit/s,
USB 2.0:
480 Mbit/s,
USB 3.0:
5 Gbit/s
Esata controller card solution?
What I want
to do looks like it can be acomplished with 2 port, 5 Gb/sec esata card.
This inexpensive (32) small card looks like it would fit ( PCI Express,
and I have three of these open. It would in effect allow me to move the
internal hard drive outside the computer. I would have two sata drives
in enclosures with esata ports, one primary and one clone secondary. When
I wanted to run on the clone secondary, I would just pull the plug on the
primary. Reviewers report better speed with the card that USB. One issue
would be that I might need a power strip to power the computer and the
two external hard drives on/off, otherwise the hard drives will spin all
the time (maybe!).
Another attractive
option is a cheap (20) PCI Express card (700 reviews) that adds four USB
3.0 ports to the computer. USB 3 (theoretically) has almost the same speed
as a sata 3 (6 Gb/sec), about x10 faster than USB 2, but file transfer
timing tests show that in practice it is often more like x2 the speed of
USB 2.
Seatools for DOS repair (2nd time) (4/8/14)
For 2nd night
in a row I did a repair scan of the internal drive. About the same result
as before, about 200 bad sectors, mostly together and close to where the
bulk of the failure were earlier. This time it fails a short test, but
'Passed long test with repairs'. Clearly I have a bad region on the disk
and then a few scattered bad sectors. I have no idea if my current 50 Gbytes
of data, only about 7% of the space on 700 Gbye drive, is anywhere near
the bad area. Clearly what would be nice is a utility to move the working
area of a drive. I should look at Seagate and WD to see if anything like
this exists.
Boots up OK
and on a quick look system is clean and OK. My goal now is not to rescue
this drive, but simply to get (at least) two backups, an image and clone,
to both use for a new internal drive and to rescue my month of work rebuilding
my system (March 2014) and for future. Now to get some clean images with
everything OK:
Clean images! (4/8/14)
1) Windows
image to K:\ #2, File format: .vhd, successful (40 min) --- System
OK, clean, 4/8/14
Note, top level directory, WindowsImageBackup, has older date 4/5/14, but
subdirectory (Windows7_HP) is dated 4/8/14. Besides the three image files
for
the three partitions, there are a whole bunch of .xml file (in same directory)
whose purpose I don't understand yet. 59 Gbyes total. A day earlier Windows
image produced only two .vhd files and no. xml files. I don't understand
why the differences, as there are no option selections in a Windows backup,
the three partitions of the internal drive being already pre-checked.
2) Macrium
image to K:\ #2, File format: .mring (propriatary)
successful (46 min, uncompressed selected) --- System OK, clean, 4/8/14
Produces a single 53 Gbyte file in propriatary format. Macrium also has
the ability to image the clone (via USB), which other image programs grey
out. Macrium makes .xml files too (option), but it puts them in a different
place: c:\users\don\documents\reflect. [Header in the Macrium .xml file:
<!-- -->
<!-- BDF v2.0.0 Image and backup definition file for
Macrium Reflect v5.0 -->
<!-- -->
<!-- This file is a template XML to enable a Reflect
backup or Image to be initiated from VB Script or an -->
<!-- MSDOS batch file. -->
<!-- Simply modify this file if required and pass
the file name as a parameter to reflect.exe. -->
3) Casper image
to J:\ #1, File format: .vhd (selected 'standard' file), successful
(2 hr, 5 min) --- System OK, clean, 4/8/14
Selected standard format. Casper writes one .vhd file (56 Gbyte) for all
three partitions, whereas Windows image writes three .vhd files, one for
each of the three partitions on the internal drive (System, c:\ and d:\
recover). Casper is slow, about 2 hr, vs 40-50 min for Windows and Micrium
images. I don't like in the Casper progress window that it does not give
the path of the destination drive, so you cannot check if you are writing
to the right USB backup drive. Casper doesn't write any .xml files. In
fact unlike Windows image which writes a whole bunch of file on every image
backup, Casper only writes this single file (clean). Can Windows use this
Casper .vhd file to recover? Who knows, need to ask Casper this.
(Update) I
verified that Casper can both create and write an image to a single
partition without affecting other partitions on the same physical hard
drive. Casper is thus far superior for image backups that Windows image
backup, which is horribly documented and I suspect strongly that its restore
process wipes all partitions to the physical disk it is restoring
to.
Computer hard drive architectures
There are
two high speed serial buses in use to connect hard drives to computer motherboards:
USB and sata. USB is well standardized, hot plugable, currently with two
speeds, and is used only externally. Sata is well standardized,
currently with two speeds, hot pluggable (sort of) and used internally.
In the last few years in a semi-standardized way the sata bus has become
accessible outside the computer case.
The external
sata connector is called esata and is data only. (There is also
a variant called something like esatap that add power pins for feeding
+5V and +12V from the computer to the drive.) In its simplest form the
esata connector, physically on an expansion bracket, is just plugged into
a sata connector on the motherboard with no buffering. This
kind of gives me the willies, but is cheap, and from data signal integrity
viewpoint it looks risky given the very high clock rates. However esata
cables are sold at 3 ft and 6 ft lengths (plus another foot or so inside),
and I read they work. Better (probably) are plug in cards that provide
sata signals thorough an esata connector on the mounting bracket. Physically
a sata cable is two data pairs with a ground between and ground on each
edge for a total of seven pins. In other words the data paths are each
a (flat) transmission line composed of two side by side wires with a ground
wire on either side. The signal quality issue depends on the impedance
mismatch introduced by the esata connector, and note with a simple bracket
type esata connector there are two esata connectors in the path
from the motherboard to an internal type sata drive when mounted in an
outside enclosure.
Nevertheless
I am buying the hardware to try running a drive outside via esata. I paid
$10 extra to get a 3.5" drive enclosure that has both an esata port and
a USB 3 port. I am also buying a card to add four USB 3 ports to my computer.
One of my 2 Tbyte data drives has a USB 3 output. USB 3 for a drive would
probably be more reliable, but it is not at all clear that this configuration
is bootable. I had my bootable clone drive connected via a sata-USB 2 converter
for ten days and was not able to get it to boot off the USB drive. Well,
there's a caveat, msconfig would tell me it booted from the clone, but
it mattered little since the clone desktop did not appear nor would the
clone files show up as c:\.
There are three
basic internal/external drive combinations (below) combined with three
ways to control sequencing: two in bios and EasyBCD boot utility. This
is a lot of boot options, and from my reading it's pretty much a black
art on which combinations work and how to set them up. Poster after poster
complains that he added a 2nd drive to his computer and he can't get the
computer to either recognized it or boot from it, and 'solutions' are generally
simplistic or incomplete. Nowhere have I seen a good overview of all the
options.
But by doing
a whole lot testing, a lot of boots of various combinations systematically,
I have made some progress. When I opened the computer and disconnected
power to the internal drive and plugged in the clone to an open sata connector
on motherboard, the clone booted with its files and desktop. This confirms
that it had been bootable during my failed USB booting tests.
1) Two sata (or esata) drives --- Obviously
with all drives on sata (or esata), both drive could be outside, or one
inside and one outside, because the computer can't tell the difference.
The computer thinks it has two internal drives. If both are bootable
and both outside, obviously one that goes bad could just be disconnected
by pulling its cable.
The tricky
part was figuring if it was possible to mount them both inside a closed
case and to switch between them. Yes it is, and I figured out two ways
to do this. First way is switch the power of individual drives on/off with
a back panel switches. Second was the proper way to set up a dual boot
using boot editor/utility EasyBCD. This option allows the controlling drive
(with its desktop and programs) to be selected at boot while the non-selected
drive is still visiable as a data drive (f:\).
Internal sata clone drive with separate drive
switched power
My first success
was to show that with both the internal and clone drive both connected
to sata I could switch from one to the other just by switching their power
connectors, i.e. powering just one at a time. I have bought (ebay) a rear
panel bank of switches that will do just this for drives mounted internally.
It is just a bank of four simple (very low Ron) fet switches controlled
by pushbuttons. This provides one way that a clone hard drives could be
mounted inside and work as a clone. Power both drives and do the cloning
(only 20 min for 50 Gbytes over sata). Power off the clone so it is isolated.
If the main hard drive goes down, switch off its power, and switch on the
power to the clone.
Clone drive switched in via dual boot (EasyBCD)
After systematically
testing a bunch of boot sequence options, I found one that works! This
is a nice option in that no hardware change is required to switch
over to the clone drive or to do the cloning. You just select which of
two internal bootable Windows drives internally you want ot be in control,
i.e. to bring up its desktop and its programs as the c:\ drive. (A boot
sequence option can be combined with power switches to take the clone off
line to protect it from being overwritten.)
2) Two USB drives --- TBD
3) One sata drive (internal) and one
USB drive --- This is a common configuration. For weeks now one of my external
USB drives is an internal style sata drive externally powered and connected
to the USB port through a (dandy) sata-to-USB converter, and I have used
this drive as a clone drive. I have EasyBCD setup to allow me to boot from
this USB clone and Windows built-in msconfig.exe tells me that in fact
it supplies the OS. However, even if I am booting from the external USB
drive I find the internal sata drive disktop and programs always (to date)
show up as the c:\ drive with the clone drive files and programa on f:\.
Since I did
these USB tests, I have learned more about how the boot sequence works,
so it might be possible to get the USB drive to control with the internal
sata drive as an f:\ data drive, but I wouldn't bet on it. I might go back
and do more tests.
4) One USB (bootable) drive,
no internal sata drive --- A key question is does this option work. I suspect
it does, but have yet to pull my internal sata cable to check it. It is
amazing that in all my online research, I have not seen a single detailed
discussion of this option.
Externally power an internal drive
One cool idea just
occurred to me. What the safest easiest way to disable the internal drive
physically, if this is necessary to allow a USB clone to take over, which
at this point it seems to be. Just power it externally with a widely available
PS brick (+5, +12V @ 2A), one of which I already have. Just remove a bracket
in back and use a long power expander cable to connect it up to the brick.
There are some issues with what do do about power to the drive when the
computer is off, but from a data signal integrity point of view it is clean.
[1 Tbyte Seagate clone on sata spins down when drive is off] Another option,
simple but somewhat cludgy option, is power the internal drive though two
expansion power cables that plug together with the connection between them
just hanging outside the computer through a hole made by removing a bracket.
(Might have a minor effect on fan airflow inside case.) I later found the
bracket power switches, which do the same thing, but are a lot cleaner.
All about boot sequencing (4/11/14)
Only after
working this problem intently for days did I find, largely by trial and
error, a boot sequence that achieves my goal. With both drives powered,
which means they can both be mounted internally if I want, I can switch
between them easily at boot without having to fiddle with the bios.
The boot pauses briefly asking which (named) drive you want to boot, and
if no keyboard selection just continues the boot to the main drive. Using
the boot utility EasyBCD the drive names, drive order and wait time are
all programable.
My first round
of boot tests was a failure. I tried all combinations of boot menu (Esc)
and EasyBCD options and every combination that booted (some didn't boot)
brought up the desktop and programs of the internal drive with the clone
drive visible too, its c:\ drive showing up as the f:\ drive. But in a
second round of boot tests I found a combination that works. This combination
used EasyBCD set up differently and changed the boot sequence not with
Esc (boot menu), but by one time going into Bios (via F10 Setup) and changing
the drive boot sequence.
With EasyBCD
installed the boot sequence is very complicated. There are three
separate ways to change the boot seqence all in some sort of cascade where
it is not clear which overrides which, plus several ways to set up EasyBCD.
At first totally confusing, but with a lot of testing and some reading
I have at least some grasp of what is happening.
Bios sequence options
Lets start
with the bios. In my HP machine there are two separate way at boot to change
the drive sequence! Why? Who knows, but my guess is that the simple 'boot
menu' (Esc) option was added to make it easy to make a temporary
(one time) change to the boot sequence. The Esc key at boot just brings
up a list of boot devices the bios sees and allows you scroll down and
select one to boot from. The other bios sequence option is the classic
bios menu choices, including boot, accessed in my HP computer by choosing
'setup' (F10) at boot. Here you can go in and change the priority order
of the hard drives, which is saved into CMOS memory so its permanent until
a new choice is resaved.
Priority? I
had assumed, because it was the only thing that made any sense to me, that
if the Esc (boot menu) option is entered that its sequence would override
the CMOS bios sequence. However, now I am not so sure, since it was only
when I made a change to the CMOS drive sequence was I able to get my dual
boot sequence to work.
When trying
to set up a dual boot, what is so confusing with sata drives at first is
that there appear to be no way to specify a particular drive. Unlike IDE
hard drives, which use jumpers to set a master and slave, with sata drives
there is no hardware setting for master or slave. It makes installing the
drives easier, but then how the boot system or OS know which drive to select?
One thing I
figured out is that the sata connectors on the motherboard are numbered
#1 to #6. These sata connector numbers show in the bios as a list of devices
plugged into sata 1 to sata 6. Each entry in the list showing the manuf
part number of the drive or DVD player plugged into that connector. The
sata connectors on my motherboard are also different colors. Detailed online
HP documentation for my computer does not identify the numbering
of the sata connectors. The bios indicates that HP at manuf plugged my
computer's single hard drive into sata 1 and the DVD player is plugged
into sata 2. (DVD group normally has priority over the drive group.) As
I moved my clone drive sata cable from one free connector to another, I
could see the move in bios and from this figure out the number of the motherboard
connector.
I now
suspect the motherboard sata connectors form a default drive boot sequence.
Of course, the drive boot sequence (by manuf part numbers) can be changed
in boot CMOS memory, so there is no hard requirement on connectors to use
for a particular boot sequence.
EasyBCD dual
boot program
This is a
nice program, free, and from what I read the standard way to set up a dual
boot. Once you figure it out, it makes control of boot easy with lots of
useful boot tools. I plan to continue to use it to control my dual boot
two drive system.
Initially this
program was intimidating, a total black box, probably some sort of low
level boot control that I had no interest (or hope) in fathoming how it
worked. I never found any sample EasyBCD dual boot setups, which would
have been very helpful, so I resorted to trial and error. From reading
about dual drive setups I began to suspect that EasyBCD was really at heart
sort of a Windows editor for boot, just an easy way to set boot parameters
that can be set manually (with great effort) in Windows. Msconfig has a
boot section that allows some boot options to be set (like a time out for
default), but other boot configurations choices, name of drives,
ID of drives, requires tricky command line queries and setups. 'BCD' is
where the boot info is stored in the boot section of the drive and the
program EasyBCD just makes it easy to set this up. Hence the name!
The heart of
my confusion in setting up EasyBCD is how to have an option select a particular
drive. The EasyBCD setup shows a drive letter for the boot program, like
c:\ or f:\, but what does this mean. In each of my desired options the
boot file will come from its c:\ drive and the boot program on the other
drive will be at f:\. So how to I get the drives to change places. Not
at all clear. I still don't fully understand it, but I like it and plan
to continue to use it to control my dual drives.
Reading EasyBCD documentation
Only after
a lot of trial and error testing, and finally getting dual boot to work,
did I dig into EasyBCD documentation on how to set up a dual boot. It's
hard to find, but the procedure works. When I deleted by earlier settings
and did it their way I was able to change the drive boot order in the bios
and the dual boot still worked. There's a little trick to setting the entries
for a dual boot, which is not that easy to find in its documentation. Here's
the key instruction:
** Adding a Windows Vista/7/8 Entry
3) "Select
the letter of the drive/partition Windows is installed on from the drop-down
menu (e.g. c:). Its important to note that the Drive Letter must be
the one currently visible in My Computer that points to the drive that
Vista/7 is installed on. Even if the drive letters change from install
to install, use the drive letters as they appear in your current
boot. EasyBCD will automatically convert them to the proper drive and partition
numbers that can be understood by the Windows bootloader."
Translation --- When I booted from my main (750
Gbyte) internal drive, the files and programs on this drive are my c:\
drive and the files and programs of the 1Tbyte clone drive are the f:\
drive. Here's what the EasyBCD instructions above mean in my case. Starting
with zero entries add an entry, call it say the 'c drive', and assign it
letter c:\. Then add a second entry, call it 'f drive', and assign it letter
f:\. That's it, if both drives are bootable you have a dual boot!
The names entered
will appear as menu choices during a pause in boot. 'c drive' should select
a boot from one drive and 'f drive' the other. Now check out which name
goes with which drive, open EasyBCD and rename the choices with the names
of the drives. There's no need to figure out the drive ID numbers. If the
Windows files of the other drive currently show in the directory as say
the f:\ drive, you only need to select f:\ from the pull down menu. EasyBCD
will figure out the details of how to identify each drive for the bootloader.
Note EasyBCD says
it can also easily make a drive bootable. This looks interesting, however,
I didn't use it or play around with it, because my clone software (Casper)
had already made my clone drive bootable.
I took pictures
of EasyBCD screens with my BB tablet as I tried various boot combinations.
I found the drive that booted would always show its bootloader on the c:\
drive. The drive not booted would always show it bootloader on the f:\
drive. The same screens for each selection show a drive ID, called 'BCD
ID'. This is critical. This is (I think) the infamous drive 'signature'
written into the boot sector. All the drives in the system will have a
different 'signature', and by screwing around I was able to get EasyBCD
to display it for my two drives.
Collision signature
One of the
needlessly horribly confusing things about Windows with multiple hard drives
is 'collision signature'. If two drives have the same ID (signature) in
their boot sector, Windows can't tell them apart, so one just disappears.
I read poster after poster wailing about this. I first ran into this myself
a couple of years ago when I bought a second 2 Tbyte WD USB drive of the
same exact model I had. I found only one would work at a time, when I plugged
both in, one dropped out. This is freaking ridiculous! WD even though aware
of this includes no warning, no help, so I was not kind about this in my
Amazon review of the drive. The 'fix' took hours to figure out. It was
suggested in a WD forum that plugging the drive into a different computer
might help, something about the new computer changing the signature. Why
or how this would do anything, I don't have a clue, but in fact it worked.
I plugged my new 2 Tbyte USB drive into the USB port of my old Vista portable
for a few minutes, and it then worked OK, and has continued to work OK,
in Windows 7. Isn't this freaking ridiculous? It seems to imply that a
computer is writing to the boot drive of a data (non-bootable) USB drive,
which seems very odd. At this point how the signature works is just a big
mystery. I see little written about this online.
So the obvious
question is doesn't a clone have the same ID as the main drive? Or do the
clone software packages change it? I need to research this at the clone
houses, but to date have seen nothing on this anywhere. Some combinations
give me no boot. Is collision signature the reason? How do you change the
ID signature anyway. I know there is a command line way to do and even
tried it. Is this what fixed my problem? Possibly.
EasyBCD looks
like a useful boot tool, which I have only dipped my toe into. It has of
bootloader tools worth exploring and documentation worth reading.
I had seen in
an article showing raw bytes of the boot sector this number and they were
viewing it with some sort of boot sector editor (or viewer). EasyBCD can
be made to show the BCD ID in hex format of the non-active drive. This
number is long, 32 hex digits in five groups. With trial and error I figured
out {363exxxx-} is the original equipment 750 Gbyte Seagate hard drive
and {5312xxxx-} is my 1 Tbyte clone Seagate drive. [update --- more testing
showed it is not as simple as this. These ID numbers appear to be tired
to the drive AND the bios drive sequence.]
EasyBCD settings for a working dual boot
Here are photos
of EasyBCD setting for a dual boot (that works!) with the main and clone
drive plugged into sata connectors on the motherboard. First photo is after
booting Windows from the 750 Gbyte internal drive. The second photo is
after booting Windows from the 1 Tbyte clone drive. I added the drive size
in the name of c drive icons (left, center) so I can tell at a glance which
drive is in control.

EasyBCD setting screen after a boot from #1
showing some of the 750 Gbyte drive's desktop (left).
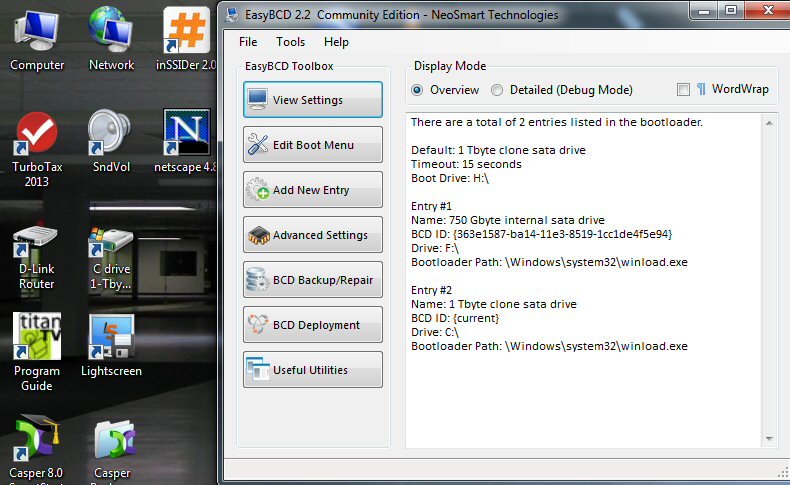
EasyBCD setting screen after a boot from #2 showing
some of the 1 Tbyte clone drive's desktop (left).
Note Turbo Tax (red con) is installed on the clone
and not the main drive,
because the main hard drive has been developing disk
errrors and is soon to be replaced.
I am going
to keep the capacity of the clone drive larger than the main drive as it
is above. While bios boot options identify drives by their manuf model
numbers, the Windows disk configuration screen shows only disk capacity
and partitions. However, drive manuf and model # can be obtained by right
right clicking disk #, properties. Selecting a larger capacity drive to
use as a clone drive makes it easy to identify the clone drive on the disk
configuration screen. Going forward it's important that the main drive
and clone drive not get mixed up, else stuff will get lost.
I first thought
if I added a 2nd clone drive, I should choose a 3rd capacity, but now that
I see that I can get the manuf and model # from the disk configuration
screen, maybe it's OK if two clones are similar. Haven't given much
thought as to how to tell two clones apart.
Trick?
[Update, The
paragraph below explains how I first got the dual boot working, but I later
found the bios drive boot sequence is not important. EasyBCD can set up
the dual boot to work with either drive set first in the bios boot order.]
The trick,
or more accurately the change that I made, that got me to a sequence that
worked was this: I changed the CMOS drive order putting the clone first.
Did it matter that this is opposite the motherboard connector number sequence?
Don't know. Important that it is different (if it is) from EasyBCD default?
Don't know. Anyway for some reason with this change to the CMOS bios drive
sequence I could now select either drive. To do this I added on entry with
name c drive and letter c:\, the second entry with name f drive and letter
f:\. When I later learned which drive each selected, I went back and put
in more descriptive names in EasyBCD, because these are the name that show
on the boot selection screen.
More on EasyBCD
Multi-boot
options on startup are built into Window 7, but the only way it provides
to set up the boot menu is through a long series of tedious command in
the command box. EasyBCD allows the command box to be bypassed. It's essentially
a windows type graphical interface for setting up and editing the built-in
boot menu.
The main section
of EasyBCD allows only partitions to be selected for boot. You choose
the drive letter of the partition.
I have learned
by trial and error that Windows 7 at boot time displays onlt the first
six
entries in the boot menu, but curiously EasyBCD does not complain if you
add more than six.
Booting .wim files with EasyBCD (update Aug 18,
2014)
Only today
did I learn how to boot directly into the Window repair environment without
a DVD or flash drive. The needed (single) file is winRE.wim (165 Mbytes)
and Windows puts in on the hard drive during install under the c:\recovery
folder (which is hidden). Turns out that EasyBCD has a special tab that
can point to this file and add it to the boot menu.
The lower half
of the EasyBCD 'Add new entry' screen is shown below. It differs from the
upper half of the entry screen, which I have always used, in that here
a path to a particular file can be entered. The title is 'Portable/External
Media'. Ignore that, the path can be to a file anywhere on the hard drive.
Click the 'WinPE' tab to enter the path to an xxx.wim file on the hard
disk, and it will be added to the boot menu, and its boot menu name can
be selected too. The only interesting xxxx.wim file I know about at this
point is winRE.wim (Windows repair environment). Below shows it being added
to the to the boot menu.
WinRE.wim is
located on in the c:\recovery folder, so the repair environment can be
selected from the boot menu entering the path to it under the WinPE tab
as shown below. I ran a test putting WinRE.wim in a new Repair partition
and pointing EasyBCD to it and that works too.
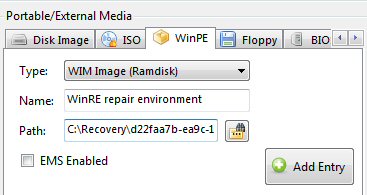
Above shows winRE.wim file in the c:\recovery folder
being added to the boot menu
USB boot test (4/11/14)
With the dual
boot working fine with both drives connected to the motherboard sata connectors
I wondered what would happen if I again tried the clone drive on USB. All
I had to do was unplug the clone's data cable from the motherboard sata
connector and plug it into the sata-to-USB converter. Well it didn't work,
and something interesting happened. Up popped screens saying a new drive
had been detected, but it had to be formatted. In the disk configuration
screen there the clone drive was, but it was shown as RAW with no partitions.
It looks like
a drive set up on sata cannot simply be moved to USB. Its partitions are
not visible, so nothing on the drive is visible. It has to be reformatted
while attached as a USB drive. I remember the same thing happened when
I moved the clone drive from USB to sata, I got the same popup screens
telling me the new drive needed to be formatted.
I wrote this
up today in an Amazon pre-review of the enclosure I am buying that has
both a USB 3 and esata port. It's logical to think you can just try both
a USB cable and an esata cable and use the one that's fastest, but unless
USB 3 acts differently from USB 2, it's not that simple. Each time you
switch the cable, at least with a bootable drive, all the data will be
wiped clean from the drive because it needs to be formatted for the serial
link that it is on.
And of course,
there is the not so minor matter than I have not yet figured out how, after
mucho hours of work, how to get a dual boot setup to work with one drive
on sata and one on USB.
Bootloader is changed
Moving the
clone drive from sata to USB and back to sata showed something interesting
that bears on the signature collision issue. I didn't format the clone
drive while on USB or do anything with it there except look at how it showed
up on the disk configuration screen. I was very surprised when I hooked
it back up to motherboard sata, exactly like before, that my two EasyBCD
menu choices of my working dual boot were gone and four different (default)
option choices had appeared with four different drive letters, and all
of which booted to the same drive. Yikes. It looks like just hooking up
a drive to a new machine (or link) can change its boot loader. This probably
explains why plugging a drive into a different computer can cure a drive
collision problem.
There was no
permanent harm done. After I deleted these four entries and added the two
entries per EasyBCD documentation, my dual boot started working again and
all the data on the drive was OK.
Disk image/clone procedure with failing drive
This is my
situation, my disk has bad blocks, most of which can be 'repaired' (or
removed), but the disk soon develops more bad blocks. I have learned
by trial and error that some image and clone software are more sensitive
to bad blocks than others. It seems that some, like Window image and Casper
image, will fail with one (or very few bad blocks), whereas other (Macrium)
are more tolerant, though even those I found can fail due to bad blocks
too.
I read the
best low level repair tools are available from the disk manufacturers.
Find out who makes the sick internal drive and go to that manufacturer
for downloadable tools. Seagate has two, one for Windows, which can only
do analysis, but (importantly) not repair. The DOS repair tool can
'repair' bad sectors, though I am not sure what 'repair' actually means,
and removes bad sectors. DOS tools must be run from a bootable DVD. This
allows the program to load and run from ram without the internal disk being
used. In this way the ram program has free access to the disk and can modify
any sector.
There's a complication
with DOS tools run from a bootable DVD, which is of course making the DVD!
Seagate provides an .iso file (raw DVD image) that can be downloaded, and
which then must be burned to a writable (DVD+R) disk. I have done this,
but don't have a clean procedure for it. I used PowerISO, which I had used
earlier to burn a Microsoft .iso file of Windows 7 to do a repair install
(which failed). It's free and makes the DVD quickly, but it downloads a
bunch of crap (PureLeads) which totall screwed up my browser. Avoid PowerISO.
Seagate claimed Windows 7 had native capability to burn the .iso image,
but I tried this and it didn't work. It just copied the .iso image
to the disk, but to burn an .iso file and made a functioning disk it must
first be expanded to show the files, which the Windows burn didn't do.
Here's is the
best procedure to get the best possible image and/or clone. Before you
run image or clone programs you first want to get rid of, and repair if
possible, as many bad blocks as possible. This is critical, not only will
it give you the best quality image/clone, without it you may not get any
image/clone at all. A lot of the image/copy programs will just fail and
exit when they run into a bad block they can't read. It takes hours to
do this, so run overnight. It may be necessary to keep running the repair
tool when more bad blocks show up, which I found happened to me within
hours.
1) First (overnight) run a
DOS tool from the disk manufacturer, chosing the long scan that can 'repair'
and remove bad blocks. The Seagate DOS tool runs for hours to scan the
whole disk and find bad sectors. At the end it shows the bad blocks it
found and gives you the choice as to whether or not to repair them. The
last 'repair' step is fast, just a few minutes.
2) Run image software, maybe running
those programs most senitive to bad blocks first. I find these are Windows
image and Casper image.
3) Run image/clone software that is
less sensitive to bad blocks. I find these are Macrium image and Casper
clone. Casper clone is nice in that if it can't read a block, not only
will it keep going, it will tell you in its report (see Exceptions) which
file(s) contain the bad blocks. This is the only tool I have which tells
you which files are affected by bad blocks. Obviously this is very valuable
information! In one case I found the only file affected was some unimportant
thumbnail cache that Explorer keeps to speed up directories and can just
be deleted, as it will be rebuilt. In the second case it was some Opera
file in the user directory (purpose unknown). If this bad block turned
out to create a problem, obviously the fix is easy, just to reinstall (and
resetup) this one program.
Booting Windows 7 from USB drive
Forum poster
says registry changes are required to get Windows 7 to boot from an external
USB drive --- "An external drive? Windows 7 won't boot natively via usb
if that is what you are trying. It is possible ,with a couple of
registry changes."
New hardware arrives
My new hard
disk (500 Gbyte for clone disk #2) plus a bunch of other stuff arrived
from Amazon. For the last week or so my orginal 750 Gbyte hard drive and
1 Tbyte clone #1 hard drive have been working OK, but I badly wanted to
get a 2nd clone copy of my system, since my original drive is not
in good shape, so after formatting it I had Casper do a clone to it from
my original drive.
Had
a puzzling issue with formatting, where I had formatted the drive in disk
manager, verified it was OK in Explorer by copying a file to it and reading
it back, but when I went to do the clone was told I had to format the drive.
Could see no way around this unnecessary step, but said OK.
More bad blocks cause clones to fail!
The Casper clone of main
drive failed, tried again and again failure. Opened Macrium but it
would not do a clone because target was smaller than original (Casper had
no problem with this), even though original is only 10% full. The problem
is my original hard drive keeps developing (hidden) bad blocks even after
being repeatedly scanned and 'repaired' by low level DOS SeaTools. Got
to get that drive out of there. Maybe in future OK to keep this drive as
a play toy, but I have learned the hard way that it should not be
used as part of my backup system as I originally planned. The reason is
copy programs can't handle it, they give up when hitting bad blocks, so
it can't be reliably cloned or imaged. I managed to get my first clone
of it, only buy running the SeaGate DOS repair tool overnight, and next
morning do the clone. So one of the present clone drives will need
to become the main drive, and need to I buy a 2nd new drive to be clone
#2.
Dual boot won't work
I took the new drive
out and put the 1 Tybte clone #1 back in, and now found that dual boot
did not work. No idea what happened. Deleted Easy BCD entries and rebuilt
it, still didn't work. Was now gettting a little worried, I had to get
to clone #1 to make the new drive clone #2. Disconnected power to main
750 Gbyte drive (first time), and the 1 Tbyte clone booted up OK.
Immediately reconnected the new 500 Gbye drive to sata and had Casper do
a clone of the 1 Tybte clone (i.e. clone of a clone). Went OK, finally
feeling better as I had two new drives each bootable and each with OS and
all my programs. Again rebuilt EasyBCD and this time dual boot again
was fine. (Have no idea what happened here) But I was back in business
with a new main drive and a clone backup drive selectable via dual boot.
----------------------------
I have putting
a bracket here in the text because it marks a turning point. After reinstalling
Windows 7 onto my old hard drive, which I soon realized had bad blocks
preventing it from being copied, I finally got the bad blocks 'fixed' for
long enough to get a clone made. With this clone in hand, two new drives,
good clone software and a working dual boot, I finally had working a dual
boot clone system.
======================================================================================
I still needed
to explore how to use a dual boot clone system, develop a clone strategy,
figure out how to make it into a real backup, mount and check out the new
hardware. This is where the rest of this essay goes.
----------------------------
Trying to figure out if my new hard drives are reliable
I have a new
problem, are my new SeaGate drives reliable? Both drives are essentually
new. One, OEM model, arrived this week from Amazon, the other was bought
retail 16 months ago, but sat unopened for 15 months. Both are modern SeaGate
internal Barracuda drives, sata 3, 7200 RPM. I have several disk check
utilities including two SeaGate tools (SeaTools for Windows and SeaTools
for Dos). Most pros say go to the manuf of the drives for the most reliable
disk tools.
Here's the
problem. They are both working fine in a dual boot, but I know that doesn't
tell me much, first because the drives are only 5-10% filled, and second
my main drive with bad sectors has worked OK this way too now for several
weeks. I decided to check out both drives and I get weird failures. During
this testing both drives are directly plugged in to sata connectors on
the motherboard and both drives are bootable.
--- 500 Gbyte
drive: SeaGate for Windows: short drive self test fails (almost immediately).
Very disconcerting as I just bought it and there are no useful reasons
given for the failure. But when I run the much more through SeaGate DOS
tool both the short test and full scan (in fix mode) report pass and no
bad blocks repaired. Again I run the Windows Seagate tool and get the short
test failing. What am I to make of this, two different tools from manuf
of new drive, one say OK, one say not OK. Yikes....
--- 1 Tbyte
clone drive: I have Seagate problems with the other drive too, the
1 Tbyte drive I bought 16 months ago, but just began to use. This is another
weird problem. SeaTools for DOS seagate always recommends as its prime
check and fix utility. I have used in sucessfully now on two drives several
times. However, when I run it on the 1 Tbyte clone drive it crashes. It
goes about half way and stops, it beeps and writes an error text message
on screen that cannot be read. It has done this both times I have tried
to run this program on this drive. What the hell is this? Are these two
drive OK, or not? I sure can't get any confirmation from SeaGate tools.
I
had my doubt about SeaTools for Windows being OK, because it doesn't show
the 500 Gbyte boot drive # correctly and it can't find the 1 Tybyte Seagate
drive at all, even though both are on sata and working OK in Explorer.
I uninstalled it, redownloaded it, and reinstalled it and same problem.
(4/18/14)
Drives probably OK, SeaTools for Windows is a crappy
utility (Update)
I think I
can explain the short drive self test failure using SeaTools for Windows.
The cause of this disk test failure is a weirdness (or bug) in SeaTools
for Windows. Above I reported a short drive self test failure was on the
500 Gbyte drive when it was the boot device. The other drive, 1 Tbyte clone
drive also on sata, passed the test, and both of them passed the short
generic test.
Later I reconfigured
the drives. I took the 500 Gbyte drive off sata and put it into my new
NexStar enclosure and hooked it up via USB 2. The system booted off the
1Tbyte clone drive, the only drive on sata. Now I find SeaTools for Windows
reports exactly the opposite! It is the 1 Tbyte drive (boot drive) fails
short the drive self test (in 2 seconds exactly like before). The 500 Gbyte
drive now on USB and no longer the boot drive now passes the short drive
self test. It's not the drives, the problem is a crappy utility from Seagate!
Pass reports from
generic check programs, like chkdsk and various PC tools, I tend to discount,
because these utilities repeatedly passed my original drive which I know
had bad blocks because SeaTools for DOS identified them, and Windows Image
and other image progrms would fail while copying.
I have another,
an ad hoc test, for bad blocks that I found by trial and error works. Most
image programs, including Windows image, will give up and fail when they
can't read one (or a few) bad blocks. Thus as a test for bad blocks I did
image backup of both drives (using Windows image) and both images succeeded,
consistent with a clean drive.
I read some
pros have a tool that can read how many bad blocks have been removed, but
I don't see this information with the tools. Surprisingly the SeaGate tools
read very little from the Seagate drives, for example, no temperature,
which I see other tools reporting.
Packaging up my new stuff
Until recently
I have been running with al my new hardware (new main drive, clone drive,
sata-to-USB converter, PC esata bracket, sata drive in esata enclosure)
lying on the floor in a tangle of cables. Today I managed to get the HP
drive bay out , replacing my sick old 750 Gbyte drive with a new 1 Tbyte
main drive and added a 2nd drive to the bay, new 500 Gbyte drive to be
the clone #1. Had to watch a YouTube video to figure out how to extract
the drive bay. (Take out two screws on top bracket, and what is not obvious
push down a lever and shift the bay to the left (toward the cables) so
it can be lifted out.) I found the bay had screw holds for a 2nd drive
well spaced apart from the original drive. The sata cable that came with
my new Seagate Barracuda drive didn't ft, too short and both rt angle.
I had to use a 20" sata cable, which is longer than ideal. The screws and
power cable came with this drive that I had bought 15 months ago retail.
Next I tackled
adding in brackets and cards. Took off the single screw that appeared to
holding in a metal bracket securing the card brackets, but I couldn't see
how the old brackets came out. Baffled again, needed to watch another video
(from HP this time) to figure out how to get the original equipment brackets
out of there. Found out they are breakaway metal, insert a big screw driver
in two slots in them and break them out. Put in the cheap esata pass through
bracket. This has no electronics, just two cables to two spare sata ports
to two esata connectors on the bracket. The cables are not very long, but
reached the sata connectors near the front with no problem. Now my PC had
esata ports, quick and dirty to be sure as they are just motherboard pass
throughs, but I had tested it and it had worked when open. I put my sick
old 750 Gbyte sata drive in the new Vantec enclosure and it was visable
both via esata and USB.
I added a 3rd entry to
EasyBCD to allow me to boot from the esata outside drive. This didn't work
with the sick drive, not sure why yet. This old drive I will use to experiment
with and plan to replace it evenually with a new drive to act as an external
clone #2 drive.
Unrelated to
the clone backup with my computer open I upgraded USB. I added a short
PCI card with four USB 3 ports for not much money. It also has a PS connection
to supply the power for these ports. It snapped in with no problem, came
with a CD for needed drivers, and worked without problem. The PS had spare
connectors for both the 2nd (clone) drive and the USB 3 card. The USB 3
specs for the card are a little tricky, says it runs on a single PCI bus.
I haven't researched this, but I suspect what it means is that single channel
PCI throughput is fast enough to support one USB 3 device at rated USB
3 speed, but as more USB devices are plugged into the card the speed of
all drops. Not a problem. This was an inexpensive card (22) and expands
the USB ports on my machine from 6 to 10 and should give me (at least)
one USB port operating at USB 3 speed.
Still waiting
for the Ebay four drive power swich bracket to arrive.
Also waiting
on a 2 GB memory card to upgrade ram from 4 GB to 6 GB.
Buying a new machine
I was thinking
how to I implement a dual boot clone backup on my next computer. Well to
avoid the hassle of opening up the case and installing a new drive, what
I should do is buy (order) a new computer with 2nd hard drive already
installed. I had seen this as customize option, so I went to the HP site
(and other builder's sites) to see what they offer, and it's very disappointing.
I just want a moderately priced Windows 7 Home Premium machine with two
hard drives (moderate capacity). Is that so hard? Try and find it, even
as a custom build!
For one thing
HP doesn't offer any customization on the lower price machines. At next
step up in price, customization is offered, but the only choice is a larger
internal drive, no secondary drive offered. You need to go up again in
price to the higher performance machines to be able to get a 'secondary
drive' option. Now what's available is the more expensive and techy pro
versions of Windows 7. I don't want this OS and drive sizes are off. The
offered drives are large, while I to run the internal drives lean and put
large video files out on an external data drive. This is just wasted money.
And to top all off their offerings of Windows 7 machines are thin. Why
they don't allow Windows 7 to be put on any machine I don't know. Need
to find someone who's more flexible than HP. Tried Dell, not much better.
So what are
the options? Have a local shop do a custom build? The risk here is weird
graphics or audio, no HDMI support, no documentation for later customization.
Probably much better is buy an HP or brand name machine with features I
want, even retail, ideally with Windows 7 Home premium, then
a) Lug it to
a local computer shop to have them install a 2nd hard drive (while I wait)
that I supply (or buy from them), or
b) Open the
new machine on table when I get it and put in the 2nd hard drive myself
Playing with sick 750 Gbyte drive
Now with three
OS drives cleanly installed I can do some experimenting. Inside I have
a new 1 Tbyte Seagate as my main drive and a new 500 Gbyte Seagate as clone
#1. My spare experimental drive is my 750 Gbyte original equipment drive
now in an external enclosure with USB 3 and esata ports. While it is still
functional, it has bad blocks and is not to be trusted. It fails a short
smart test. Seagate DOS tools has several times 'repaired' bad blocks,
but new bad blocks keep showing up.
First thing
I did was use Window disk configuration to parition the drive. This is
the first time I have ever played around with partitions. As far as the
operating system goes, each partition looks like a separate drive
with its own letter. Makes no difference to the OS whether the new letter
drive is one a different physical drive or a partition of an existing drive.
However, I am disappointed to see that most of disk check tools I have
don't see it that way. PC Tools only offerss to check a whole physical
drive, not its partitions separately. I am sure tools like this must exist.
Partition tests
If bad blocks
are local, which Seagate DOS seems to show most of them are, then one way
to bypass them should be to partition the drive. Found one free program
that will find bad blocks and set the partitions based on what it finds,
but I just decided to cut the drive into two or three pieces. Started off
deleting the Recovery partition just to start clean.
Used Windows
disk configuration to 'shrink' volume of h:\partition. Here I ran into
a well known limitation of this tool that for idiot reasons it will not
allow you shrink to a small size. It told me about 450 Gbyte min while
only 50 Gbyte are used (15% free has long been the general rule). So I
did this. Took two trys, first time telling not enough room (!), 2nd time
succeeded. Then in the new 250 Gbyte partition used 'Create Simple volume'.
Everything looked OK. Assigned letter 'z' to new 250 Gbyte partition, with
the shrunk 450 Gbyte remaining as 'h' drive.
To test my
partitioned sick drive used Casper 8 to clone my main drive (just its c:\
partition) to both partitions on sick drive. Both copies reported success,
the update clone of 'h' going a lot faster than the new clone of 'z'. Cloning
was done over USB 3 using my new USB 3 card and USB 3 port of the Vantec
enclosure. Explorer showed both partitions with a clean 50 Gbyte clone
directory.
I know Windows
image is sensitive to bad blocks, so I next did a Windows image to each
partition. Windows image does not give a choice for source, it will image
only the boot drive (all of it). Here's where things get a
little interesting. Both images reported success, but when I checked disk
size was 100 Gbyte for 'z' (correct) and 50 Gybe for h'! No image file
on 'h' in directory. Some success, Window's tools are such shit. So at
this point I suspect 'z' is in better shape than 'h'. However, I did more
images between them and everything worked.
Quad boot
Switching
over to an esata I found I was able to boot from both partitions of the
(esternal) sick drive. With my main drive and clone #1 internal to the
case and four EasyBCD memu entries, this gave me a quad boot system! When
I booted from z:\, I found the foles of c:\ (main) and z:\ (sick) switched,
the z:\ files showing up as c:\, with clone #1 remaining as f:\ and the
other directory of the sick drive remaining as h:\
Missing drive
Following
recepies using the command line for making a USB flash drive boot, which
I had already done and was successful, I applied it to the sick drive.
Turns out the receipie formatted the whole drive wiping out my two partitions
and it took hours, clearly this was not a quick format, but a byte by byte
format. I was up to 35% or so and next time I looked the format had
failed, probbly hitting bad bytes. Whiile the formatting was going on disk
configuration page showed the sick drive and indicated it was being formatted,
but after the format failure, it disappeared from disk configuration page.
Rebooted and it's still missing.
This brings
up a problem I have seen before. What to you do when a drive is not recognized?
Disk configuration page is the lowest level disk view in Windows. A drive
doesn't need a letter to show up here as it does in explorer. At this point
I have a partially formattted hard drive connected via USB 3 and even on
a reboot, the OS does not see it. I will try replugging USB with power
on. I can always power down and go over to esata cabke, but it should be
possible to do via USB. I see missing drive complaint a lot on forums.
I unplugged
and replugged USB. I can see the enclosure led go on/off, so the unclosure
is powering up the drive. Also when I plugged it in, I can hear the drive
making sounds, but I get no USB sounds and the drive still does not
show up on disk configuration page. It's not on device manager either,
not does it show in comman box (list disk). This should not happen. About
5 minutes later, while writing this an installing new drives popped up,
so I thought the drive would be there. It's not. I will power down, then
attach the drive to the running sytem, which should be no different really
from what I just did. When I power down, Windows hangs, so this partially
formatted drive has affected it. Also when the computer powers off, the
enclosure doesn't detect it as it normally does and leaves the led on and
the drive spinning. So I switch the enclosure power offf/on and that resets
it.
Now with computer
rebooted and I plug in the sick drive something strange happens. Sill no
USB sound and the drive still does not show up on the disk configuation
page, but a Casper windows pops up saying new hardware has been detected!
When I look a little more, I find the drive (with model #) now shows on
device manager, which tells me it is working. The disk configuration page
is interesting. I was looking at the bottom half where drives always show,
but I now (don't know if it took a few minutes, or I missed it) that in
a half ass way it is there on the top. A line with no name has the capacity
of the sick drive and while its 'status' is "healthy, primary partition",
its file system is shown as 'RAW' rather than NTFS. Curiously on Caspers
disk explore page there it is and it is marked 'ready' the same as all
the the other drives! This is just plain weird, and example of how buggy
windows is. Crap I just discovered it on the disk configuration page way
down below the grayed out (removable) drives. I may have missed it. From
here I should be able to format it. Partitioned it into three pieces: h:\,
y:\ and z:\.
Tip --- An unformatted drive will appear at the
bottom
of the list of (potential) drives on the disk configuration page. It will
probably be necessary to scroll down to find it as above it will be many
grayed out removable drives. An unformatted drive will be seen to have
a RAW partition. Once it is formatted it will move up near the top of the
disk configuration page next to the other hard drives of the system.
How to find drive physical location
The disk configuration
page in its basic view shows each physical drive and a graphic view shows
how each is partitioned, the size and the letter assigned, as well as it
status (healthy, etc). What this view does not show is the manufacturer
and model # of a drive and how the drive is connected (sata, USB, esata),
but this information can be pulled up by right clicking the disk #, properties.
At top the manuf model # is shown, and a line below marked 'Location' gives
info on how the drive is connected.
Below shows
the disk property screen for three of my drives (left to right): sata drive,
sata drive in an external enclosure connected via esata cable (passthrough
connector on rear bracket direct to motherboard sata) and USB drive. As
you can see, only USB drives (right) are clearly identified as external
('USB mass storage device'). The sata connected and esata connected drives
are more cryptically shown as a Bus #, Target ID # and LUN #. I don't see
any way to distinguish on these screens the sata from the esata connected
drives, not too surprising since esata just brings the internal sata connection
to outside the case.
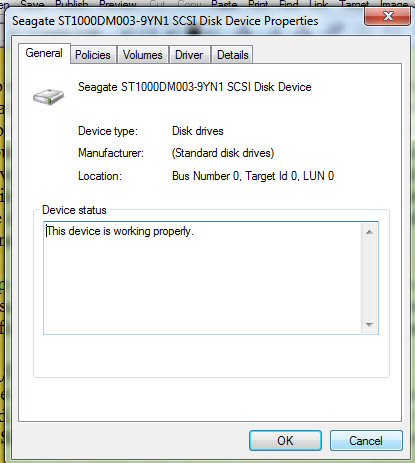 .
.  .
. 
Disk configuration disk properties screens (left to
right): Sata connected, esata connected, USB connected
(left) Seagate 1 Tbyte (ST1000xxx) drive is mounted
internal to the case and plugged into the motherboard sata
(middle) 750 GB Seagate (ST3750xxx) (sick) drive is
mounted in an external enclosure that connected via esata cable
(right) 2 Tbyte Western Digital drive is connected
via USB 2
Cloning articles
Windows 8
Window 8 and
Win 8.1) is able to boot directly from a USB 2.0 or 3.0 drive (USB Flash
memory or USB Hard Disk). This feature is only officially supported in
the Windows 8 Enterprise Volume Licence version - see here for details
of how to make Win8ToGo Using Enterprise. You can however make a Win8ToGo
USB boot drive from any Windows 8 version (though you will need to activate
it if you want to keep using it and so you will need a volume licence version
if you want to move it from system to system). Note that your BIOS must
support booting from it's own integral USB 3.0 ports (if it has any) -
a BIOS will not boot from a USB drive connected to the USB port
of an added USB 3 adapter card.
Apple
Apple method
of hard disk upgrades using cloning. Apple computers have a dual boot built-in
(accessed by option down option key when booting) and unlike Windows machines,
they can apparently be booted via a USB connected clone. Here's there drive
upgrade procedure:
a) Connect the new hard drive via USB (by use of a sata-to-USB adaptor
or enclosure)
b) Boot old hard drive and do the clone from it to the new USB drive
c) Built-in dual boot will now show both old drive (inside) and new drive
(connected via USB) as bootable. Select USB new drive
as boot drive and verify clone.
Yikes, Apple
has big USB boot problems too. So much for Apple reliability. Even in Jan
2014 I see poster after poster complaining that booting a clone via USB
3 is hit or miss proposition. Drives mounted in some WD enclosures apparently
just won't boot. On guy recommends making the clone via USB 3, but then
switching to USB 2 for booting.
Bottom line
Apple computers
offically supporting booting via USB hard drives (but has bugs booting
via USB 3), while Windows 7 computers officially do not support
booting via USB hard drives, but a new feature of one special version of
Windows 8 (Enterprise, intended for IT guys at companies) does support
booting from USB hard drives.
Cloning to upgrade to a new hard drive
Been reading
articles on recommended cloning procedure to upgrade a (healthy) hard drive
to a new hard drive, usually larger, but if a solid state drive (SSD) is
likely to be smaller.
-- Simple (open
case) cable swap procedure --- This is also the upgrade procedure Seagate
recommends in the booklet that came with my new Barracuda drive. They provide
clone software on a disk and specifically show connecting the new drive
to an open sata connector. After the clone is written, the instruction
is to power down, disconnnect the sata and power cables from the old drive
(which leaves only the clone connected), then at power up the system will
boot to the new clone drive. (Possible clean up step is to review bios
so that the new drive is first on the list of boot drives.)
1) Obtain free clone software
2) Connect 2nd drive (via spare sata connection)
3) Write clone
4) Disconnect old drive (by removing sata and power cables)
-- USB variation
--- New upgrade (sata) drive is connected via sata-to-USB converter (or
a sata enclosure) to USB port. Clone is made (using EaseUS Todo Backup).
PCWorld says the USB clone can then just be physicall swapped in for the
old drive and it will boot.
-- Acronis
(maybe others) recommends the best way to use a USB clone drive in a hard
disk upgrade. I read of forums that claim Acronis recommends: Copy the
hard drive while it is still in computer to a clone drive connected via
USB. Replace the hard drive in the computer with the new hard drive, and
then via USB cable clone back. (However, I am beginning to doubt this is
correct. I have yet to find this way of cloning mentioned on the Acronis
site. Acronis does its cloning with its own bootable media (DVD or flash)
in a low level dos mode. This means they do not need an OS on the target
disk. Hence their baric method of cloning is put the new hard drive in
a laptop, boot it with their media, it will find the old drive now hooked
up via USB and do the clone to the new drive in the machine.)
I'm
surprised this works. Based on my tests I would think the boot sector would
get mangled and the new hard drive would not boot. Maybe they are using
a trick. One of the semi-magic ways to fix a clone's boot sector is just
use boot the newly cloned machine with Windows repair disk and select ''startup
repair'. Operating from the recovery environment the DVE will write a new
boot sector, enabling the cloned drive to boot. (I should do some reading
on the Acronis site about this. And I have the hardware to do a test, since
my sick drive can be connected via USB.)
Acronis
Did some poking
around on the Acronis site. They seem to be regarded as the premier backup
software company (even though my experience with their WD version was BAD).
(These instructions are so freaking bad. They just say take out your laptop
drive and connect if via USB, with no mention of a how. They speak of having
the new hard drive in a 'bay' without describing how the bay is connected.
Yikes!)
-- "If you
clone a disk with Windows to external USB hard drive, you will not be able
to boot from it. Windows does not support booting from external USB hard
drives. Please clone to internal SATA SSD or HDD instead."
-- The important
point to remember is that you need to put the new drive in the laptop first,
and connect the old drive via USB. Only after this you may do the cloning.
Otherwise you will not be able to boot from the new cloned drive.
-- Hard disk
bays cannot be used for target disks. For example, if you have a target
hard disk (i.e. the new disk to which you clone, and from which you intend
to boot the machine) in a bay, and not physically inside the laptop, the
target hard disk will be unbootable after the cloning.
-- "Disk Clone
operation it is not generally used as a backup strategy, as it offers little
flexibility. In general, disk clone is a one time operation designed to
clone one disk to a different one for the purpose of migrating to a larger
hard drive or to a new machine." (I disagree!)
-- "If you
intend to clone or restore the local hard disk to an external USB one,
it is safe to do so."
-- Duplicator
hardware -- guy above goes to local computer shop. They sell him
a stand alone drive duplicator. Removes old drive from computer puts in
new drive and it does a sector by sector copy.
-- Hardrive
cady --- For a portable computer you can buy what is called a harddrive
cady that allows 2nd harddrive to plugged in where the optical drive goes.
Youtube guy was able to remove the optical drive by just taking out one
screw in bottom and it pulled out. He then just plugged the cady with new
hardrive in in the optical drive slot.
-- You can
also use the cloned drive in another PC, and aside from some potential
missing drivers due to hardware differences, it should work just like your
old system, making it an ideal backup in the event of a damaged PC. (PCMag)
(Won't Windows fail to run without a new key?)
-- WD advises
customer service advises to upgrade hook up your WD drive via sata-to-USB
converter, download WD version of Acronis and clone. Guy on YouTube video
says it doesn't work. This free WD version of Acronis will only work if
it sees a WD drive, and through the sata-to-USB converter it can't identify
the drive as WD so it wont run! Yikes, drive customer service. How could
they not know this doesn't work.
-- (One reason
I think running a clone along with the cloned drive is rarely discuess
is apparently a few years ago the OS didn't allow it. This forum poster
expresses the old view of not working only to be corrected by people who
know it now does work.)
You cannot
make bootable clones because it is illegal to have multiple working copies
of software that you only have 1 license for. Cloning software will make
an exact image of a drive with an OS, but it will not include the boot
loader if you are not actually changing the drive out with another one.
If for instance, if you were changing a drive, it would configure a new
bootloader on the cloned drive, but disable the one the drive you just
copied. There are ways to fix the problem though as described by other
answers in your thread. (not true, some clone software like Casper 8 makes
bootable clones) (http://www.tomshardware.com/forum/33902-63-clone-windows)
(reply to above)
This needs
reworded or something. What's the point of cloning software if it won't
copy the boot loader. Cloning software should make an exact copy of the
drive, boot loader and all, and that is exactly what cloning software does.
You can also have both drives installed afterwards, but you have to make
sure the bios boot order is set to boot from the correct drive. I'm not
sure why you'd want two copies of a drive in a system though, unless you
are going to reformat the old drive and use it for storage.
(original poster responds)
Really? Please
tell me what software you have used that does this, as I have never seen
it work as you describe. Perhaps I have be doing something wrong as well.
I'll add though that is has been a couple of years since I did any cloning,
maybe something has changed?
(reply)
Acronis true
image, clonezilla, macrium reflect, norton ghost,...
(another poster replies)
This reason
why a clone install doesn't include the bootloader for the OS , is to prevent
certain individuals from doing a copy of there hard drive and using it
to power and other chasis . Otherwise people would share these all over
the internet , because the Os can usually adapt to configuration changes.
we call upgrades like motherboard or Cpu swaps * This is the price
we pay for Windows not locking down our install to specific hardware ,
and being able to hot swap anything out with compatabile hardware and expect
the machine to still boot.
(reply)
I think I
know where your problem lies. If you have multiple drives installed when
you first install your OS, windows will put the OS on one drive and the
boot manager/loader on another drive. This causes problems like you are
having. Whenever you install a windows OS, make sure only one drive is
attached to the system. This forces windows to put the OS and boot loader
on the same drive. Once the OS is done installing, then install your remaining
drives. this is what I do for all my systems.
Uses a clone to test risky software downloads
Just occured
to me that one good use of a clone is testing risky software downloads.
If the install brings in viruses or rootkits no problem, just reclone and
all the crap is gone. The clone can act like sort of like a reverse Restore.
Instead of rolling the back to a previous time, it advances the clone to
the latest clean version.
Disk check software
Using AOMEI
disk partition lite (free) to check all my hard drives for bad blocks.
It's the first software I have found that will map out the location of
bad blocks using a single screen of 3,000 or so (61 x 49) green/red blocks
that it fills in as it goes along (like the old Norton utilities). It adjusts
the sector/dot based on size of partition, so the screen is always the
same, each line 2% (approx) of partition. This nicely shows in proportion
where a bad block is. This mapper check has no option to repair, it will
just show if and where any bad blocks are. (Another option will launch
Windows chkdsk for whatever repair it can do.)
I developed
confidence in this program when it found a hundreds of bad blocks at exactly
the sector # that Seagate for Dos found bad blocks (and did some repairs
before crashing!). Time: 1.5 hr for a 1 Tbyte drive that has no bad blocks.
When it hits bad blocks, it slows to a crawl counting the blocks, like
one second per block!. It never did get past the bad block cluster on my
sick drive after counting several hundred. Select partion, Check partition,
check whether there is a bad sector on partiion (3rd choice):
Internal Seagate drives (both new)
c:\ main 1 Tbyte
0 bad blocks
(System and d:\ Recovery partions 0 bad blocks) 134 mb/sec
f:\ 500 Gbyte clone #1
0 bad blocks
(System and g:\ Recovery partions 0 bad blocks)
136 mb/sec
750 Gbyte Seagate (sick) in enclosure via esata
124 mb/sec (esata)
h:\ 157 Gbyte partition (passed)
0 bad blocks
y:\ 12 Gbyte partition (passed)
0 bad blocks
i:\ 370 Gbyte partition (sick)
many bad blocks found starting at 817,xxx,xxx LBA
z:\ 209 Gbyte partition (passed)
0 bad blocks
USB WD data drives via USB (2 or 3)
j:\ 2 Tbyte WD USB 1021
0 bad blocks (22 hr!)
(old data drive)
23 mb/sec (via USB 2)
k:\ 2 Tbyte WD USB My Book
0 bad blocks
(new data drive)
79/23 mb/sec (via USB 3/2)
I worked on
the bad blocks on my sick 750 Gbyte drive, partly for fun and test and
partly to see what could be done. Knowing where the bad blocks were located,
I partitioned the drive to contain them in one partition. I later was able
to clear them out, at least temporarily, by two full sector formats of
that partition. This enabled the drive micocode to see that they could
not reliably be written to, and it swapped them out with sectors from its
reserve store.
Too slow
I am coming
to realize that 2 Tbyte drive over USB 2 is too slow. It works fine for
normal file acess, able to stream recorded hidef TV shows without problem,
but when it comes time to check it or back it up, it takes forever. For
example the complete sector check above of my newer 2 Tbyte USB 3 drive
took 6 hr (overnight), but for my older drive of the same capacity with
a USB 2 link the time needed is 21 hr (impractiscal).
The full scan
of my 2 TByte drive is expected to take about 7 hours via USB 3. This is
x3.5 faster than the same drive plugged into a USB 2 port, so it proves
tha my new USB 3 card really can speed up some operations. The check out
of all the sectors on my older 2 Tbyte USB 2 drive is going to take close
to 24 hours!! Above disk read/write rates show sata x1.7 faster than USB
3 and esata only slightly (10%) slower than sata.
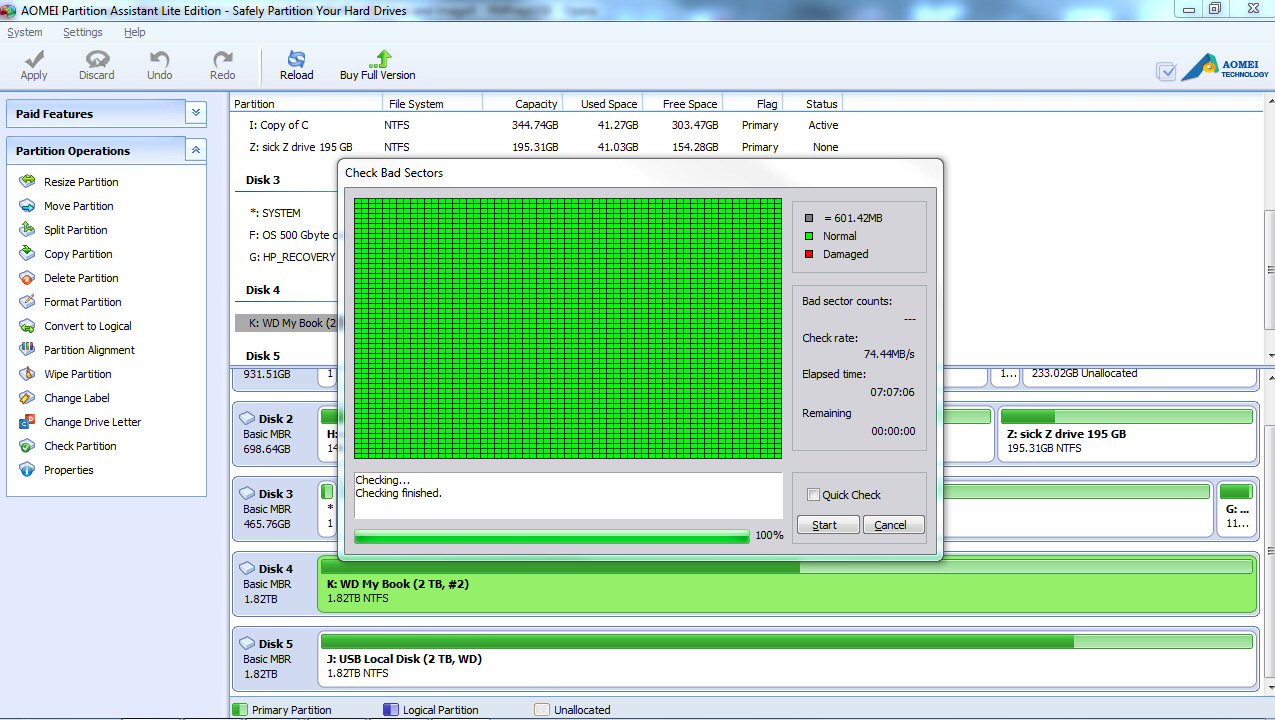
Here's what you want to see -- 100% clean
7 hours check (via USB 3) shows no bad sector counts
in my WD 2 Tbyte USB data drive
Weird Windows boot in a quintuple boot system (4/30/14)
I swear Windows
is such a piece of crap. I've been testing clone software so currently
I have FIVE bootable drives in my system all selectable at boot with a
quintuple boot menu set up by EasyBCD. This setup all works, with one caveat
that I will get into. I can certainly boot from four of the five drives
and disk configuration tells me I can boot from the 5th too.
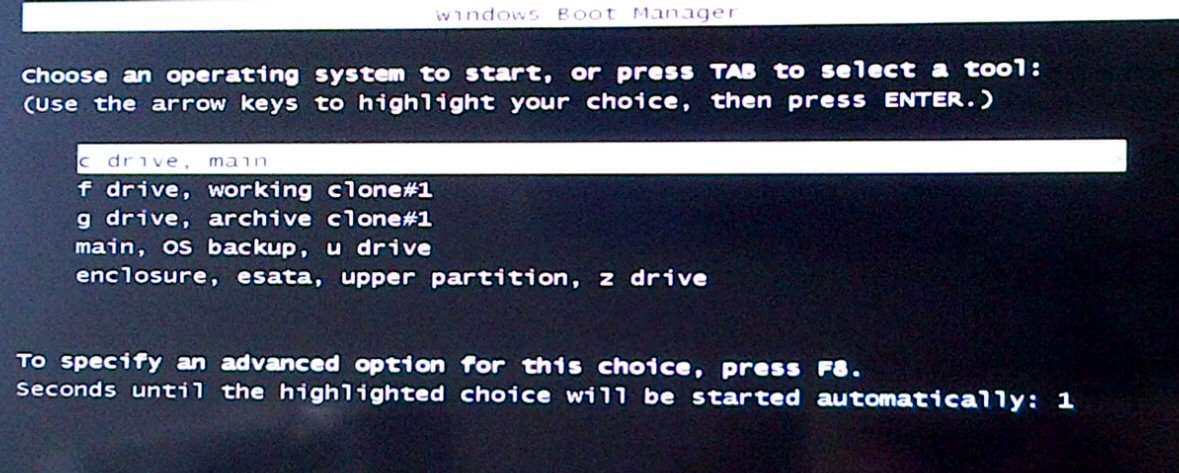
Quintuple boot -- choice of five bootable drives (5/27/14)
This screen pops up for 15 seconds (programable) during
Windows 7 boot.
If no key is hit, boot occurs from the highlighted
first selection ('c drive, main').
(Menu descriptions, order and default along with screen
display time are edited using EasyBCD)
Two drives,
my main drive and clone #1 drive, are internal hard drives. The other three
bootable drives are partitions on the same physical hard drive, which is
the old drive I removed from my computer now mounted in an enclosure and
connected via an esata cable. I use currently using it to test clone software.
All five bootable drives have pretty much the same 50 Gbytes of OS, program
files and data, because all were originally cloned from original hard drive.
The three bootable clones on the external esata drive were cloned from
the main drive or the internal clone #1 drive using either Casper
8 or AOMEI Backerupper clone software.
In rapid succession
I booted all five options. Four of the five boots were normal and one was
weird, as I will explain. I originally assigned letters to the partitions,
but Windows (on its own) changes letter assignments when the system boots
from other than the main drive, because it normally makes the root directory
of the booting drive the c:\ drive, hence the root directory of the main
drive has to be assigned another letter. Often drive letters of two drives
will just switch. For example if my main drive's root directory is c:\
and clone #1 files show up as f:\, then if I boot from clone #1, c:\ and
f:\ just switch, I find the clone #1 files on c:\ and main drive's files
on f:\. After each boot I screen captured the disk configuration
page. It shows the physical drives and what is important their letter assignments
for that particular boot. The letter assignments on Explorer are always
the same as the letter assignments on the disk configuration page.
Here's the
weirdness. The booting drive or partition is clearly shown on the disk
configuration page as 'boot, page file' (etc) and in 4 of 5 cases the booting
drive or partition is assigned the letter c:\, which it should be, but
in one of the five boots it is not. This is not a detail, not just
a letter assignment issue, because in the weird boot the desktop that came
up is
not the desktop on the booting drive, the booting drive is
not in control. So here's the problem, either
a) Disk configuration page is lying and the boot didn't really come from
the partition marked 'boot', or
b) Boot came from the partition disk configuration shows, but somehow its
files and desktop did not load to control the computer
I have researched
this problem and can find nothing. It is a bitch to search, but I can find
no one ever reporting this. It's not a one time thing, it repeats. This
is also not the first time I have seen something like this either. A few
weeks ago when my original drive was still internal and I had a clone drive
connected via USB, I thought the USB drive had booted the machine. Why
did I think that? Because the disk configuration page told me that!
Yet like now the clone did not take over the machine, its desktop did not
come up and its files remained at f:\. I wasted a lot of time trying to
get a USB drive to (properly) boot and take control, because the disk configuration
page was telling me I was very close, that a USB drive was actually booting
Windows, something that weeks later I suspect may not have been the case.
First boot
is baseline, it is a boot from my main (1 Tbyte) internal drive. In the
2nd and 3rd boots only two letters change, the main drive's OS partition
swaps letters with the booting OS partition. The 4th boot is a little odd
in that when booting from the z:\ drive nearly all the drive letters have
changed. Why the difference? Not a clue. The 5th (weird) boot has exactly
the same letter assignments for all partitions as the 1st boot, which would
seem to indicate of the main drive booted, yet the h:\ partition on disk
1 is shown as the booting drive!
Here's the
disk configuration page for the five boots. There were no hardware or software
changes between boots, which were all done in the space of less than an
hour. Notice the physical disk and partition configurations never changes,
but the drive letters move around. In each case the partition marked as
the 'boot' partition is the drive I chose from the boot menu. First is
my baseline configuration, next a boot from clone #1, then three boots
from the three bootable partitions on the esata drive. The last one is
the weird one, notice its partition marked 'boot' is not c:\, which it
is in all the other four boots.
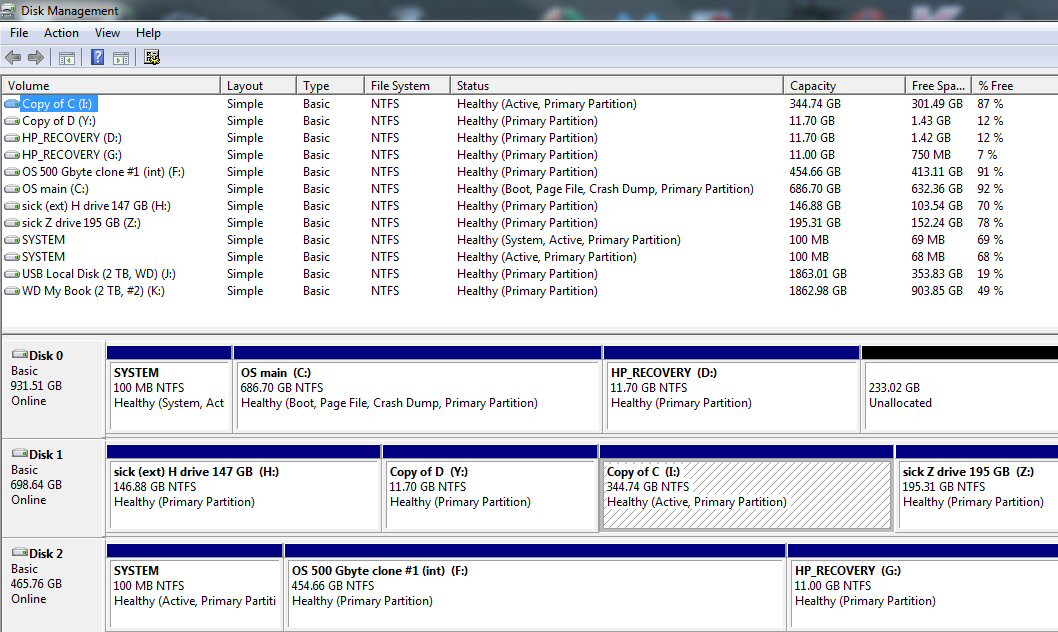
Baseline configuration, booting from internal Disk
0
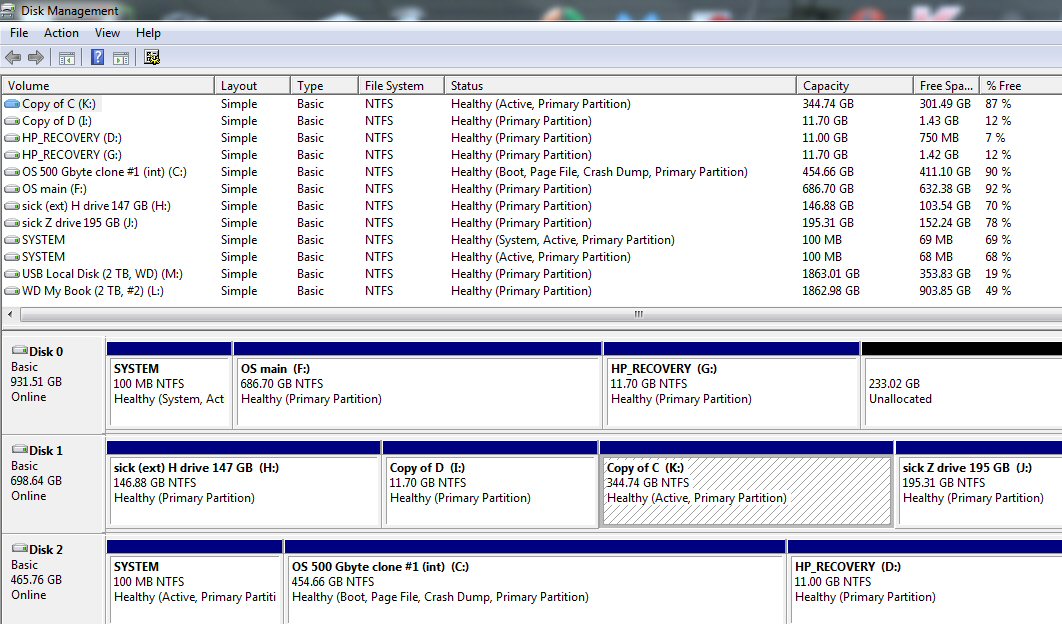
Booting from clone #1 Disk 2
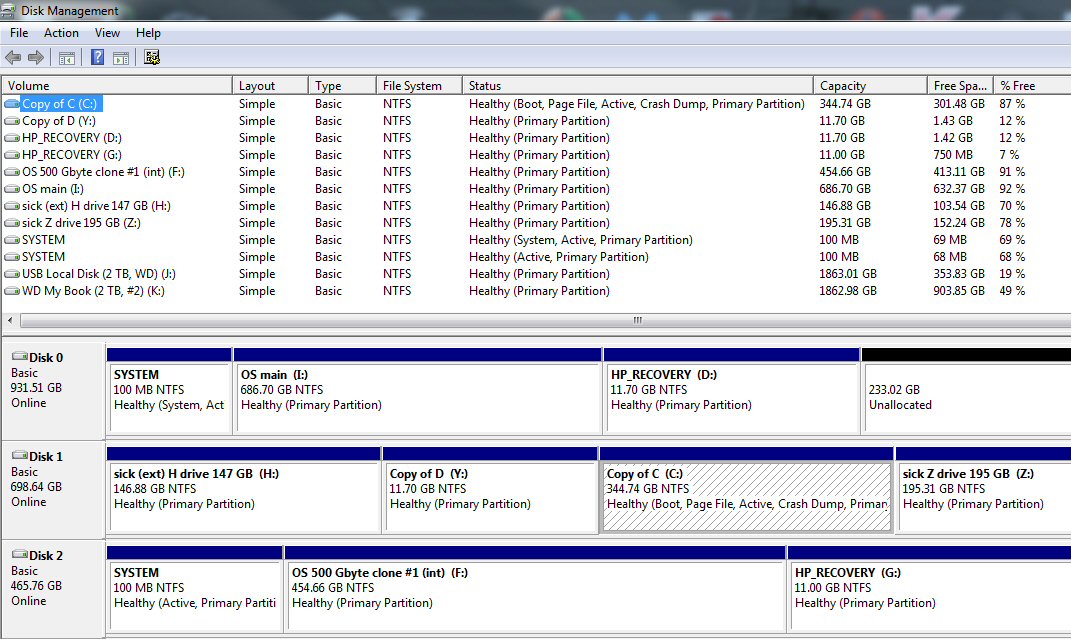
Booting from 345 Gbye partition of esata connected
Disk1
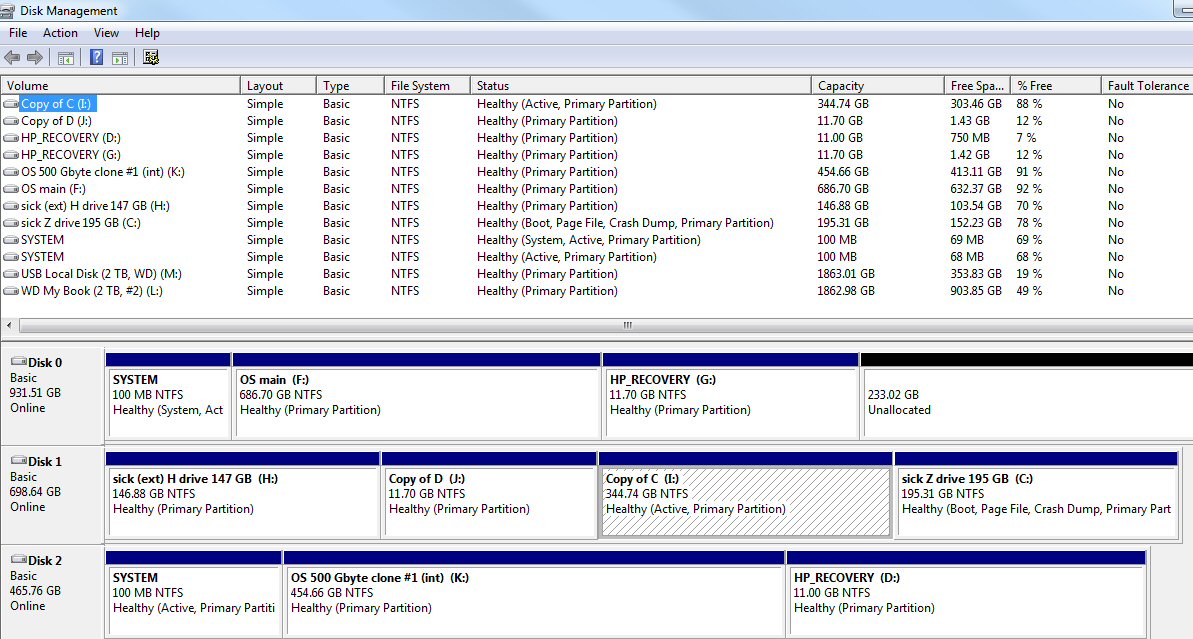
Booting from 195 Gbye partition of esata connected
Disk1
(There's someting odd in this boot, nearly all the
drive letters have been changed.)
Weird boot
Below is the weird
boot. Note the 1st partition of Disk 1 is marked 'boot', but the desktop
of this drive did not come up, and unlike all the other four boots this
'boot' drive was NOT been assigned the letter c:\. It retained its original
letter h:\ with the main internal drive assigned c:\. So which drive really
booted, Disk 0 (c:\) or 1st partition in Disk 2 (marked 'boot')? Who knows?
But I do know this, even if the boot technically did come from Disk 1,
Disk 0 was in control of the machine, its desktop came up and its root
directory files showed as c:\.
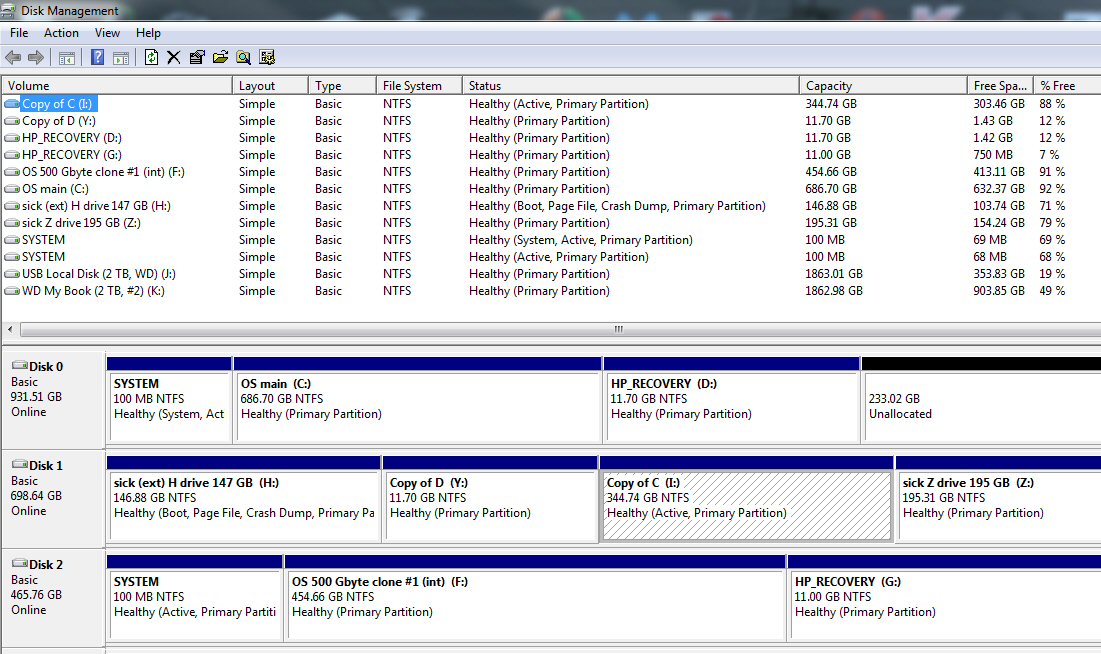
Booting requested from 147 Gbye partition of esata
connected Disk1.
This is the weird boot. Above shows boot from the
1st partition of Disk 1 but its desktop did not come up,
and as above shows it has NOT been assigned the letter
c:\.
It retained its original letter h:\ with the main
internal drive assigned c:\.
Even weirder boot (update 5/1/14)
This boot
was done next day and is even weirder than the weird boot above. This boot
really bothers me as it undermines what I thought I could trust. I thought
I could tell at least which partition was which by the names I have assigned.
That has always been the case, but with this boot I am not so sure.
Here is the
situation. I had just cloned the clone #1 (500 Gbyte) drive OS f:\ partition
to sick drive (750 Gb esata) z:\ partition, which had just been reset up
and formatted. I did this clone with AOMEI because by test it is x7.5 faster
than Casper, at least when doing a fresh clone over esata (20 min vs 2.5
hr!). (My moving on of clone #1 to clone #2 (z:\) was in preparation
for updating clone #1.) I then booted into the new z:\ clone to check it.
But what came up (see below) as the c:\ drive appeared to be clone #1 (old
f:\ drive) at least that was the name attached. (z drive got relettered
to be E:\, which is bizarre because E:\ is always the DVD drive). Now the
desktop looked like clone #1, but of course clone #2 has the same desktop
due to the clone.
Here's the
really weird part. From below it would appear I have the weirdness of above,
it shows I have booted of 'z on sick' (now E:\) yet clone #1 has come up
as c:\, but there is a problem. Explorer shows the size of two 'identical
drives' as c:\ 40 Gbytes (on internal clone #1) and E:\ 46 Gbytes (on sick
esata drive) the 6 Gbyte difference being the size of page.sys file. This
clone was done by AOMEI, but when Casper clones the new clone is always
smaller
than the original because as Casper explains it does not copy two (large)
system files (page.sys and xxxx.sys) which are just temp working files.
I haven't yet checked if AOMEI does the same thing, but I would expect
it to. The problem is I found 6 Gbyte page.sys tile no on clone #1, but
on the newly formatted clone on the esata sick drive 3rd partition (original
z:\). What!
This leaves
me totally confused as to which partition was copied to which, which set
of files is controlling the machine. c:\ carries my label clone #1, so
I have every reason to believe that this set of files in on my 500 Gbyte
internal drive, yet it is smaller than its supposed clone on the
sick esata drive. I can't tell from the desktop or file dates since they
are clones of each other, and everything agrees and I do get a clone #1
style desktop. The only think I can think of is this: Is it possible that
AOMEI clone does exactly the opposite with page.sys as Casper? I would
find it shocking if it was, because it would mean AOMEI is actually modify
the directory that it is supposed to be just copying!!
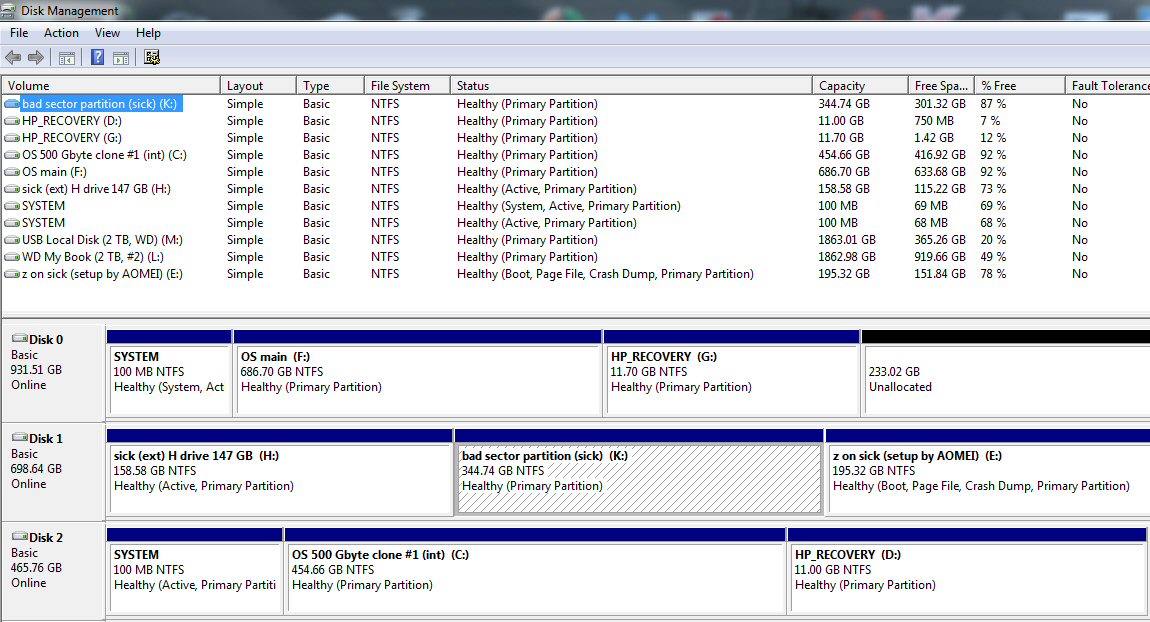
I booted to the old z:\ here relettered E:\ and it
is shown as 'boot'
Above shows clone #1 files in control as c:\ directory.
The problem is c:\ (clone #1) was SMALLER than 'z
on sick' (clone #2) because 6 GB system page.sys file was ONLY on
'z on sick'!
Don't need no System partition
Notice also another
interesting thing. Disk 0 and Disk 2 both have a System partition (and
Recovery partition too) which was created by the clone software when
it cloned my original disk. However, there is no System partition (or Recovery
partition) on Disk 1. This is because when I cloned to Disk 1 I only closed
the OS c:\ partition, yet these partitions on Disk 1 are all bootable!
I researched this and found that indeed, while Windows installations makes
a (small) System partion, it is really not needed as the required boot
files are on the c:\ partition.
Boot Reference
Link below
has a wealth of articles on booting and boot software. Don't see any workaround
on this site to allow Windows (except for new Windows 8 Enterprise) to
boot from a USB hard drive. (Booting from a USB flash is standard, but
a USB hard drive, nope.)
http://www.rmprepusb.com/tutorials/win8togo
Fixing bad sector on hard drive
Well 'fixing'
is standard term, but really the objective is to to make bad sectors invisible
to the OS. Hard drives come with spares built-in microcode that swaps in
good sectors from its reserve store when sectors are marked bad. The question
is how do you get sectors marked bad. I researched this one evening thinking
I would find a lot of disk repair utilities. What I found was very little
software and even less good information. A lot of articles suggested the
way to clear bad blocks was to 'write zeros' to all sectors, but I couldn't
find any utility to do this. Others though chkdsk or format would identify
and mark bad blocks, but did not really know for sure. The general recommendation
was go to the hard drive vendor for tools, but my experience is that the
two tools I have used from Seagate are so bad that I didn't want ot go
there. I found a forum reference to a hard disk program called HDDScan
written in Russia (by one guy), but when I downloaded it and clicked the
.exe file nothing happened. Too bad because it looked interesting with
options to read sectors in 'linear mode', which I guess means see info
on the raw voltage pulse from a sector read.
Slowly I came
to realize why working with bad sectors on a hard drive is such a jungle.
Objectives differ. Many people, not surprisingly, are most interested in
getting the data off bad sectors so they can recover a file, or write and
image or clone. Certainly that was my main objective when my one and only
hard drive had bad sectors and was killing my backup attempts. What saved
my ass was Seagates's SeaTools for DOS tool that worked well enough overnight
to 'repair' bad blocks, so that next morning I was able to get a sucessful
clone copy. One guy said hs sector by sector checking was going to take
760 hours for a single 2 Tbyte drive. His objective was not data recovery
but to mark bad sectors fast to get the bad sectors over a threshold that
he could return the drive under warrantee. Another problem is some of the
discussion and utilities are out of date. In the old days the OS could
do a real low level format, but I read that modern drives don't allow low
level control like this anymore. I never did find out if writing zeros
is outmoded, I never figured out if this is what format does, and I certainly
never found a utility that would do it.
My bad sector work
I started
with an excellent tool I had stumbled upon: AOMEI's Partion Lite (freeware)
that maps bad blocks in a partition. I had faith in this because it found
bad sectors on my sick drive at exactly the same LBA (logical block address)
that Seagate Dos tools had found them. I have used it to scan all my other
hard drive (except USB 2 Tbyte that will take 24 hr!), and they all
came up 100% green with no bad blocks found.
I decided to
experiment. The obvious place to start was with format and chkdsk. From
the disk configuration page I full formatted (removing the 'quick format'
check mark) the partition where I knew the bad blocks were (300+ count).
Full format took 2-3 hours for 375 Gbyte partition. I found this full format
clearly helped clean up the drive. After the format, AOMEI showed two small
clusters of bad blocks, totally only 37, easily a 10:1 reduction from before.
With fewer bad blocks the scan was able to complete . These two bad clusters
(close together) startied just a little further along than before. So I
a full format again (overnight) and next morning the scan came up 100%
green, 0 bad blocks. Hence the data is clear, in a 'full format' the drive
(at least Seagate drives) appear to be detecting bad blocks and swapping
them out. That day after two clones it still checked out 100% clean.
Formatting
is indeed a way to clear a drive of bad blocks.
List of free backup/clone utilities
AOMEI backupper
(and partition lite)
EaseUS Tudo
Backup
FBackup
Backup Maker
Comodo Backup
Clone software testing
AOMEI and
Casper will both clone partions.
AOMEI x7.5
faster than Casper in cloning via esata [120 Gb/min vs 16 Gb/min, or 20
min vs 150 min for 40 Gbyte (c:\main to (sick) i:\ partition)]
Reject
Macrium
--- Does not do partitions (insisted on erasing all partitions on target
sick drive)
Backup
Maker --- No clone, file backup only
FBackup ---
No clone, file backup only
AOMEI clone/backup and partition utilities (keep)
Good: fast
clone via esata (27 min/50 Gybe)
AOMEI cloned partition to esata sick drive (i:\ partition with bad blocks)
verified bootable (after added to boot menu with EasyBCD)
** Map of bad blocks using 'Bad sector check' of partition utility
(40 min for 300 Gybe)
(very useful, it has found a group of bad blocks on my sick drive at exactly
the same sectors Seagate for DOS located night before)
150 Gb bad block scan takes 25 min (if no bad blocks). It crawls when it
hits a string of bad blocks.
Bad: file backup
is only image backup
partition clone (without asking, repartioned taget drive when cloning 11
Gbyte recovery partition)
clone not set bootable?? (it booted!)
Cloning speed --- a wide variation
What I never
see talked about online is cloning speed, but in the real world this is
important. I find in my testing of various clone software and hardware
configurations that clone speeds are all over the map, a huge variation.
For example, the time to clone (or re-clone) my 50 Gbyte primary hard drive
varies from as little as 4-5 min to 2.5 hours. This is a 30:1 variation!
There are two
major reasons for the large speed variation. For some reason I found writing
speed to my esata connected clone varied hugely. Casper when writing to
my esata clone slowed way, way down (factor of x7.5) compared to it speed
writing to the sata clone, while AOMEI slowed little variation, just 10%
slower on esata. The second reason is that some clone software can do incremental
clone updates and some can't. An incremental update saves a lot of time,
for example, 5 min vs 20 min for 50 Gbyte.
Casper and AOMEI
I have
focused my attention on two lesser known (newer) clone software packages:
Casper 8 and AOMEI Backupper. In one list of ten top backup programs neither
of them were listed, partly I think because they are newer. Acronis (True
Image) seems to get the most press, but beause of my huge problems with
it (free WD version) I have avoided it. The two I have been testing are
quite flexible and have a clean interface. (Other clone packages I downloaded
got deleted quickly because their interfaces were so damn annoying.)
I started off
using Casper 8 (30 day trial). Since it seemed fast and clean and works
with different size clone drives, I bought it for $50 intending to make
it my primary clone software. I later learned that (for some reason) its
writting speed to an esata drive was much, much slower than to a sata drive.
Then I stumbled onto AOMEI (free version), another capable program with
a clean interface. I found AOMEI site has other useful free hard drive
programs. I have been using their partition (lite) tool to check my hard
drives for bad blocks. It does sector by sector read/write, counts any
bad blocks and produces a cool map of where bad blocks are located, plus
it's a high power partition utility too.
Here's the
features to check in clone software:
* Write speed
write time to sata clone
write time to esata clone
can clones be incrementally updated?
* Boot
do clones boot (without fixing MBR)?
* Flexibility
can clone drive be smaller than primary drive?
can individual partitions be cloned and save to or just whole drives?
* Image option
does software also do image backups?
My requirements
are a bootable clone. Plus I want the option to use a smaller drive for
the clone and (partly for experimenting) the flexibility to make any partition
the target or the source. And of course, the more speed the better assuming
the clone is ok (verified?). 20 min clone and 5 min update is real nice,
but 2.5 hr to write the same stuff to an esata connected clone is ridiculous.
Caveat --- My esata connected clone at this point
is my three year old original drive, whereas my two sata drives (main and
clone #1) are both new sata 3 drives mounted internally. I don't know the
sata speed of my three year old motherboard. It is not on the HP or motherboard
spec, which leads me to believe it might be sata 2. One technical reviewer
of the HP p6510f said it was sata 1, and it is true all I see in the bios
is sata 1, but there is are counter arguments.
The hard drive
that came with the machine is 7,200 RPM sata 2 drive (Seagate Barracuda).
I now have two sata 3 7,200 RPM drive plugged into the motherboard and
working fine. The key thing is that sata 3 hard drive is backward compatible
with sata 2 (it downshifts in speed by factor of 2), but to work at sata
1 speed a jumper must be put on pins on the drive. My original hard drive
did not have a jumper nor do either of my new drives. Hence the motherboard
must be supporting (at least) sata 2 speeds. Also I see posters in 2007
with motherboards at that time supporting sata 2 and the HP p6510f was
introduced three years later (2010). Sata 3 standard was released in 2009.
Yet there are
counter-counter arguments. I saw hints that maybe drive vendors made sata
2 drives backwood compatible with sata 1 (even though the standard didn't
require it). In the early days of the sata 2 drive it would certaintly
have made it easier to sell drives! Two if my motherboard did support sata
2, why does it not say this in the spec or in the bios? Furthermore my
computer was mid-range in price in 2010, and this is just the place to
save money with a tiny tradeoff in speed that would never be noticed by
99+% of users.
Sata speed is
determined by the slowest element n the chain. For the case of the internal
drive, this is just the drive sata rating and motherboard sata rating.
For esata you must also consider the sata rating of the enclosure and the
esata card (or port) on your machine. In my case.
Motherboard
sata 1 (maybe sata 2)
Internal Seagate drives (new, main and clone)
sata 3
External 'sick' drive (original equipment drive, 2010)
sata 2
Vantec 3.5 " USB 3 and esata enclosure
sata 2
Computer esata card
(none) (pass-through type)
Anyway in terms
of real transfer rates the sata speed of the interconnect link between
the drive and motherboard probably doesn't matter much. It's a peak transfer
rate, the average transfer rate is dominated by the time it takes to move
the heads and for the platters to spin around. I crunched some numbers.
My fastest transfer is about 20 min to write a 45 Gbyte clone sata to sata,
but there's overhead setting up and verifying, say the actual transfer
time is 14 min or 45 Gbye/14 min = 3.2 Byte/min or 53 Mbyte/sec. I read
in forums that 50 Mbyte/sec (sustained) is reasonable for hard drives,
only the fastest 10,000 RPM drives can reach 150 Mbyte/sec (near sata 1
saturation limit) for a portion of their platter.
One
poster measured these numbers. Time to move 4.7 Gbyte video file: 260 sec
(18 Mbyte/sec) with esata and 315 sec (15 Mbyte/sec) USB 2. In my test
AOMEI took (with overhead) 49 min (2,940 sec) to write a 42 Gbyte clone
to the enclosure drive via USB 2. This is a USB 2 transfer rate of 14.3
Mbyte/sec, very close to the 15 Mbyte measured by the poster.
The sata 2 (peak)
rate is 3 G/s (bits/sec) or 0.375 Gbyte/sec or 22.5 Gb/min. The sata 2
peak transfer rate is x7 my measured actual data transfer rate! Sata 2
or 3 is going to make almost no difference to the average data transfer
rate. The key thing is that the sata speeds of the drive and motherboard
are compatible.
AOMEI 'USB' drive bootable
Looking over
AOMEI Backupper I noticed under utilities that it specifically said it
can make a USB drive bootable. That looked interesting so I tried
it out. I powered down and changed my test enclosure drive from esata to
USB 3, and verified that all three of its partitions had 50 GB clones.
The AOMEI warning was not very clear, but seemed to say the whole drive
was going to be erased. I said OK, but when I later checked only the first
partition was erased and a boot partition added, the other two partition
clones were intact.
When I tried
to boot from it, I found the drive was not on the boot menu. I went into
the bios and looked at the USB devices and it was there either. My USB
3 is via a PCE card I added. What I learned from the bios is that it sees
the card (one USB entry) but can't identify anything plugged into the card.
So I can't boot from a USB 3 device with my hardware. So I switched the
enclosure over to USB 2, and now my sick test drive showed up in the boot
menu. When I selected it, I did indeed get it to boot!
I didn't know
what to expect. The only thing on that booting partition is what AOMEI
put there. I thought it was going to be like the Windows 7 recovery DVD
environment, but it's not. It had two just two features. Its main purpose
was as recovery media for an AOMEI created image, a (graphical) way to
find the image and use it to restore. The only other tool on the screen
was a command box, which if you are not a pro is pretty much useless. It
does boot, so there might be a way to get it boot into a clone (or a windows
installation), but I don't know the details of how to do this. (I know
when USB flash is prepared, it is first made bootable and then the Windows
installation, or whatever is added.
Macrium Reflect clone software
Hard drive ID
-- "Macrium
Reflect manages the hard drive IDs such that the target disk will be bootable
on the same system once the cloning process has been completed."
Drive ID is
a tricky thing. I read that you can't have two bootable hard drives on
your system with the same drive ID. I think this explains why some old
time pros don't think cloning is a practical backup strategy only to be
contradicted by younger pros. On the Macrium site I found this interesting
detail about their clones. It probably just means that when they do a clone
the two bytes that make up the drive ID are not copied, that a new ID is
inserted.
Clone to a USB connected drive
--"You can
also clone your hard drive to a hard drive installed in a USB hard-drive
Caddy using this as the Target/Destination. To boot your computer with
the hard-drive from the Caddy, the hard-drive will need to be installed
into your computer such as by using SATA.
Here Macrium seems
to be saying that you can clone to a USB drive, then if you remove it and
connected it via sata it will boot. This should mean that a clone made
to a drive in my Vantec enclosure via USB can be booted from there by just
changing over to an esata cable. I need to try this. To data I have been
both making and booting my external clones via esata. Presumably it also
means that hard drive cloned while hook up to a sata-to-USB adaptor an
be booted by plugging its sata data cable direct into the motherboard sata.
The
reference here to USB is confusing. I first learned about the 'hard drive
caddy' in a YouTube video. It was a little plastic piece that allowed laptop
users to insert a 2nd hard drive for cloning into the DVD bay of their
machine. The video showed a single screw on the back being removed and
the DVD player slid out, then in the open bay a small hard drive sitting
in the caddy was slid in. In my desktop machine the DVD has the same exact
type of sata data and power connectors as hard drives, so presumably laptops
do to. But if this is the case the caddy hard drive is direct connected
to sata not via USB.
OK, I think
I figured it out. I see on Amazon that a small plastic enclosure for a
2.5" drive with both a USB and esata port is called an "external enclosure
caddy", so caddy is just another word for enclosure.
Bytes/sector
There are
seem to be two 'bytes/sector' in use: 512 and 4,096. There are four possible
combinations that can be run into when considering a source and target
for cloning or image backup. Macrium explains that three of the cases are
no problem, but one is not supported and that is when the resolution of
the target is coarser than the source: source = 512 and target = 4,096.
I checked all five of my hard drive (see below) and see that all of them,
including my 2 Tbyte data drives, have 512 bytes/sector.
To
find the bytes/sector: Press the 'Windows' key, type 'System Information'
and press 'Enter', then 'Components', 'Storage', 'Disks'.
Macrium explains
that the 512 or 4,096 is associated with the 2 Tbyte limit. All drives
used to be 512. Some USB enclosures report a fake 4,096 even if the drive
is 512, and the reason for this is to allow a stardard MRB partition table
to work with drives 8x larger than 2 Tbyte. However, clones made to drives
in USB enclosures that fake byte/sector cannot be read when plugged directly
into sata, they will not boot.
Macrium images
Macrium will
do both clones and images. There is a YouTube video from Brittec on restoring
from a Macrium image. I learned three interesting things here. One, you
can look inside the image an pull out files: right click, select 'Explore'.
Two, while Macrium makes an image in a proprietary format, the image can
be converted to a stardard Windows image (.vhd or virtual hard drive),
by a pull down menu at top of screen. To 'mount' an image, simple means
to assign it a disk letter so it show up in Explorer. Three, recovery of
an image needs a 'recovery media', and there is a way to do this from the
main screen under 'Other Tasks'. It makes a Macrium recovery image that
operates in the Window PE environment (Windows preinstallation enviromnet
or WinPE).
http://kb.macrium.com/KnowledgebaseArticle50081.aspx
I later uninstalled
Macrium when I found its clone feature would not clone partitions.
Data drive speed tests
My USB 2 Tbyte
data drives have about 700 Gbytes of data. If I clone one drive to the
other, I expect this is going to take many, many hours. Since about half
the data on my these drives are lower priority video files (mostly DVR
captured TV shows), and I now comfortable with partitioning, I decided
to partition the data drives putting the video in one partition and my
personal stuff ( photos etc) in the other. This way my personal stuff can
be backed up more often and will go twice as fast.
Before I could
begin cloning I had separate my data into the two partitions. It was when
I began copying 350 Gbyte of data that I saw how slow this process could
be. Upon thinking about it, I wondered if there might be significant speed
variations depending on how the copying is done. I decided to run some
tests. With a USB 2 data drive, USB 3 data drive, plus a sata drive in
an enclosure with both USB 3 or esata links, I can test lots of different
combinations.
I
just learned one hard lesson. I started off with a 'cut' and 'paste' of
my video files. This was scheduled to take about seven hours and when I
got home it was about half done. Without giving it any thought, I canceled
the copy to do speed tests. I wanted to clear out the new partitions so
I deleted the pasted files, which I was told were 'too big for Recovery
bin'. I soon realized that doing a 'cut' instead of a 'copy' was a Big
Mistake, it's too easy to lose your stuff. I found half my video files
on the source drive gone, they got 'cut' even though directory copy was
not completed! Thank goodness I still had a copy of them on my other data
drive, but it will take many hours to restore what got 'cut'.
Since I am starting
off with the two data drives (nearly) clones of each other, I can copy
the data is different ways too. For example I wonder if it's quicker to
move video files to the empty partitions on the same drive or between drives?
If data is read from one physical hard drive and saved to the other might
it be faster due to some overlap in reading and writing? (Yes, says one
data point below. It is about 20% faster to move data between two USB 3
drives and within a USB 3 drive.)
Measured transfer rates and times
Here's a nice
set of timing tests. My test file is 22 Gbyte of video files, 345 files
with an average length of 64 Mbytes. In each case in Windows explorer I
copy and paste. The MB/sec number is the stabilized 'speed' that the copy
box reports. In a couple of cases I checked this number by timing the transfer.
The pattern I find is that the actual transfer time runs 10-15% longer
(say 13 min vs estimated 11 min) than what Windows predicts, which means
of course the transfer rate is 10-15% lower. Nevertheless the ratio
of speeds is probably still valid and using it makes comparing speed of
various combinations a lot quicker.
One entry below
is for a move of much longer video files, and it's x1.5 faster!
I was surprised that apparently file length makes a big difference in transfer
rate. When I copied my 325 Gbyte directory of downloaded TV shows (1.7
Gbyte (av), or x30 longer than test files) in a USB 3 to USB 3 I got 60
MB/sec instead of earlier 40 MB/sec. Doesn't make sense to me this difference
is due to file overhead. In my test directory each file took about 3 seconds
to copy. Partitions on the enclosure drive were changed, is it something
to do with head movement? Don't understand what all the factors are here
affecting speed.
j:\ to q:\ within same USB 2 drive
10.5 MB/sec (0.63 GB/min)
35 min for 22 Gbytes
k:\ to j:\ between USB 3 and
USB 2 drive
17.3 MB/sec (1.04 GB/min)
m:\ to q:\ between USB 3 and USB 2 drive
17.3 MB/sec (1.04 GB/min)
f:\ to q:\ between internal sata
drive and USB 2 drive 18.2 MB/sec (1.09
GB/min)
20 min for 22 Gbytes
k:\ to m:\ within same USB 3 drive
32.7 MB/sec (1.96 GB/min)
i:\ to z:\ within USB 3 enclosure drive
32.0 MB/sec (1.92 GB/min)
13 min for 22 Gbytes
k:\ to z:\ between USB 3 and esata
enclosure drive
33.0 MB/sec (1.98 GB/min)
k:\ to f:\ between USB 3 drive and internal
sata drive 35.7 MB/sec
(2.14 GB/min)
10.5 min for 22 Gbytes
k:\ to i:\ between USB 3 and USB 3 enclosure
drive 39.0
MB/sec (2.34 GB/min)
(k:\ to y:\ between USB 3 and USB 3 enclosure drive
60.0 MB/sec (3.60 GB/min)
x30 longe video files)
f:\ to k:\ between internal sata drive
and USB 3 drive 41.5 MB/sec
(2.49 GB/min)
8.5 min for 22 Gbytes
The big picture
is clear. The time to move the same files around varies about 4:1. Slowest
transfer I measured was between partitions of a single USB 2 drive (35
min) and fastest between an internal sata drive to a USB 3 drive (8.5 min).
Transfer time between two USB 3 drives was almost as fast. Data moves within
USB 3 drives are x3 faster than within USB 2 drives. A transfer between
a USB 2 and USB 3 drive are sort of a (geometrical) average of their two
speeds. A transfer between two USB 3 drives is x 2.25 faster than between
a USB 3 and USB 2 drive. A transfer between an internal sata drive to a
USB 3 drive is x2.25 faster than to a USB 2 drive. A transfer can vary
15% or so depending on direction, with fastest direction being internal
sata drive (reads) to USB 3 drive (writes).
The data shows,
a little surpassingly, transfers from my Vantex enclosure drive are about
20% faster over its USB 3 link than over its esata link. A good sign is
the data shows the USB 3 card clearly works. It cuts data transfer time
by x2.25 compared to USB 2 not only when one USB 3 drive is connected,
but also when the data flow is between two USB 3 drives.
The above data
makes a strong case for updating my data backup clone drive from USB 2
to USB 3. It would shorted the backup time by more than a factor of two
from 11 hours to 5 hours for my current 700 Gbyte of data. This is useful
as it will reduce the time required to backup both partitions from longer
than overnight to overnight. (At this point I have not measured a 'clone'
time, I am using copy and paste times as a proxy.)
External USB hard drives have sata drives
inside
An interesting
long (Apple) article explained that inside nearly all external USB hard
drives (built since 2010) is a standard sata drive (with the usual
sata interface ports for power and data), and a thin PC board that on one
side has female sata connectors for the drive to plug into and on the other
side the external USB port. The article argued that a 'failed' drive maybe
half the time (guess) is really just a failed PC board, so author recommends
prying open the plastic case (will destroy it) and hook the drive to a
sata kit. You might find it still works and you can get your data off.
Does this show
a quick and dirty way to upgrade my old USB 2 data drive to USB 3? Just
pull the sata drive out of there and put it in a USB 3 enclosure. While
with a new PC card it will have much higher peak rates, high capacity USB
data hard drives are mostly 5,400 rpm (cheaper and lower power).
Cloning tests
On my USB 3 enclosure
hard drive I use for testing I made a new r:\ partition with only the 22
Gbytes of video files, then cloned it to another (larger) partition of
the same physical drive. I am going to compare clone times and reclone
times for various clone packages.
Casper 8 and AOMEI --- Casper's stated transfer rate is
4.0 GB/min, twice the stated copy rate. Casper's has an excellent reclone
mode, that couldn't have taken more than 30 secs (and updated clone with
the one file I had added). Was surprised that with default settings AOMEI
reduced the size of the target partition (leaving balanced unallocated)!
AOMEI does not appear to have an incremental reclone mode, it went a little
faster on a reclone. I was going to do the same partition clone with Macrium,
but I found it will only clone whole hard disks. It will only image partitions,
and that took 17 min. (Probably will uninstall Macrium.)
r:\ to h:\ Casper 8 clone in USB 3 enclosure drive
16 min for 22 Gbytes (Casper says 15 min)
r:\ to h:\ Casper 8 reclone in USB 3 enclosure drive
< 1min for 22 Gbytes (smart clone)
r:\ to h:\ AOMEI clone in USB 3 enclosure drive
15 min for 22 Gbytes
r:\ to h:\ AOMEI reclone in USB 3 enclosure drive
13.5 min for 22 Gbytes
This shows
Casper 8 is the best choice for cloning. The big edge Casper has over AOMI
is its incremental clone mode. In this test the incremental mode was very
fast, in a test of 70 Gbytes the incremental mode reduced the clone time
by a factor of three (45 min to 15 min). I will have to see if the incremental
clone mode speed up a large clone of 350 Gbytes to make the speed
of USB 2 clone drive acceptable.
First real data clones
I first used
Windows copy to transfer about half my data files (two directories with
370 Gbytes of video files) from the main partition on my USB 3 data drive
to an upper partition I created. I was now ready to try Casper 8 on a large
clone job. I had it clone the USB 3 data drive upper partition to a large
empty partition on my enclosure drive connected via USB 3 too. The data
drive is a 5,400 rpm drive while the internal drive i the enclosure runs
at 7,200 rpm. The clone took five hours. With no changes I did a reclone
and it finished in less than one minute. So far so good.
Verifying a USB clone will boot via esata
I confirmed
what I read on one of the clone web sites, a clone can be made via USB
and it will boot when reconnected via esata. Using Casper 8 I cloned to
the enclosure drive via USB 3 (c:\ OS partition only), then switched it
over to its esata cable was able to boot from the clone I had just made.
Didn't have to resetup with my dual boot settings either. This means I
can keep and update clones on the enclosure drive with it connected via
USB 3 (slightly faster and safer), and then, if I ever need to boot from
them, I can, but it means going around to the back of the PC to change
the cable from USB 3 to esata, something in the future I will probably
forget. Thus keyboard selection at boot time of internal drives (or boot
partitions) remains the easy way to do clone backups.
Backup clones on pure USB drives are useful
Can
a backup clone on a pure USB (data) drive be moved and still boot? I am
running a test now where a backup clone I made on small partition on one
of my USB data drives is being recloned to my enclosure drive (USB
to USB). I will then power down, reconfigure the enclosure as an esata
drive and see if the twice cloned backup will boot. (All the clones made
with Casper 8.)
Yes, I have
confirmed that Casper 8 clones can be moved around (on USB drives) by recloning
and will still boot when a recloned clone ends up on a bootable (esata
or sata) connected drive. Also it is only necessary to clone/reclone OS
(c:\) partition for it to boot. Test show it is not necessary to clone
System partition or the Recovery partition to get a bootable clone with
the OS, programs, and data.
Checking drives temperature problem
I now have
five physical hard drives each of which is partitioned, so I have something
like 10-12 logical hard drives! The two newer sata hard drives (1
Tbyte and 500 Gbyte) are mounted in the desktop drive bay. Airflow here
looks poor as they are in front corner and with case open and lying on
its side one is above the other. I doubt they get any airflow at all from
the rear mount fan, especially with the side of the case off. My old 750
Gbyte sata drive (with bad blocks, but at least for a while it is bad block
free) is in a fan cooled external Vantec enclosure with both USB 3 and
esata. All three of these drive run at 7,200 rpm, and probably dissipate
about 10 watts each based on a spec I saw for one of them. I have also
have two 2 Tbyte WD external USB data drives in plastic cases. The older
one is USB 2 and a newer USB. One of these data drive is 5,400 rpm and
the other probably is too as most external data drives are 5,400 rpm.
I previously
checked all five drives for bad blocks using AOMEI scan mapper. All passed,
my old sick drive after two full sector formats. I now wanted to check
the drive temperatures (spring day, 70s). All modern drive have a standardized
SMART feature which includes self check and temperature. You would think
it would be easy to find a utility to read the (SMART) temperature of the
five drives. Well think again... Some utilities read only internal drives,
some only external drives, some only drive made by a specific manuf, and
data just goes missing. I poked around on the WD site sure they would have
a way to read drive temperature, putting 'temperature' in their knowledge
data base search. After explaining about the smart temp sensor, including
where it is located, they explained they provide no way to read it (incredible),
but that 3rd party software is available. What software is that? That's
for them to know and you to figure out. Some support!
Tools: Disk
reviewers on Amazon mention using CrystalDiskInfo, but it only does external
drives and it can't figure out the enclosure drive. HP's Hardware Diagnostic
Tool, which came with my computer has info on all five drives, but it only
has temperature for the three external drives. Both of these tools report
the same USB drive temperatures. Another discussed disk monitor utility
HDDScan downloaded and the .exe doesn't run. At this point I have
yet to find the temperature of the internal drives. (Useless SeaTools for
Window reports no temperatures.) HDTune (freeware) is another recommended
disk utility that does temperature. I get it, it does make a scan of access
time vs load, but temp of all five drives is blank.
Read somewhere
SMART needed to be enebled in bios, which seemed odd, so I checked that.
A bios prblem would explain why so many utilities for temp just are not
working. There are SMART entries in bios, and I verified they are set to
'enabled', and it doesn't help. To add to confusion rechecking HP disk
properties I now find only two temps (Seagate 750 Gbyte and old WD 2 Tbyte)
where before there were three, butmissing temp of WD my book is still in
CrystalDisk.
Got fancy trial
version of Hard Disk Sentinel Pro. This is the most data I have seen to
date: full SMART data (including temp), but only for the three external
drives. No info at all on the two internal Seagate drives! Smart data shows
the old 750 Gbyte Seagate had 'reallocated' 526 bad blocks, number is zero
for the two WD USB drives, leading the program to flag its health. Why
can't the new Seagate drives plugged directly inot the motherboard sata
be read?
I find this in Sentinel's help:
Note:
some hard disk controllers or drivers may prevent the reading and examining
of S.M.A.R.T. values. In these cases, the current health, temperature or
other status cannot be determined for the affected hard disk(s). Please
contact the manufacturer of the controller for an updated driver or firmware.
It is not possible to determine the S.M.A.R.T. status of external USB/Firewire
hard disks and hardware RAID arrays.
I have seen one
Amazon reviewer updating firmware on his hard drive, but I doubt this is
it, since I bought one of the Seagate drives 15 months ago and it just
sat in shelf and the other recently. However, the 'raid' array comment
may be a clue. I do think my bios identifies the internal drives as Raid,
which I thought was harmless, and I was getting spurious Raid effors for
a while (like other HP users), but haven't seen one of these in weeks.
Ok, this makes
sense, my motherboard controlller is set up as Riad (confirmed) so this
is why I can't read the SMART data (including temp) of my two internal
hard drives. So in bios I find there are two other entries beside 'Raid',
'IDE, and xxxx. When I change to IDE, suddently a Sata 2 entry appears.
I figure I got it. Won't boot! I try the other controller mode, still no
boot. The only thing I can think of do no next in bios is disable Sata
1, now it really won't boot (imediate black text screen). I've tried every
disk controller option in bios and its back to Raid (and Sata 1), because
this is the only combination that will boot. Yikes! (Last hope is
I have a vague recollection it might be possible to uninstall Raid, which
is just asking for trouble.)
Seagate old 750 Gbyte in fan cooled Vantec enclosure (vertical)
35C
37C
WD 2 Tbyte USB 3 data drive (newer My Book) plastic case (vertical, vented)
41C 32C 36C
39C
WD 2 Tbyte USB 2 data drive (older 1021) plastic case (vertical, no vent
holes)
47C 39C 40C
44C
Seagate 1 Tbyte internal (main) in drive bay
?
Seagate 500 Gbyte internal (clone #1 in drive bay
?
Finally I can see the temperature of my internal drives
After
mucho hours over 2-3 days, I finally solved the drive temperature visibility
problem! The fix was to update the hard disk controller. I found on the
site of a disk utility (Hard Disk Sentinel) that the disk controllers that
ship with computers often block access to SMART parameters (which is where
temperate is), so the solution is to upgrade the driver.
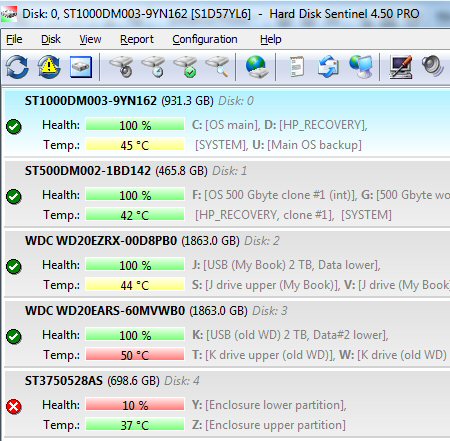
Temperature of my two internal drives (top) and three
external drives (bot) from SMART data read by 'Hard Disk Sentinel' utility
Health of my original 750 Gbyte drive (bot) is flagged
because SMART data shows 526 sectors have been 'reallocated',
whereas the value for all the other four drives is
0.
Hottest drive (50C) is my three year old 2 Tbyte USB
2 drive which is in a plastic case with no vent holes.
For the first
time I know the temperature of my two internal, 7,200 rpm sata hard drives,
and they are OK. I can now see all the SMART parameters for all five of
my drives. The 'bad block' data is how many sectors have been reallocated.
Translation: how many bad blocks have been marked and removed from use.
So temperature
not being readable because the internal drives were 'raid' was not really
right (uninstalling RaidXpert made no difference), but it pointed the way.
The issue was the AMD raid controller chip on the motherboard and its driver.
On device manager this driver is obscure. It is not under 'Disk Drives',
but way down at the bottom under 'Storage Controllers'. The exact name:
'Storage Controllers, AMD AHCI Compatible RAID controller'.
Windows, of
course, told me I was using the latest driver (another lie from Redmond
Washington), but Hard Disk Sentinel provided a long list of updated drivers
that it recommended. I found one under AMD that looked like an update to
the one I had installed, so I downloaded it, and then it was another 30
minutes pointing Windows directly at it to get it installed. And it worked!
When I started Hard Disk Sentinel, up came the temperatures of all five
of my drives (above). A freeware disk utility I had earlier downloaded
(Crystal Disk Info) also changed from displaying only the temperature of
my external drives to displaying the temperature of all my drives.
AMD Raidxpert --- uninstall?
I suspect
that I can't read the temperatures of my internal drives because they are
somehow lablelled as 'raid drives'. Though why reading SMART data in a
raid drive is disallowed is beyond me. Anyway I see my uninstall software
list includes AMD Raidxpert. This is is part of the HP initial software
package. It must mean it is installed, though whether it is running or
not I don't know. I may have shut down a raid service weeks ago to kill
the pesky Raid error. I did some search to see if I can uninstall this
program. Here is what AMD has to say"
What is RAIDXpert?
The AMD RAIDXpert
utility gives you complete control of your RAID arrays within a simple
web browser based application. This tool allows you to monitor and manage
your RAID arrays in the Microsoft Windows environment or via remote login
to your system. ... Upon being installed, the software adds a Windows Service
which is designed to run continuously in the background. Manually stopping
the service has been seen to cause the program to stop functing properly.
It adds a background controller service that is set to automatically run.
OK, it's a utility
from AMD to allow a drive raid array, which their disk controller on my
motherboard supports, to be setup with a browser. Since I am not running
a raid array, it should be OK to uninstall, and the web page implied as
such. A poster had said after Raidxpert was installed on his HP machine
device manager identified his drives as Raid. I do not have this, which
is consistent with its service not running.
AMD says the
executable for RaidXpert is 'BeepApp.exe'. I did a search and there it
is: c:\Windows\SysWOW64\beepapp.exe.
I uninstalled
it. Didn't fix my temperature visability problem, but another piece of
useless crap gone off the system.
Partitioning my five drives
I'm going
with a five (physical) hard disk system:
2 internal sata drives (7,200 rpm)
2 USB data drives (5,400 rpm)
1 USB and esata connected test/extra backup
sata drive in external enclosure
Since I have
learned how to partition and have had no real problems, meaning no data
loss while expanding and shrinking partitions, I've got a little carried
away with partitioning my five drives. Except for the time involved to
set it up, seems to me it just uses the available space more effectively,
gives another layer of backup. For example, since I have deleted some crap
and don't expect to have any more huge images, I've got about 700 Gbytes
of data on my 2 Tbyte data drives, so that leaves a lot of extra space.
So I set aside a small partition at the top of both data drives to hide
an extra backup clone of c:\. This 125 Gbyte partition of the OS backup
will barely be missed on a 2 Tbyte drive.
To reduce clone
time I also have roughly cut the remaining space on the data drives in
half, creating two 850 Gbyte partitions (for currently about 350 Gbyte
of data). Into the lower partitions will go the half of my 700 Gbyte of
data that is personal stuff and into the other large partition will go
my captured videos. This will give me the flexibility with backup time
and frequency, not to mention that backup time of my personal data will
take half as long, so I will probably do it more often. I have verified
that Casper 8 can do an initial clone of 350 Gbyte from my USB 3 data drive
to my USB 2 data drive in about five hours (comfortably overnight) with
incremental clones a lot faster.
I assigned
partition letters and names carefully so that in Explorer it's easy to
tell the drives apart and their purpose, also to identify which upper partitions
are on which disks. For example, the OS and Recovery partitions of my internal
drives are c:\ and d:\ (main drive) and f:\ and g:\ (clone drive). [e:\
being reserved for DVD player\]. My data drives are j:\ and k:\ (lower
partitions) and s:\ and t:\ (upper partitions). Letters at the top of the
alphabet (u:\ to z:\) are used for OS backup and enclosure drive partitions.
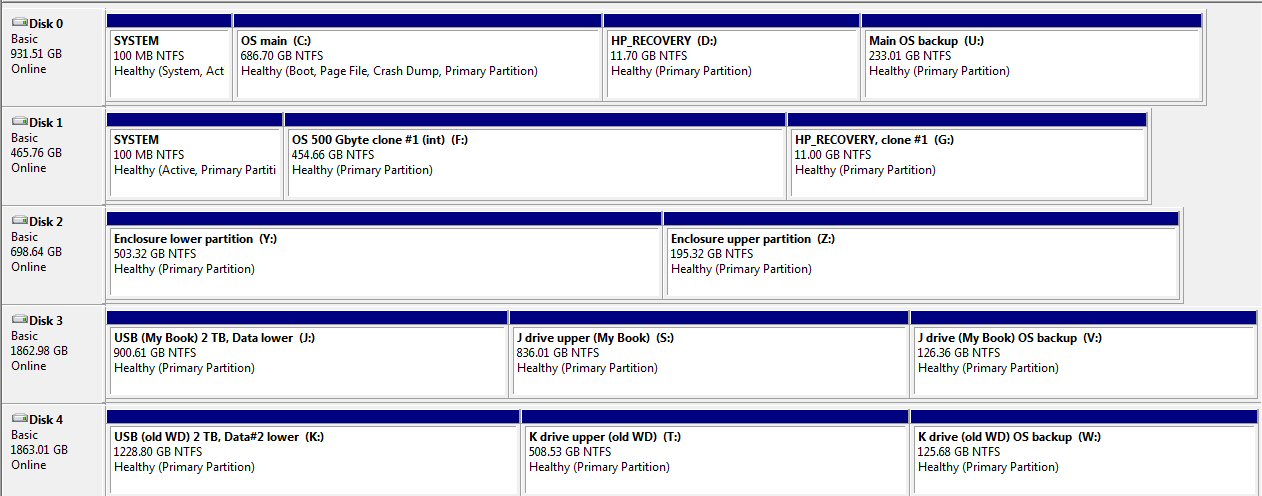
Partitions, drive letters and logical drive names
for my five drives
(Disk configuration page screen capture 5/8/14)
Next day I
realized I could do a little better. Why does the Recovery partition in
a clone drive need a letter? It doesn't. If the letter is removed, the
Recovery partition is still preserved. It just frees up the letter. Clones
boot fine from only the OS (c:\) partition, I have been doing it
repeatedly. A Recovery or System partition is not needed to boot. After
booting, a letter could always be assigned to the Recovery partition to
allow a System File Check (sfc /scannow).
So with letter
g:\ freed up, I split my 500 Gybte clone drive (using AOMEI split partition)
into two 225 Gbyte partitions for an 'archive clone' and 'working' clone'.
Partitioning tools
I partitioned
and repartitioned all my drives using two tools: Windows disk configuration
page and AOMEI (freeware) Partition Lite. Both of these work very well
and complement each other. The Window's disk configuration page is a windows
tool that actually works well, my guess it because it has long been used
by the development team. It's a breeze to change partition letters here.
I recently discovered that in setting you can control the look of the disks
graphic: fixed, logarithmic, or linear (disks and partitions individually).
It's a little easier to expand and shrink partitions in AOMEI because it
has a slider (though on only one side). AOMEI has a useful 'split partition'
that Windows lacks. Most partition adjustments are fast, but once in while
it can take an hour or two. At one point I had a little partition (3 Gbyte)
I couldn't seem to get rid of using AOMEI, but Windows disk page made short
work of it with two steps: 1) Delete partition, which leaves its space
unallocated, 2) Expand adjacent partition into the unallocated space.
AOMEI partition update (5/12/14)
AOMEI are
partition experts and have a bunch of partitioning programs. They make
available as freeware for home use not one, but two different partitioning
programs that for some strange reason are almost the same. I started with
AOMEI partition assistant lite, and stayed with it when I discovered its
very useful bad block mapper. It features a bunch of partition tools and
as I wrote in the paragraph above using it together with Windows disk configuration
page I was able to make a lot of changes in my disks' partitions. But I
finally ran into a partition problem I couldn't solve: Merging two partitions,
one with data and an adjacent (lower) unallocated. AOMEI lite and Windows
support extending partitions, but extending is not the same as merging
and comes with restrictions. AOMEI provides an extender slider bar, but
only on the right side. Windows would extend the data partition into adjacent
unallocated space, but warned me that this would convert my disk from fixed
to 'dynamic' (another complication which I did not understand) meaning
I would not be able to boot from the disk. Reading on an Apple partition
site I see the same sort of restrictions on resizing, so these are apparently
inherent to disk organization.
AOMEI Standard Partition Assistant add 'Merge', but
is missing 'Convert between Primary and Logical'
(web site shows AOMEI Standard Partition Assistant
has the same bad block mapper as lite version)
The merge problem
drove me to download the AOMEI Standard Partition utility, which has a
'merge partition' feature. Since the web site shows the stardard version
of the program has the same bad block mapper as the lite version, the only
feature that would be lost by going to the standard version from the lite
version would be logical to primary conversion. This is a feature I have
used. Windows disk page when there are more than 3 (or 4) partitions makes
new ones as logical (no booting), but this feature of AOMEI can convert
them to primary (bootable).
I planned to
also install the standard version, but ran into a problem. The installer
detected the 'lite' version and refused to install the standard version
unless I approved uninstalling it. I didn't really want to do this, but
realized I could use my multiple clones to advantage here. I rebooted to
working clone#1 and let the AOMEI installer in this partition remove the
lite version and install the standard version. It's merge feature is just
what I needed. As I write it is doing the merge, but this is a SLOW process
(est 4-5 hrs, but it took about 10 hours!). The unallocated space was below
(left) of the data partition, so the merge moved downward the lower boundary
of the data partition. Since all partitions appear to fill upward starting,
in this case moving the lower edge of the data partition required all 350
Gbytes of data in the partition to be moved. This is why it took all day.
I confirmed
that moving the top edge of a partition takes basically no time. Rather
than repeat the slow merge process with my other USB data drive, I first
deleted all the data in the partition whose lower edge I was going to move.
Sure enough the partition 'merge' now took about 1 min vs 10 hours before
confirming that virtually all the time was taken in moving the data. Copying
back the data into the adjusted partition is also slow (few hours), but
it looks like it will take only about half the time merging a partition
full of data took.
What are logical partitions?
One of the
mysteries of partitions is that at some point when another partition is
added will be to physical drive, you get not a 'primary' partition, but
a 'logical' partition, which seems important in that is shows up in a different
color on the disk configuration page. But what the hell is a logical partition
and how is it different from a primary partition. I read one article and
it was totally unclear. I did a quick test and found I could read and write
to it using Explorer, it doesn't look there any different than any other
partition. AOMEI can convert logical partitions to primary partition.
When I split
the big OS partition on my internal 500 Gbyte clone drive, the lower half
(f:\) retained the clone and remained a primary partition, but the upper
half, which was empty, was made into a logical partition. (This
splitting was done by AOMEI.) Why? Who the hell knows. So for fun I have
left it a logical partition, and Casper is now happily cloning to it.
I
later learned that for historical reasons the maximum number of primary
partitions on a drive was three, any more than that become logical
partitions. Logical partitions are essentially a workaround to allow a
hard drive to have a large number of partitions.
-- "While it
is true that you will need at least one primary partition, additional Windows
7 installations can make use of logical partitions thereby giving you the
potential for a nearly unlimited number of bootable versions of Windows
7."
OK, I found the
answer. Logical partition differs from a primary partition only in that
you can't boot from it. A Microsoft
page, which applied to Vista, said explicitly that you can't start
an OS on a logical drive, which (see below) turns out not to be
true!. Obviously not the best for a clone drive so I canceled my clone
to it. (What happened to Casper cloning the OS in 20 min? This was going
(sata to sata) for over an hour and was only about 25% along.) There is
some limit on the number of bootable (primary) partitions that can be put
on a physical drive, the limit variously given as three (Vista) and later
references saying four. When I split the 500 Gbyte partition, I went from
three to four partitions on that drive. Logical partitions historically
have been a 'work around' to allow more partitions on a drive usable for
data storage. Whether AOMEI logical to primary conversion gets around the
limit on the number of bootable partitions I don't know. I am going to
use it to convert my 500 Gbyte logical partition to primary.
Whoops (7/29/14)
In spite of
what Microsoft says when I ran a test on my Vista portable today, I found
that a Windows 7 clone on a
logical partition did indeed boot and
run OK! A google search shows this is the case. The 'explanation' I read
now is that a logical partition cannot be a
system partition (and
I think not active), but it can be a boot drive, can hold a bootable
clone. (The system partition is the first small partition on a drive that
doesn't seem to do anything, except maybe when Windows won't boot.) I find
others in forums thought only primary active partitions could be boot drive,
but were suprised to find, like I was, that a logical partition can be
bootable too, that it is perfectly OK.
Random things I learned about hard drives
Working for
weeks on cloning, partitioning, and various ways to connect hard drives
I picked up a bunch of ramdon facts about hard drives and the cloning process.
-- Nearly all
hard drives made since 2010 have a standardized sata interface. This is
obscured in external USB drives, but if you open the case you will find
a standard sata drive. The drive is plugged into a small PC board that
does a sata to USB conversion.
-- The standard
3.5" sata drive used internally computers usually runs at 7,200 rpm, whereas
external USB (data) drives usually run at 5,400 rpm. One of the reasons
for this is thermal. 5,400 rpm drives dissipate less power so can be cheaply
packaged for external use without a fan.
-- 3rd party
utilities are available that will read standardized SMART data from hard
drives, which includes drive temperature and how many bad blocks it has
reallocated. These are two important paramters in evaluating your hard
drive. (I found I had to update my HP motherboard RAID controller driver
to get access to the SMART data on my internal sata drives.)
-- Partitioning
a clone drive will allow it to hold multiple clones, which can be updated
at different times. To utilize this capability choose clone software that
supports partitions (like Casper or AOMEI).
-- Windows
blocks 'booting' from clones written to USB drives, but USB clones can
be recloned to sata or esata drives, and from there they will boot.
-- Good disk
utility (like AOMEI partition assistant lite) will make a map of bad sectors,
which may allow the drive to partitioned to wall them off.
-- Repeated
full sector formats (several hours) will identify bad blocks to the hard
drive and it will (attempt) to clear them out by replacing them with sectors
from its reserve store.
-- My tests
showed for full sector checks USB 3 has a real edge over USB 2. A full
mapping of blocks of a 2 Tybyte drive took 5-6 hr (overnight) with USB
3, but nearly a full day (21 hours) with USB 2.
-- A useful
and inexpensive upgrade to an older computer is add a USB 3 card. $22 buys
(short PCI-E) card that will add four USB 3 ports to your computer. So
for a few dollars I now have a machine with 10 USB ports (six USB 2 and
four USB 3), far more than you find on even expensive computers. I have
confirmed that these USB 3 (card) ports are much faster than my motherboard
USB 2 ports. My HP desktop had three empty PCI-E connectors.
Separating data from OS and programs --- Is this the
best clone strategy?
The main concern
with using an 'old' clones is not with the OS or programs, but with the
fact that the data in the clone is out of date. I see articles advising
that data, or is it [data + programs], should be on a separate partition
from the OS. After playing with clones for a few weeks, I clearly see the
merit in this. But how simple is this to implement? I haven't tried it,
but my expectation is that there will be traps.
The root of
the problem of mixing data and programs goes back to the early days of
personal computers. Programs often put data in their own directory, and
most everybody had a single (unpartitioned) disk drive (pretty much like
now!). I have been working with the same directory structure for over 30
years. My local essays, homepage and online web site are all in a single
c:\ directory. I'm a creature of habit, I just don't want to change this,
though as a practical matter it would probably not be too difficult to
move it as all this stuff are under one top level directory. I suspect
that getting
all your data segregated is not so simple. Here are
my concerns.
One big one
is this. I am loathe to mix my data that is updated frequently (essays,
stock tracking , etc) with the bulk of my data (350 Gbytes) that is mostly
archival in nature: pictures, music, etc. Video files being huge are a
different issue. Because I use my computer as a DVR to record TV shows,
I have a lot of Gbytes of video files, and I have moved all of these to
a separate partition on my USB data drives. This makes sense. I now have
two data partitions to clone (backup), but each is half the size of the
original 700 Gbyte. However, I feel somehow better (irrational though this
may be) that my more active personal data are tucked away on my internal
drive rather than on an external USB data drive.
A more practical
concern is with the many data files kept by browsers: emails, program settings,
bookmarks, passwords. This stuff is all in different files and is (or seems
to be) sprayed all over the place. I have a lot of browsers, and maybe
I would be pleasantly surprised, so I just checked where Opera by default
puts stuff. It lists 9 directories it uses, and all but the plug-in directory
are under c:\user\(my name)\appdata\ (roaming or local\xxxx. Ok, well first
thought is this is good, personal data are in the personal c:\user directory,
and I wouldn't be surprised if a lot of programs use the c:\user directory
for settings and data. My guess is that Microsoft has recommended this
since the c:\user directory made its appearance in Windows. But is it not
true that each and every program using the c:\user directory would have
to tracked down and told to use something like g:\user? This I suspect
would be a real hassle and stuff would get missed. Another issue: I looked
at properties of c:\user\(my name)\appdata\, and this personal subdirectory
is 5 Gbytes in size with 25,000 files! (God knows what's in there!).
So when I step
back, separating programs and data does not seem so easy. Well how about
separating the OS? Is this easy or hard? Frankly I have no idea, I don't
even know how to go about it. My programs have always been at c:\. Is it
as simple as running a c:\ with no programs? Pointing all your shortcuts
to a different drive letter would not be hard. I have found that when I
can click a program in a clone partition from Explorer, it runs. Is that
all there is to it, to start a program from Explorer you first click g:\
to bring up your programs? Maybe, I would need to research this and to
experiment. It requires a new way of thinking about hard drive partitions,
so it's kind of hard to wrap your mind around this with playing around.
-----------------------------------------------------------------------------------------------------------------------------------------------------------------
Try out this simple piece of freeware: ISO to USb, claims
to be able to transfer a Windows ISO file to flash or disk drive and make
it bootaable
http://www.isotousb.com/
-----------------------------------------------------------------------------------------------------------------------------------------------------------------
Hard disk nonsense I find online
Article from
Washington Post (2010) claims most new PC come with a single parition
on the hard drive. Really? My HP retail (2010) Windows 7 computer, and
I suspect most Windows computers, came with three partitions: System
partition, c:\ OS partition and d:\ recovery partition.
Flash
memory -- booting and partitions
I found out
from Amazon reviews that some vendors of flash memory are changing how
flash memory is identified to the OS. The story (according to what seeem
like knowledgable Amazon reviewers) is flash memory has typically been
usable as a Windows boot device, but some have unhappily have found that
new memory bought from some vendors (SanDisk) will not boot. What has happened
is that a bit in the new memory has been permanently changed identifying
the USB flash device to Windows as a 'fixed disk' rather than a 'removable
disk' as in the past. (They are doing this to qualify their memory for
use with the Window 8, some of the new memory sticks include 'Windows to
Go' flavor of Window 8 Enterprise already installed.)
I think I understand
why this change prevents the flash memory from booting. Flash memory is
a USB device. With the change to a 'fixed disk' it appears to Windows like
a small USB hard drive, and Windows has been designed to specifically not
allow USB hard drives to boot.
-- "If you
have a USB hard disk (classed as a 'Fixed Disk' by Windows), you will find
that Windows can format that disk with multiple primary and logical partitions.
However, most USB Flash drives are set as 'Removable Drives' when shipped
by the USB drive manufacturer which means that Windows will only access
one partition (first) on the drive."
-- "Please
be informed that the flash drives are the plug and play storage devices.
In mid-2013 SanDisk changed production of Cruzer USB Drives to show up
as fixed disk to meet a requirement for Windows 8 certification. At the
end of 2013, SanDisk reverted back to producing Cruzer USB Drives as removable
disk. There is no tool available to change SanDisk Cruzer USB Drives between
fixed and removable disk configuration. SanDisk Cruzer USB Drives in removable
disk configuration will be available again shortly in retail outlets."
(Feb 2014)
-- (Below is
a special driver that makes an ordinary (removable) flash drive look like
a fixed drive. So probably what would make a USB hard drive bootable is
the reverse: 'special driver' that would make hard fixed drive look like
a removable drive (where only the first partition would be accessible).
"USB
Flash Drive (removable) can be disguised as a USB Hard Disk using
Filter
drivers. This way a USB Flash Drive can be partitioned using the inbuilt
Disk Management Tool (diskmgmt.msc) and all the partitions of the USB Flash
Drive can be accessed simultaneously in Windows Explorer. A filter driver
is a Microsoft Windows driver that adds value to peripheral devices or
supports a specialized device in the personal computer. It is a driver/program/module
that is inserted into the existing driver stack to perform some specific
function. In this case Filter Drivers make USB Flash Drives (Removable
media) appear as fixed drives in Windows.
There are three
filter drivers which can be used for this purpose: 1) Hitachi Microdrive
Filter Driver cfadisk.sys, 2) Anton Bassov Dummydisk.sys, 3) Karyonix
diskmod.sys http://agnipulse.com/2012/03/filter-drivers-removable-media-fixed-disk-windows/
Clone on a flash
drive?
Summarizing: a removable
type flash drive can boot, but only its first partition is accessible (because
Windows doesn't support partitions on removable media). A while back I
created a Windows USB recovery card fom an old camera card, and it booted
(but very, very slowly), so I know the few steps that are normally manually
applied via command line to allow it to boot. My guess is that the MBR
added automatically by the cloning process will make this preparation unnecessary.
Hence I now
think that one of my 'c:\ OS' (single partition) bootable clones (made
by Casper) on a 64 Gbyte (or larger) removable type flash drive
should boot and be able to run the machine. This could be useful for offsite
backup. I have put the following 64 Gbyte flash USB stick in my Amazon
cart. Seems like good speed for not much money and reviewers use it to
boot. (After using it a while, it is pretty fast, certainly much, much
faster than my camera card.)
I later bought a 2nd one, slightly lower in cost ($25),
to use as bootable Windows repair flash stick.
(Notice how Amazon has downgraded reviews. Review
are still there, but you need to hunt for them!)
I have experimented
with the PNY 64 Gbyte flash. I have not found any way to expand booting
utilities. For example, when booting a Windows recovery environment (or
other proprietary environment), any other programs I put on the disk are
inaccessible from the menus of the boot program. However, they can be used
for archival purposes and accessed from Explorer.
Yes, clone
on a flash drive --- (with limitations) (update 12/11/14)
After
a hiatus caused by health problems, I got around to a test of a clone on
the 64 Gbyte PNY flash. Casper 8 in clone mode showed the 64 Gbyte PNY
(removable) flash drive as a target for a clone of OS and files, which
doesn't mean it is bootable because Casper shows USB hard drives too as
a target. It just means they have enough capacity to hold the clone. Even
though the PNY flash was plugged into a USB 3 port writing a clone of the
30 Gbytes of the OS and files took a long time, about 11 hours, but in
the end it reported it had successfully written the clone. The 64 Gbytes
of the flash was treated as a single partition and writing the clone overwrote
all existing files on it, just like writing a clone to a partition of a
hard drive overwrites all existing files on that partition.
Now the question
was, will it boot? The answer is yes, but with limitations, it is far from
robust. Here's what happened. I tried the following: booting from USB 3
port on plug in card, booting from USB 2 motherboard port selected from
boot menu at power up, booting from USB 2 motherboard port added by EasyBCD
to the Windows 7 multi-boot menu options, the latter two options repeated
with the flash moved to Windows 7 on a different machine (my old Vista
portable now running Windows 7). Repeat.
As I expected,
I got no boot using the USB 3 port that had written the clone, but that
is because this USB 3 port is on a plug-in card and the card is not yet
installed at the this point in the boot process. When the flash was selected
from the boot menu at power up, I also got no boot. This happened on both
machines. This surprised me as I thought Casper 8 clones were bootable.
In both cases the screen message was 'BOOTMGR is missing'. References say
this error message is triggered by trying to boot from a flash drive that
is non-bootable.
I did, however,
get the flash clone to boot by first adding it to the boot menu options
using EasyBCD. Not only did this work with my desktop machine, where the
clone was written, but it worked too with my portable, bringing the desktop
files to the portable, though due to hardware differences a lot of the
programs did not run correctly. The booting process and program start up
working from the PNY flash drive plugged into the desktop motherboard USB
2 port was pretty slow, but it did work and programs ran.
Later when
I tried to repeat the boot on the desktop machine, I found it would not
boot. Noting that I had seen weirdnesses like this before where a clone
needed to be freshely made, I had Casper 8 update the flash clone (twice).
Casper 8 using its incremental 'smart clone' mode took one and two hours
to update the clone, this time writing to the flash in a USB 2 port. Rewriting
the clone did the trick, getting it to boot. The reason for doing it twice
was the first time the boot froze close to the end with most shortcuts
on the screen.
Because of
the limitations on booting and speed and how easily booting a flash clone
fails, it's not clear how useful in practice a clone on a flash drive drive
is. However, like all clones all the OS files, programs and personal files
are on the flash clone written separately in a normal manner with the usual
directory structure, so for archive purposes the clone need not be booted,
its files can be copied over. Better, clones can be recloned, so
Casper 8 should be able to reclone the flash clone to a system hard
drive. (I didn't test this.)
Booting Windows PE environment from flash
The key flash
spec is speed. The speed of flash is all over the place, it must vary by
a factor of 100 or more. A good test of flash speed I have found it put
the bootable Windows PE environment on it and time the file load time.
It's fast with a HDD, faster still with SSD, pretty good with PNY USB 3
(above) and just crawls with a new 8 Gbyte flash card I bought for my camera.
This new flash had a x133 speed rating, and reviewers commented it was
pretty fast, so I thought it might be a lower capacity card for PE recovery
flash, but nope, its barely any faster than unrated camera flash. Yet this
card cost about half the price of the PNY for 1/8th the capacity. Makes
the PNY look like a good deal.
Bootable
flash needs to be 'active' --- A Microsoft trap
I already had the bootable
Windows PE environment on the PNY flash stick. This environment is just
five files in two directories, which I thought I well understood as I had
researched it and made the PNY bootable. No fancy MBR need to be explicitly
written, just copy over these five files (four of which control booting),
and it just boots. Well sort of.
I formatted
my new flash and copied over the contents of the PNY, verified the two
flashes were identical, and it wouldn't boot. I remembered a reviewer saying
something was pre-installed on the Transcend card, so I wiped it, which
took hours, but it still wouldn't boot. Onto the web. Found a mention that
the secret sauce is a (flash) partition must ACTIVE to boot. This is one
of these little Microsoft traps: a key flash feature that is'nt fully supported
by Microsoft. Sure there's a command box series of commands 'to make flash
bootable', but why does it have to be done this way? In fact it doesn't!
I want into
the diskmanager page only to find 'make partition active' grayed out. Why
is it grayed out? Who knows. Here's where AOMEI partition utility is a
godsend. It had no problem making the flash drive active, and that was
all it took, it now booted.
Actually to
be bootable flash has to be both active and freshly formatted (quick
format OK) prior to the copying of files to it. I figured this out after
removing the flash from the camera and repeating the boot exercise. Even
though it was active it would not boot. When I then quick re-formatted
it, and recopied over the files, it booted.
Here are the times
to load Windows PE environment files:
SSD
2-3 sec
64 Gb PNY USB 3 (in USB 2 port)
24 sec
8 Gb x133 speed compact flash card
7 min (420 sec)
Image
recovery environment and image both on flash drive
One usage that show
promise for a large flash USB drive is image backup (back stop for clones).
For image backup I like Casper 8 because unlike Windows image backup which
only works at the physical drive level, Casper 8 works at the partition
level. Casper 8 puts its whole copy/image program on the flash drive and
makes the flash drive bootable. The Casper 8 program is only about 1/3rd
of
a Gbyte, so virtually the whole flash memory was empty. Finding an image
is always a problem, especially with my system where there is like a dozen
partitions, so it occurred to me the right place for a Casper image would
be on the flash stick, so the image recovery program and the image would
be together! And as a bonus it is removable for remote storage.
I tried this
and it worked very well. I was able to recover using an image of my main
SSD partition stored on the flash to an (upper) partition on a HDD drive,
and it was remarkably fast, 1-2 minutes for a 26 Gbyte image. 32 Gbytes
are still free on the flash, so it could probably hold a second image.
Running some flash tests
Prior to ordering
a 64 Gbyte flash stick, I ran a few tests with an old 8 Gbyte compact flash
card I had bought for my Cannon camera (and never used much since it turned
out it was horribly slow even in the camera!).
Plugged into
a card reader and a USB port it shows up in disk manager as 'Removable'.
I was unable to partition it in disk manager as options were grayed out.
However, AOMEI partition utility let me split the 8 Gbytes into two 4 Gbyte
partitions, and sure enough what I had read is correct. Windows only sees
the first partition, the size in Explorer dropped from 8 Gbytes
to 4 Gbytes. The upper 4 Gbyte shows up in disk manager, but with no properties,
and neither it nor AOMEI will allow me to assign a drive letter to it.
Conclusion: Don't partition a removable USB flash drive as upper
partitions are unusable.
I am going
to see if I hook up the same memory with some sort of USB to sata converter.
Amazon sells converters that convert USB to esata, but seems to me there
must be a combo of hardware than can do the reverse. Hard drive links have
to work in both directions. Nope... Found a USB-to-esata converter, but
not the reverse, and it won't work backwards because there is no source
of power from a sata (or esata) cable. Any such reverse converter would
need a separate source of power, and I don't see any such converter on
Amazon.
Flash and hard drive specs are almost impossible to
find!
Found searching
for flash memory and hard drives frustrating. It is nearly impossible to
find real (engineering) specs for consumer products like this. When you
do go to a manuf site and dig around and find 'download spec', it usually
turns out not to be just a glossy advertising piece with no real information.
(One Amazon reviewer calls them 'just works' specs.)
To use flash
memory to boot Windows it is vital whether or not a certain bit is set.
This is the bit that tells Windows if the device is a 'fixed drive' or
'removable'. It's not adjustable, so get the wrong type and you might as
well throw it away. This critical spec, not to mention speed numbers and
max write cycles, is nearly always missing. I checked a bunch of different
flash memories on Amazon and at manuf sites and never once found it speced!
Even SanDisk which has flopped around like a dying fish, changing their
memory from removable to fixed, apparently without telling anyone,
then a few months later back to removable again, doesn't spec it. I dared
not buy Sandisk, because even though I saw a posting from them that they
had reverted to removable at beginning of 2014, because I had no idea which
type I would get from Amazon.
For hard disks
I want to know power dissipation and rpm. I saw somewhere a real hard drive
spec, which as I remember it a 7,200 rpm, 3.5" drive had 10 watts dissipation
(under what conditions?). Small 2.5" drives can run off USB 2 ports where
available power is 2.5 watt max, so clearly hard drive power dissipation
is all over the place. Gamers use 10,000 rpm drives and I see these can
run screaming hot if not fan cooled.
My own two
new internal Seagate 7,200 rpm drives mounted in the drive bay (with space
between) are running hotter than I would like. With computer on its side
and the cover off the fan airflow is probably not reaching them. Even with
little activity and on a rather cool rainy day my SMART monitors tell me
they are running 44C (lower drive, 1 Tbyte drive) and 41C (upper 500 Gbyte
drive), whereas my old 7,200 rpm drive in the fan cooled Vantec enclosure
is 37C.
SSD
(solid state drive) speed advantage (5/25/14)
While researching
USB flash memory sticks I stumbled on a comment that SSD drives were much
faster than any USB stick. Really? I initially didn't understand why this
would be. I knew flash memory came in in several speeds, and SSD drive
was flash memory too configured to look like a (small) hard drive. Then
looking at the layout of a an SSD card (with its multiple flash memory
chips) the light dawned, if you have four (or eight) flash memory chips
paralleling is possible. Sure enough I read SSD drives have onboard a controller
IC whose job I suspect it parsing serial read/writes from the sata link
to the various memory ICs.
As an engineer
I knew the best way to get a handle on SSD speed vs flash memory stick
speed would be to compare speed specs at a vendor that made both, which
from Amazon I could see included SanDisk and Kingston. And sure enough
on a quick look I saw SSD transfer rates more than x10 the fastest grade
of flash memory sticks. Sandisk SSD comes in three speed grades. As you
can see, the big differenceis not sequential read/write speeds but
IOPS, which stands for something like operations/sec. It looks like the
medium grad (Ultra Plus) is the sweet spot. [specs: select 'where to buy',
Sandisk or Microcenter]
Sandisk Solid
State Drive - 120GB SATA 6.0GB/s, 2.5" size 7 mm ht,
($65 Amazon)
Read Up To 475MB/s 120 mw, 70C
Sandisk Ultra
Plus Solid State Drive - 240GB SATA 6.0GB/s, 2.5" size 7 mm ht,
($109 Amazon)
Read Up To 530MB/s 120 mw, 70C
Sandisk Extreme
II Solid State Drive - 24GB SATA 6.0GB/s, 2.5" size 7 mm ht,
($154 Amazon)
Read Up To 550MB/s 600 mw, 70C
Sandisk Extreme
Pro Solid State Drive - 240GB SATA 6.0GB/s, 2.5" size 7 mm ht, ($172
Amazon)
Read Up To 550MB/s 130 mw, 70C
Solid State drive Ultra Plus
Extreme II
------------------ --------------
-------------
Seq. Read (up to)
490MB/s
530MB/s
550MB/s
Seq. Write (up to)
350MB/s
290MB/s
340MB/s
Rnd. Read (up to)
8,000 IOPS
80,000 IOPS
91K IOPS
Rnd. Write (up to) 2,100
IOPS
33,000 IOPS
74K IOPS
class 10, UHS
(Sandisk Ultra)
up to 30/40MB/s
128 GB microcard is $120
Sandisk Extreme,
USB 3 stick
up to 190MB/s
64 GB stick is $59
USB 3 flash
thumb drives
It does look
like the high end USB 3 sticks are approaching SSD numbers. Kingston has
a DataTraveler HyperX 3.0 up to 225 GB/s read, 135 GB/s write, 60C ($100,
128 GB Amazon). (One Amazon reviewer commented that booting his apple computer
from this flash drive took 30-60 sec longer than from the SSD built into
his MacBook Air.)
A reasonable
priced (very) fast flash thumb drive that rates well on USB 3 flash speed
tests is SanDisk Extreme (245 Mb/sec read). Smallest is 16 Gbyte ($18),
$30 for 32 Gbyte, and $50 for 64 Gbyte. It's an advantage to have
a different brand (from PNY) for Windows recovery USB flash, because it
can be identified on the boot menu, which only shows the manuf model #,
if two flash drives are plugged in, as well as being visually distinct.
While the current model has only 9 reviews, there's an earlier model of
SanDisk extreme (190 Mb/sec, little more expensive) with 630 reviews, rated
4.5 stars.
One reviewer
tested this USB 3 flash stick on USB 2 and a commenter to his review noted
(below) that the lower peak transfer rates of USB 3 really only
affect the transfer speed of large files. The reviewer in section below
notes the SanDisk extreme is much faster than the PNY flash I now own.
How fast is a fast flash thumb drive on USB
2?
-- Take a
closer look at the 4K test results. These read and write speeds are lightning
fast compared to any hard drive you can buy. So, although large file-size
transfer speeds are clearly limited by using the USB 2.0 ports on many
computers, small files such as most documents and program launch files,
and Windows boot-up files are handled extremely quickly. You could even
run a whole Windows operating system on this Sandisk and everything (except
transferring large files) would be quick and efficient. And, hey, don't
forget the long warranty Sandisk includes. (Amazon comment)
PNY Turbo 64GB USB 3.0 drive (P-FD64GTBOP-GE) flash memory
stick
Considered
buying this flash memory stick for remote storage as (for a noname) it
was cheap ($26, 64 GB) yet rated for USB 3. Can't find a real speed spec,
but the comments below from a reviewer give some perspective. (The Sandisk
Extreme referenced is $100, 64 GB):
--
You'd think that sort of performance would make this drive suitable for
general-purpose use. Not so much. Random-write performance is awful; par
for the course for almost all USB flash drives, 3.0 or not. The controller
hardware in these things is rudimentary. I briefly had this PNY configured
as a download folder for a program that would automatically reconstruct
downloaded files. It couldn't keep up with my 5.5 MB/s (megabytes/s) internet
connection. The program interface was constantly unresponsive.
While
it's terrific bargain for general use (you won't find 80 MB/s sustained
writes from a reputable memory brand for $0.39/GB anywhere else), I returned
it in favor of a SanDisk Extreme 64 GB/s. Half the space and 30% more expensive,
but with a proper drive controller that makes it just as responsive (and
nearly as fast, with legit 150 MB/s+ writes and excellent random write
performance) as an SSD.
SSD drive considerations
(5/25/14)
Until recently
I knew virtually nothing about SSDs (solid state drives), hence the idea
of using one in my setup never even popped into my head. However that changed
when a quick look on Amazon showed an SSD big enough for my lean OS cost
barely more than a HHD, and everyone agreed that replacing a standard HHD
with an SSD could really speed up a PC. Of course, there were caveats.
I don't really know whether my motherboard is Sata 1 or Sata 2. There were
comments that you need to switch the drive bios type to AHCI to get full
speed, and this requires a change to the registry. I needed to pour over
the specs of SSDs to understand them and figure out the price/performace
tradeoffs. But still the prices are so attractive that I think instead
of buying another HDD, as I had planned, that I will instead buy a 120
or 240 Gbyte SSD. My boot time is pretty slow (2-3 minutes), so an improvement
here, even though in the scheme of things is relatively minor, would be
a nice surprise.
The prices
for a SSD large enough to hold my (lean) internal drive is not much different
from a normal drive. Of course it will have less capacity than a standard
drive, but so what. My clone strategy focuses on keeping my internal drive
lean (currently about 55 Gbyte), so a 120 GB SSD will do nicely. Prices
for 120 GB SSD run from 65 to 86, including brand names like Samsung.
2.5" SSD are physically tiny
All the SSD
I find are 2.5" size sata drive, which is the universal standard hard drive
for laptops. I had not realized how tiny these drives are, basically they
are credit card size: 3.94" x 2.75" (heights vary, 7 and 9.5 mm are common).
While they can be mounted in a (small) external enclosure and connected
via esata, they can be mounted with velcro tape to the (bare) bottom of
a desktop PC, which seems to me a good choice. Construction is very simple:
a single PC board (with 6 or so ICs) in a molded case that exposes the
sata data and power connectors (built into the PC board).
Here are the SSD candidates I find on Amazon, listed by price
(and except for PNY) by performance.
86 Kingston HyperX
3K 120 GB SATA III 2.5-Inch 6.0 Gb/s Solid State Drive, 9.5 mm
555MB/sec read and 510MB/sec write speeds, ?? IOPS, 0.46 w (idle) 2.11
w (active)
(95) Kingston like Sandisk
has three basic speeds of SSD. Above is high end (HyperX is described for
gamers). Medium performance (but has enterprise features) is KC300 (525
GB/s read, 500 GB/s, write, read IOPS: 17,000 random, write IOPS: 64,000
random. Low performance is V300
------------------------------
SSD candidates
The following three SSDs are the most
attractive: medium grade with good performance at reasonable prices, and
made my vendors that make their own memory chips. (5/14)
81 Samsung Electronics
840 EVO-Series 120GB 2.5-Inch SATA III,7 mm (Amazon)
(140 for 240 GB)
2,300 reviews
Seq Read Speed 540 MB / Seq Write Speed 410 MB / Random Read Speed 94K
/ Random Write Speed 35K
(Samsung tripled seq write speed of 128 Gb to 410 MB/s with a new controller
chip)
75 SanDisk Ultra
Plus 128GB SSD, 7 mm (Amazon)
(120 for 240 GB)
375 reviews
SATA 6.0GB/s 2.5-Inch SSD Read Up To 530MB/s
530 MB/s seq read, 290 MB/s seq write, Random Read up to 80,000 IOPS, Random
Write up to 33,000 IOPS
72 Crucial (Micron)
M500 120GB SATA 2.5-Inch, 7mm (Amazon)
(105 for 240 GB)
1,200 reviews
500 MB/s seq read, 130 MB/s seq write, Random Read up to 62,000 IOPS, Random
Write up to 35,000 IOPS
(500 MB/s seq read, 250 MB/s seq write, Random Read up to 72,000 IOPS,
Random Write up to 60,000 IOPS) 240 GB values
(seq write speed only 1/3rd the full full seq write speed of 400 MB/s in
480 GB and above)
------------------------------
65 PNY
XLR8 SATA 6Gbps 2.5-Inch Solid State Drive, 9.5 mm (assembled in
USA, NJ) (110 for 240 GB)
500MB/s seq. read, 450MB/s seq., up to random 85,000 IOPS
(This drive has better specs than its price would indicate. Is there a
reliability, or lifetime issue?)
Observations
Three mainstream
competitors, all major flash memory manufs that build SSDs with their own
ICs, are priced from 72 to 81, all sold by Amazon so free shipping: 75
SanDisk Ultra Plus has the edge in seq write and IOPS over 72 Crucial.
At 81 the Samsung has a small edge over the SanDisk Plus. There is a clear
variation in performance with price (PNY the exception), but its nearly
all in write speed and IOPS.
Boot time does
not involve writing, so probably IOPS is what is important here. In fact
when I think about it, I don't see how write speed is that important, at
least for how I use a computer. Download saves are paced by web download
speed. Html file saves, like this essay, are only a second or so, so there
is little to be gained there. Cloning would not normally involve SSD write
speed either since SSD would be my primary drive. (The exception would
be if I got a 240 GB drive and partitioned it to hold a clone.) One reviewer
commented write speed was important for him because he processes video
or audio files, but I do little of that. The only exception would be that
Windows shut down time must be controlled by write speed.
PNY is a puzzle
with (apparently) higher performance than its low price would indicate.
They use Sandisk technology (just losing a 28 million dollar suit over
breech of licensing agreement). PNY company is much smaller than Sandisk,
but still it is 350 people, founded 1985, based in NJ and the chips are
assembled in USA. Their 64 GB flash stick also has a low price for its
specs, but it's not sold by Amazon like the three mainstream parts so there
is an additional 6 for shipping (next day I find the price has increased
to 65 with free shipping), which takes away half the price advantage. I
am concerned about reliability or lifetime as PNY sells two higher lifetime
versions of this part. Also their spec is not complete, but oddly
the spec of UltraPlus on Sandisk site was not complete either. The Kingston
offerings are too slow or specialized (gaming and enterprise).
Shopping for SSD
At first I
leaned toward the Sandisk, but was a little concerned that maybe they are
not so good as Micron and Samsung at manufacture of a board and that the
spec for Ultra Plus is not on their site. Since it's all about speed I
next leaned toward the 120 GB Samsung for just a few dollars more with
the best numbers, but after thinking about speed specs, I realized write
speed probably not very important so all options open. I then checked the
240 GB prices. A 240 GB SSD would allow me to have two 120 GB partitions,
one of them for a clone. This should make cloning really fast (when used
with Casper incremental clone mode). The 105 price for 240 GB price of
the Crucial (Micron) is very attractive, plus the write speed (it's one
small weakness) both seq and random are double the 120 GB numbers.
Ordered:
Crucial (Micron) M500 240 GB SATA 2.5-Inch, 7 mm, internal Solid State
Drive CT240M500SSD1
price 105 (two days later I found the price increased to 110)
Price was 105 when I bought it, two days later increased
to 110
(Crucial is made my Micron)
SSD considerations
SSD being
an entirely different technology than a rotating hard drive, it has to
be treated somewhat differently in a computer.
Defrag
Important to turn defrag off for SSD drive. Burns up lifetime and
offers no performance advantage.
Trim
Don't know what this is yet, but I read it is important to 'trim' SSD and
supposedly this is built into Windows 7.
AHCI
Bios setting, which I don't understand, but see below for reviwer comments.
Trim
TRIM command
has been designed to counter the performance drops of Solid State Drives
over time. TRIM basically allows the operating system to notify the SSD
about data blocks that are no longer in use so that they can be wiped (sort
of an SSD garbage collection sort of thing). Windows 7 is supposed to detect
SSD automatically, but SURPRISE I read it often doesn't.
-- Check Trim setting in Windows 7. Open command
prompt with elevated rights: Start, All Programs, Accessories, right-clicking
on Command Prompt and selecting Run as Administrator. Now execute the command:
fsutil
behavior query DisableDeleteNotify and take a look at the result. Two
results are possible:
DisableDeleteNotify = 0: This indicates
that TRIM is enabled and working on the operating system.
DisableDeleteNotify = 1: This means
that TRIM is not enabled, and that SSDs will therefor not benefit from
it.
If TRIM is
not active on the system, which can be the case if the SSD has not been
properly recognized, if it is to slow or if drivers have not been properly
installed. TRIM can be enabled with a similar command if it is not enabled
in Windows 7. To activate TRIM issue the command: fsutil behavior set
DisableDeleteNotify 0.
I tried the above command and got the reply 'DisableDeleteNotify
= 0', so Trim is apparently already enabled on my machine.
AHCI
The three
options in my bios are (in order): IDE, Raid, AHCI. I have always run on
RAID. (I briefly tried AHCI once while developing my clone stategy and
no boot.)
-- Make sure your motherboard bios is set to
use AHCI with this drive to increase performance.
-- IDE mode is limited to 150 Mbit speeds. For traditional
mechanical hard drives, this is plenty for 99% of operations, though it
can slightly bottleneck drives when transferring from the onboard cache
of those drives. Many recent mechanical drives of reasonable quality have
32MB or 64MB of cache in which data is kept that is being frequently accessed.
That way, if the command is given to access that data it will immediately
transfer it from that cache instead of having to re-fetch it from the spinning
platter using the head to pick it up and read it. When AHCI is enabled,
most modern systems will enable 300 Mbit (sata 2) transfer speeds, and
600 Mbit (sata 3) on the newest chipsets. For SSDs that commonly have 400-600
Mbit read and write performance, this difference is absolutely gigantic.
Access time
isn't affected very much by the switch from IDE mode to AHCI mode, but
transfer speeds are a big one. This is most notable when loading large
applications, waiting for Windows to boot, etc. There are some very old
SATA implementations which only transfer at 150 Mbit (sata 1) as their
maximum, but that is quite rare to come across these days. We're talking
boards from the late Pentium 4 and Athlon XP era (2004, such as the VIA
KT880, Intel ICH5, etc). Basically anything from 2007 onward will have
at least Sata 300Mbit, AHCI, and NCQ Support.
-- AHCI is definitely advised with a modern OS and hard
drive, and basically a no brainer with an SSD.
-- Make sure controller is set to "AHCI" (in BIOS setup)
beforehand and ahci driver is loaded (typ. msahci.sys).
HDD vs SSD --- IOPS and sequential read/write
IOPS stands
for input/output operations per second. For reference a standard 7,2000
rpm hard drive has an IOPS rating of about 100. Compare this to IOPS ratings
of SSD which are up near 100,000, or x1,000 faster! The difference, of
course, is related to the mechanical move time of the platter and the read
head. A 7,200 rmp drive platter rotates 120 times/sec, so to access a random
piece of data on average the platter need to rotate a half turn, which
takes about 4 msec. On top of this the read arm has to swing to move the
head head across the platter. In an SSD setting up the address (apparently)
takes a few usec, hence the factor of 1,000 difference.
Here's a nice
performace review of a HHD posted on a technical blog. Shows sequential
read/write rates vary about a factor of two across the platter radius with
an average here close to 70MB/x. This is about x7 slower than a typical
SSD with a 500 MB/s read speed. The poster notes that for random read/writes
the date transfer rate of this HHD drops to about 1 MB/s (increased to
2-3 MB/s for write by caching). Another poster with a high performance
10,000 rpm drive reports seq read/write speed maxing out at 115 MB/s.
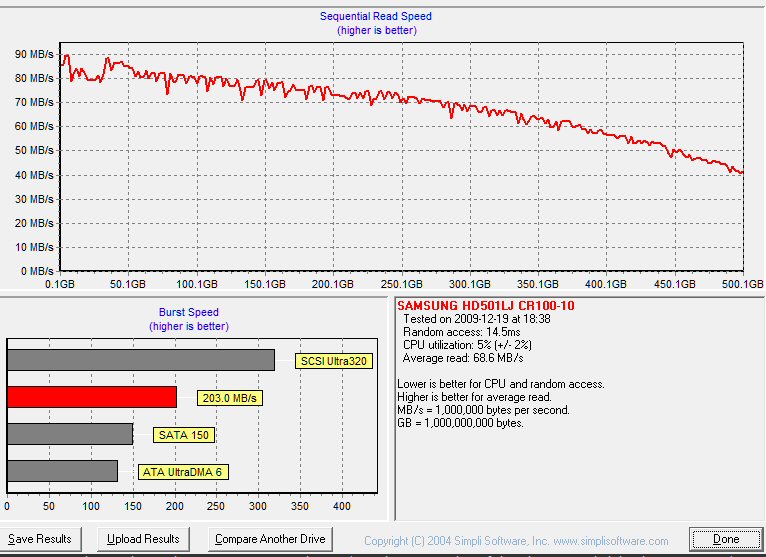
Red curve shows the sequential read speed of a HHD
varies with radius.
Near the outer edge of the platter the magnetic domains
are traveling faster under the read head than near the center.
This explains why the read speed goes from near 90MB/s
at the outer edge to 40MB/s at the inner edge.
(source -- http://www.overclockers.com/forums/showthread.php?t=678783)
I have read
elsewhere that transfer rates on the outer edge of the platter can come
near to saturating a sata 1 data link. The number from above don't quite
show that, but come close. The plot above shows 90 Mbytes/sec, which in
bits is 720 Mbit/sec, and without considering overhead bits this is about
half the sata 1 data transfer rate of 1.5 Mbit/sec.
Boot time
My SSD arrives
tomorrow so for the first time I timed my boot with HHD (7,200 rpm, 1 Tbyte,
Seagate internal drive). I would have guessed my boot time was 2-3 minutes,
but from power on to icons appearing I got an amazingly short time: 1 min
and 5 sec, 1 min and 2 sec, 1 minute flat! The dual boot select windows
came up in about 16 sec and I immediately hit enter, so this took only
a second or two. I'm pretty sure my boot times vary a lot, occassionally
it takes a long time for just the icons to fully populate.
SSD not recognized
I hooked up
SSD powered with kit PS and my sata-to-esata cable. Nothing. SSD does not
up in device manager page nor on bios.
So I changed
the configuration. I connected the SSD to my old sata-to-USB conveter that
I know works and for good measure changed to a new kit PS. Joy, this time
(via USB 2) I see the SSD in device manager as one partition, unformatted.
I format it in device manager and using AOMEI split the 240 Gbytes into
two 120 Gbyte partitions. Then I use Casper to clone (just OS c drive)
into lower partition. This took about and hour and 45 min, then I cloned
the lower SSD partition to upper SSD partition which took about an hour
and a quarter. In explorer both directories look fine, and I can read and
write and run programs from SSD over USB 2.
What I am really
interested in is the reclone time. Made a minor change change (added on
image), and Casper did an incremental SSD to SSD reclone: very fast, about
half the 5 min a similar HDD to HDD incremental clone takes. This is over
USB 2 and my bios is still set to Raid.
Of course,
I can't boot from SSD at this point because it is connected via USB. So
I now just again swap in my sata-to-esata cable and for good measure user
the other esata port, and again no joy, SSD not recognized. At this point
it looked like maybe the sata-to-esata cable was bad. Next I pulled the
sata cable from my internal HDD clone#1 drive and plugged it into SSD (with
power still supplied from PS that worked for USB). Again no joy, SSD does
not show up in device page nor in device manager. Power down/up SSD and
nothing. Clearly there is some sort of sata communication problem between
SSD and the motherboard. Either the speeds are not syncing up or I've got
a bios problem. Do I need AHCI bios setting?
Reseaching AHCI
Did a little
reading in Wikipedia, Windows and postings on technical forums about AHCI,
and the information is confusing and even contradictory. AHCI (Advanced
Host Controller Interface) does control the sata link. It activates an
advanced set of sata features that a drive designer can use such as hot
swapping and power management, which don't seem very important to me. To
use AHCI mode an ahci driver (msahci.sys?) needs to be installed, and Windows
7 does not routinely install this driver, because it says installing unused
drivers shows down the boot process. The reason for the registry change
is to tell Windows to load the ahci driver on boot, which is a requirement
for chaning the bios to AHCI.
Where it gets
really confusing is that Intel recommends that bios normally be set to
RAID and that RAID bios setting will also enable AHCI. My bios setting
has always been RAID, and when one time I tried AHCI it would not boot.
But my processor is not Intel it is AMD. A poster whose Kingston SSD would
was not recognized posted a Kingston screen saying bios should be set to
AHCI. Yikes, what a confusing mess. Also none of this has anything to do
with Sata 1, 2, or 3 speeds. Might it be that Crucial SSD will only do
sata 2 and 3 speeds and my motherboard is sata 1? I need to do some reading
on the Crucial site.
* Procedure
from Microsoft (and poster) for changing the registry to force AHCI driver
to load.
In regedit locate and then click one of
the following registry subkeys:
HKEY_LOCAL_MACHINE\System\CurrentControlSet\Services\Msahci
(HKEY_LOCAL_MACHINE\System\CurrentControlSet\Services\IastorV)
In the pane on the right side, right-click Start in the
Name column, and then click Modify.
In the Value data box, type 0, and then click OK.
Restart PC, go into BIOS and set it to "AHCI". Windows should start and
install the Microsoft AHCI drivers.
I checked this
(first) registry setting and it is not '0', it is '3'. Seems to me to be
relatively little risk in changing the bios setting as all it does is load
ahci drivers, which can slow down boot, so I am going to make the registry
change to '0'. I have verified that I have in c:\windows\system32\drivers\
what appears to be the correct driver: msahci.sys (2010 date).
Yikes, still
won't boot. However, even though it won't boot with bios set at AHCI I
find the Crucial SSD now shows up in both the bios menu and setup menu,
so some progress. From bios I can even run a SMART disk check for SSD (2
min), so I run it and it checks out OK. This is good news as it probably
means there is no sata speed incompatibility between the drive and motherboard.
(This is all with a direct sata connection of the drive to the motherboard.)
I had to change bios setting back to RAID to get a boot. I notice that
Crucial SSD is (still) showing up on bios boot menu, but not on system
disk page or device manager. When I try to select boot from SSD, I suspect
it gets overridden because dual boot menu comes up and I boot from c:\
main drive. (I verified the registry change had been made. The other registry
key is still '3'.)
Not sure what
do now, so onto the Crucial site. My Crucial SSD drive was a bare drive
with nothing in the box, but a spacer to increase the 7 mm thickness to
9.5 mm. Can't find anything useful on Crucial site. I read the registry
change should to thsh: "Next time you restart, Windows 7 will load the
default drivers for AHCI (msahci.sys) and will use it for queuing SATA-controllers
and their drives that run in AHCI-mode." But when I look at disk drivers
msahci.sys is not there! Now what?
Yikes, EasyBCD trap (5/30/14)
There's a
nasty trap with EasyBCD. Trying to get Crucial SSD to boot, I decided to
elminate the dual boot, because it seemsed to be overriding the boot selection
menu. When I delete all the entries in EasyBCD, it warned my the computer
would not be able to boot. I didn't believe it, but yikes it's true. I
can't believe there is a trap like this with dual boot. I need to figure
out the proper way to disable it.
On the EasyBCD
site I find this:
-- "If you no longer have more than one entry, the boot menu itself will
be hidden and you will automatically be booted into the remaining
OS."
However this
begs the question of what happens if the one entry I leave in EasyBCD is
not bootable, for example my SSD (in its current state). Also I set out
to confirm above, and found it is not true. I left only one entry
in EasyBCD and when I rebooted, the boot menu with the one entry still
came up!
Finally I get the PC to boot
It took me two hours
with repeated rescue disk startup repair attempts to get my computer to
boot. I have all these clones and none of them would boot! Repeated startup
repair attempts all failed. Startup repair put together a boot menu with
three entries simple labeled Windows recovery (all the same name!). I swear
Windows is such a piece of crap. One of its 'recovered' boot drives was
on a USB drive!! I finally got a window showing my partition names, so
I could see that one of them (default I think) was on a USB drive. I then
resorted to System Restore which told me it did not successfully
complete, but guess what, when I chose the 2nd on the boot menu 'windows
recovered' option I got a boot. God, two hours wasted. Since I had earlier
disconnected the SSD drive, I had only two bootable drives on my 1 Tbyte
drive, and the upper OS backup is the OS that booted. I have now cleaned
up EasyBCD and will check that I am back in business.
All this EasyBCD
induced boot failure has been a big distraction, since I still haven't
got the SSD to boot, and I am running out of ideas.
My SSD problem -- not visible in Windows!
Summing up:
I appear to have a very unusual SSD problem. I have spent all day and can't
get two things done. And both of these problems seem to be very unusual
in that I see no other poster complaining and Crucial does not address
it.
a) Can't get
the computer to boot when I enable AHCI mode, even though I have made the
registry setting change Microsoft and everyone recommends and have confirmed
it. The change is supposed to get msahci.sys to boot at power up. I have
confirmed this bios is in my drive folder and has the right date, but I
never see it in device manager. It does not seem to load. Do I need AHCI
mode to get the SSD to show up? No one seems to say this, it just seems
to be an optimization.
b) Can't get
the the SSD to show up in disk management or device manager, but it does
show up in bios (both boot menu and in the drive order). I have connected
it via the same sata cable I normally used for HDD clone drive, so I know
the sata cable and port are OK. Also I know the SSD is working because
when I connect it using a sata-to-USB to a USB port it is visible. And
via USB I formatted in using the disk management page and using AOMEI I
partitioned it into two 120 Gbyte partitions. I even cloned my c:\OS to
both partitions. Via USB my SSD works fine. The problem is it disappears
when I connected it to sata (or esata). I even ran a smart test on the
SSD in sata via bios and it passed that test, which tells me there is unlikely
to be a sata speed problem.
The only idea
I have is that maybe the Acronis drivers I see in device manager are preventing
AHCI from loading and this is preventing SSD from showing up. This would
be unique to my PC, consistent with the data. Since deleting (or renaming)
these Acronic drivers is risky I have recloned my c:\ OS partition to main
backup (u drive). Now I can try deleting the Acronis drivers. There are
actually 8 of them in system32\drivers\ all with the same date.
In device manager
I see I have installed 'AMD AHCI compatible Raid controller' with driver
ahcix64s.sys (from AMD) under 'Storage controllers'. So this says my RAID
bios setting does provide AHCI features (as I read it might) and it is
using a different ahci driver. I was able to update this driver, but it
made no difference.
Solved -- SSD in sata shows up in Windows and is bootable
After two days of
intense work I finally got Windows to see the SSD! I had read a poster
had solved his visibility problem by first installing windows on it, so
I pulled out my Windows install DVDs. First try was my four CD from HP,
and it refused to install telling me the hard drive was smaller than the
original drive. I noticed that this was labeled a 'factory image restore',
and primitive Windows restore will not adjust to a smaller drive. I then
(on a lark) tried my one of my two xxxx.iso disks I had burned months ago
for a repair install. I had forgotten I had concluded they would not work
from boot. The first time it didn't see the drive, but when I changed the
bios setting to 'AHCI', up came the 200 GB SSD, and it asked me if I wanted
to install Window 7 (Custom install) here. Yes, and in 30 min or so I had
a bare bones (zero bloat) Windows 7 installation. A little primitive looking
since it was missing the video (and probably audio) drivers for my HP motherboard.
For first time with SSD in sata it showed up in windows and from disk management
screen I was able to partition and format it. Then downloading Casper I
put a clone on the upper partition. Boot time (best case) about 20-22 seconds.
When I attached 500 Gbyte clone #1 drive, it was visible as a secondary
drive.
Clean Windows 7 install from boot with xxxx.iso
disk is possible! (update 6/3/14)
After writing
above that the xxx.iso DVD would not install Windows 7 from boot, I was
able to get it to install a clean version of Windows 7 from BOOT on my
new SSD (solid state drive)! I had a new SSD that Windows just would not
'see' though it showed up in bios. Not remembering that these xxxx.iso
disk could not work from boot, I just popped one in to see what would happen.
The SSD was not blank as I had cloned Windows onto it in USB mode. First
time nothing much happened, though (somehow) I could tell it was seeing
the SSD.
Knowing
SSDs work best with AHCI mode, I changed the bios sata setting from 'RAID'
to 'AHCI' and that did it. The xxxx.iso disk I had burned then proceeded
(in 30 min or so) from boot to install ('Custom' option) a bare bones Windows
7 (with SP1) on the SSD! As part of the install process I had to enter
my Windows 7 ID number, but I did not allow online activation. Without
activation Windows 7 will run for 30 days!
My joy at getting
the SSD to show up in Windows was short lived when I set up a dual boot
and found clone #1 would not boot. The clones had all been made with bios
set ot RAID. I find they will not boot with bios set to AHCI. When
I change the bios mode back to RAID, the clones will boot and SSD (even
though it has a full Windows 7 on it) disappears from Windows. Trapped.
My tests show SSD requires (pure) AHCI mode (my RAID has AHCI built
in), but the clones will not boot in this case. My clones require RAID,
because that was the sata mode when they were made, but SSD is not visible
in this case. I see no way to use the SSD as I intended as a faster clone
drive.
** Crucial SSD requires AHCI to boot!
Summary: my tests
show putting a clone on my new SSD and using it as my main drive is not
going to work. My clones were made with the bios set to RAID and I find
will only boot if the bios remains at RAID, but my Crucial (Micron) SSD
I find will only work with a sata connection if the bios is set to AHCI.
In this latter case it will boot clean new version of Windows 7, which
I got off the xxxx.iso disk of Windows 7 I burned. This has some utility
in that it is a bare bones Windows 7 (with SP1) taking up only about 20
Gbytes. The SSD can be used in my clone setup as a faster data drive via
USB. Here's my Amazon review of my 'Crucial M500 240GB SATA 2.5-Inch 7mm
Internal Solid State Drive CT240M500SSD1':
Careful --- Requires bios be set to AHCI mode to boot Windows
7, May 31, 2014
Update 2 (6/9/14)
A search of the M500 forum on the Crucial web site
shows a lot of posters with the same problem I have. It appears that the
M500 will not work in windows 7 or 8 under the following conditions:
1) Bios sata controller set to RAID
2) AMD hardware on motherboard
3) M500 connected internally (sata or esata port)
Under these circumstances what happens is that the M500
does not show up in Windows (though it is visible to the bios). There appears
to be no fix or workaround at this time. Cause is not understood, but might
be AMD RAID drivers.
-------------------------------
Update
After 20 hours work I finally figured out what
is going on. The good news is that under AHCI bios setting it will boot
in 20-22 seconds a clean Windows 7. Bad news is that this SSD will not
do what I wanted it to do.
I thought this SSD would look like any other hard
drive, it doesn't. It has (to be kind) a 'quirk' that on my Windows 7 machine
REQUIRES the bios to be set to AHCI, otherwise it just will not show up
in Windows.
I have been researching the use of clones as backups,
and in fact am the author of a clone-backup essay online. I bought this
SSD to be a faster clone boot drive. In Windows a boot drive has to be
plugged into a sata (or esata) port. My clones were made on a 3 year old
machine with its bios set to the earlier standard (RAID). I can plug in
any HDD to a sata port on my motherboard, and it will boot and run one
of my clones, but this SSD will not. It REQUIRES the bios be set to AHCI
to show up on Windows, and under AHCI my clones will not run! For a new
Windows install with the bios set to AHCI, there is no problem, but the
whole point of having clones is to avoid having to go through the agony
of setting up all your programs for the nth time! Bottom line: I can use
this Crucial SSD as a data drive via USB, but not as a boot drive for my
cloned version of Windows 7.
I searched the many reviews here and found only
a few references to operating this SSD with bios set to RAID. I found a
few reviewers able to do so, and one who could not, well make that two.
---------------------------------------------------------------------------------------------------
(my original post, before I figured out what was going
on)
I cannot get Windows 7 to see this drive when it is plugged
into a sata port on motherboard. However, when connected via USB using
a sata-to-USB converter it works fine. On USB I can format it, partition
it, read and write to it, but when I plug it directly into a sata connector
(tried two) it is not recognized by Windows 7. It doesn't show up in in
disk management or device manager (or on command line). However, while
plugged into sata it DOES show up in the bios. From the bios I can even
run its SMART test (passes), so I know it can communicate via its sata
cable and port.
I know a lot about clones, partitioning and hard drives,
but this is my first SSD. I have worked hours on this, and I'm running
out of ideas.
My SSD is 240 Gbyte, MU03 firmware, Marvell 88SS9187 controller,
NTFS formatted. My system is Windows 7, Home Premium 64 bit, SP1. 3 yr
old HP desktop with AMD processor. I have the bios sata mode set at RAID,
I can't get AHCI drivers to load even though I have made the required registry
change. If anyone has had a similar problem or any ideas please leave a
comment.
SSD invisible in RAID with AMD hardware is a common complaint
(6/6/14)
I found a
lot of posters on a Crucial SSD forum in recent posts with the same problem
as me: M500 SSD not visible in Windows 7 and 8. This seems to be associated
only AMD hardware and the Raid mode. There is no solution. The M500 (it
is argued) is a true AHCI device and the suspicion is that AMD RAID drivers
don't adequately support AHCI. I read that Windows 7 itself didn't support
AHCI until SP1. Maybe a new AMD driver at some point resolve the problem.
SSD enclosure
If the SSD
is not to be my main drive I see little reason to mount it internally.
My thinking now is buy an enclosure for it with both a USB 3 and esata
port. Typically the USB 3 powers an SSD if it runs over esata. I could
leave the lower partition with the new clean version of Windows 7 to play
around with that I could access via esata and a change of bios to AHCI.
I could put data files I want fast access to in the upper partition, or
maybe a clone of the new Windows 7 installation. At this point I have no
idea what such files would be!
2.5 inch enclosure with USB 3 and esata ports
includes both USB 3 cable (dual plugs for power) and
esata cable
(very similar to the black Ankers enclosure that is
$5 more)
===================================================================================================================================
Two versions of Windows
7
6/8/14
I have
now moved into the phase where I have two versions of Windows 7 Home Premium
I can play with and clone. My highly optimized version, derived (Mar 2014)
from the original HP install disks (with bloat), and a slimmed down, bloat
free version installed (June 2014) from a Microsoft xxxx.iso file burned
to disk. The former runs only with the bios sata controller set to RAID,
and the latter runs only with the bios sata controller set to AHCI!
I cannot get
my original clone to run on my Crucial SSD because those clones were created
with the bios set to RAID and in RAID the Crucial SSD is invisible
to
Windows (though visible to the bios). To try booting with the SSD I had
little choice but to switch the bios to AHCI and do a clean Windows 7 install.
When I found (contrary to what I thought I knew) that xxx.iso would do
a clean Windows 7 install on a blank drive, I did that allowing me to experiment
with a non-bloat, generic driver version of Windows 7 (with SP1). I have
now cloned it too, to an upper partition on the SSD and to a partition
on my original HHD (via USB) in an enclosure.
Clean new Windows 7 in SSD under AHCI
I have been
exploring another approach. After being blindsided by finding my (Crucial)
SSD was not visible with the bios sata controller set to RAID, I began
to play around with the SSD and its clean Windows 7 install (not activated,
but I have up to 120 days).
I would like
to see how an SSD works, how fast is it in practice. A clean install of
Window 7 is interesting too. Starting from the xxxx.iso + SP1 it has no
bloat. Even with a lot of programs added it is very small only about 12
Gbytes (plus another 10 Gbytes when used due to temp hidden files: hiberfil.sys
and pagefile.sys. Casper can incrementally clone this to the upper SSD
partition in one minute! It's also very instructive for the first time
setting up Windows without all the support drivers that a retail manuf
would normally provide. For example, when first started the desktop, resolution
looked poor because the settings I normally used were not available in
the generic video driver that comes on the Windows disk.
There's obviously
a certain irony here. After all my work with clones, the purpose of which
was to not have to set up Window 7 again, I found my self for the last
2-3 days setting up Windows again! It sucks you in, in the beginning progress
is fast, but as you do more, every step takes longer and longer. It took
me almost an hour to add the keyboard sound scripts even though I documented
what I had done it a few months ago in this essay. At that time it took
2-3 days to make it work, so at least this time it was quicker.
The solution
to finding video and sound drivers for hardware built into the motherboard
was a trip to the HP support page. This was relatively painless and fixed
the screen and added sound. To make my new USB 3 ports active I needed
to install the drivers from the disk that came with the PCI express card.
Ditto for getting my Cannon scanner to work. I got my printer working by
just having Windows update the list of printers it supports and choosing
my Cannon printer (choosing MX450 from list for my model MX452). To set
up the many shortcuts to system functions (several Explorer directories,
volume, disk management, regedit, System restore, etc) I made a list of
these shortcut properties looking at my clone. I have to take pencil notes
for things like this, because it is not quick to go back and forth between
the two windows versions since I need to restart Windows after a change
of bios sata setting and selection of the drive from the dual+ boot menu.
Some programs I just copied over and they worked, for example: Paint Shop
Pro, Netscape 4.8, inSSider, HP hardware diagnostics.
It's the fine
tweaking and annoyances that really kill the time. For example, every time
I started Opera a popup box told me a new version was ready to install.
I researched this and found the (hard to find) preference for 'don't check
for updates', yet the popups continued. This was really annoying. I finally
realized the popup box wording might mean the update had already been downloaded,
and sure enough a search for 'Opera' in filenames by Agent Ransack located
it, and after deletion, the popup went away.
KMPlayer copy over
I have been slowly
adding programs to the AHCI SSD master (lower partition). It's a lot easier
to do this when I have access to my optimized clone. I was very surprised
to find that KMPlayer, which is a very difficult program to install and
get working correctly, I was able to just copy over. I just copied the
whole directory ('The KMPlayer' at the root), and it immediately worked
with every preference preserved (except one)! The one preference I had
to reset was the capture type and capture directory. This program is a
bitch to set up. I couldn't find the rev of the version I had been running.
When I downloaded the latest rev, it starts up in Korean, the same exact
problem I had months ago and was a bitch to fix.
Tricky script
based utilities that I wrote from online references, like keyboard volume
and the Create Restore Point were also easy to get working by checking
the icon properties for the script locations (and write up in this essay
in the case of the volume control) and just copying the scripts over to
the right locations. Once that is done, they just work. Other programs
I just copied over are inSSiDer (works better than before), Paint Shop
Pro, Netscape 4.8, MiViewCap (digital microscope utility) and HP
hardware diagnostics.
My desktop
has lot of shortcuts for system utilities, and these were all set up (quickly)
by looking at the original shortcuts: (many) Explorer opening at specfic
directory, regedit, Disk Management, SndVol, System Restore. The remaining
programs were mostly downloaded plus a few that needed to be installed
from disks: ACDsee 7, USB 3 PCI card, Cannon LDI 210 scanner, Hauupage
WinTV7, Casper 8 clone software. (I learned a little Windows 7 trick in
my reading that I was unaware of. The desktop can be brought up by hovering
the mouse above a bar in the lower right corner!)
AHCI clones
In AHCI mode,
where all drives (SSD and HDD) are visible, I was able to run some more
clone tests. I first cloned clean Windows from the install lower partition
of SSD to the upper partition of the SSD. An incremental clone with target
and source both on the SSD takes all of one minute (12 Gbytes)! In a second
AHCI test I cloned to the upper partition of my original HDD now in an
enclosure and connected via USB 3. I then reconnected the enclosure via
esata and was able to boot from the clone derived from the SSD. This again
confirms that the 'system' partition is not needed to boot. The Windows
install put a 'system' partition on the SSD, but I only clones the c:\
(OS) partition to the HDD.
Strange slow downs
I would
have thought that running a clean Windows version off an SSD would give
amazing speed. In fact it's not really noticeably faster and on two occasions
after running a while it slowed down noticeably.
However, I
ran into a really puzzling slow down while using the clean clone on an
HDD. Surfing the web over time got to be so slow it was nearly unusable.
I am pretty sure this was not an internet speed issue (my broad band connection
is very reliable), because even access to my local .htm homepage file was
very slow. Sure enough I did a system Reset and a minute later was back
surfing the same site and the speed problem was gone. We are talking about
a huge speed difference here, something like x5 to x10. Not a clue what
is going. And this is important, this has never happened (well almost never)
with my polished clones on my HDDs. There's a lot of possibilities: related
to the SSD, or the new Windows install, or AHCI, or transfer of an SSD
install to an HDD?
(update 6/15/14)
I later found out
that when I had the slowdowns (above) the SSD System partition was far
too large 13 Gbytes, and the SSD drive partition boundaries may not have
been properly aligned. For the last couple of days this has been fixed,
and so far no slowdowns.
Bootable USB flash clone (6/10/14)
When my 64
Gbyte PNY flash drive arrived, I used Casper to put a clone on it starting
with the smaller new Windows version under AHCI. From what I had learned
about flash and booting, I knew it had to be a single partition, and as
I had expected it showed up in disk managment as removable media. It came
in preformatted with FAT 32, and I left it that way when I made my first
clone, but when the clone was finished I was surprised that Casper had
converted it (without telling me) to NTFS.
I did the first
clone via USB 2, and it took over five hours! I really had no idea what
the speed of this thing would be, its spec seems to be artfully crafted
to imply it has USB 3 speed without exactly saying so. Five hours was x2
to x5 longer than I would have expected a first clone of this size to take,
so not a good sign. But hey it was via USB 2 and maybe converting from
fat 32 to ntfs slowed it down, so I repeated the clone via USB 3 and again
it took over five hours. I had no real idea how to go about making it bootable
and how to set the bios to boot from USB.
Some research
on the latter point showed some bioses have a USB setting, but my American
Megatrends bios doesn't mention USB. Some articles suggested this might
mean it does not support USB booting, but this of course conflicts with
the oft quoted statement that most machines since Vista days support USB
booting. Still it left uncertainty about how to set up my bios so that
a USB clone could boot. I knew I was able to boot into a Windows recovery
environment, from my old camera card flash via USB, but that's not the
same thing.
How to set
up the MBR (master boot record) on the flash was another mystery. There
were three possibilities:
1) Nothing special needed as Casper cloning, which I know writes the MBR
to HDD, would work for flash too.
2) Use the command line sequence I used for the Windows recovery flash,
but how to intgrate it with the clone content was unclear.
3) My suspicion is that programs like EasyBCD that promise to make drives
bootable are probably doing the same thing as
the command like, but this is a guess. EasyBCD writes the MBR without erasing
the contents of the disk.
I used the
command line to make it active, which was grayed out in disk management.
I figured using EasyBCD to add the MBR was good insurance so I did this.
Now the complications really began. I have two versions of Windows 7 on
my many drives, some set up under RAID and some AHCI. On top of that my
two baseline drives for these two bios sata settings have their own dual
(quintiple) boot menus. Do I try to boot from USB 2 on motherboard or can
I boot from USB 3 PCI card? No idea. This is a lot of combinations! I played
around all day trying to get my flash clone to boot with no success, but
finally next day I hit a combination that worked! That's the good news,
proof of principle, the bad news it was so freaking slow it was
totally unusable. We are talking 30 sec to 1 minute to open a program!
Here's the proof it booted. Note the first entry shows the the 64 gbyte
removable media drive is the c:\ (boot) drive.
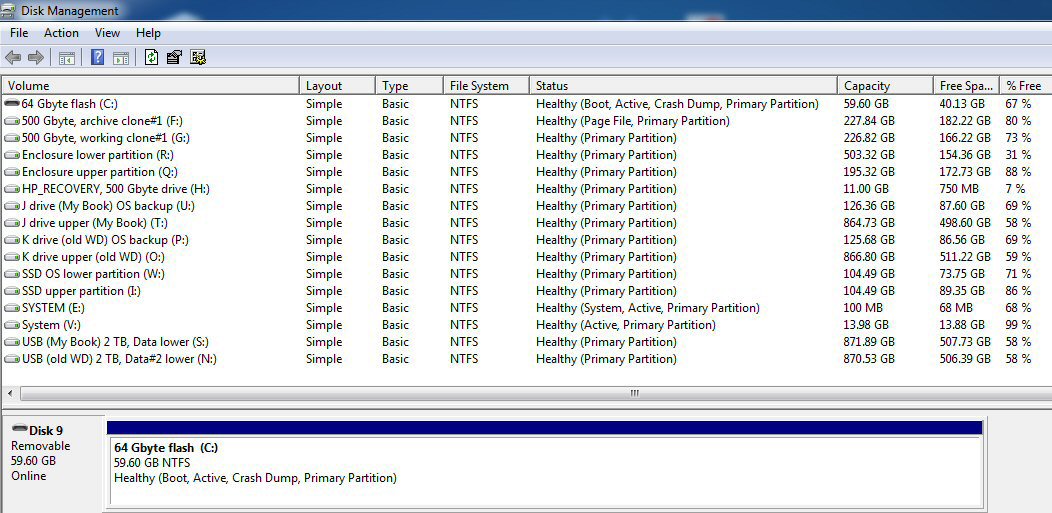
64 Gbyte PNY removable media (via USB 2) flash thumb
drive is boot drive (c:\ drive)
Don't have
a clean formula for getting it to boot, but I think I figured out a few
things. Looks like bios must be set to the same sata setting under
which the clone was made. The first flash clone I made was from the SSD
with the bios set to AHCI. I got the USB flash clone to boot with the bios
set to AHCI. I hoped that the flash clone would boot faster from USB 3,
so I made no changes except moving the booting flash from the front USB
2 to a USB 3 on my PCI card. I can't get it to boot from the USB 3 port.
I wouldn't be surprised if booting from a PCI card may not be possible.
If the card gets 'recognized' later in the boot process than a motherboard
USB, it may made booting from a USB 3 card impossible.
Yup,
a little searching shows booting via a USB 3 PCI card (as of late 2012)
generally doesn't work. A lot of people really want this feature, but very
few USB 3 cards have a Rom that tells the bios it is a bootable device,
or their drivers don't support boot. http://forums.anandtech.com/showthread.php?t=2228240
Getting the PNY
flash to show up in the bios and be selected as a boot device is also a
crap shoot. It is never (?) in the list of hard drives, but I sometimes
get to see in in the boot menu. What seems to work is very indirect. When
I select it via the boot menu, no boot. The one time I got it to boot what
I think I did was to select in the boot menu the SSD, main AHCI drive under
which clone was made, then from its EasyBCD boot selected the PNY
flash!
I
got the same result again. I remade the new Windows clone (under AHCI)
on the 64 Gbyte flash. If I select PNY flash via boot menu (it's on the
list), all I get is Bootmanager missing, hit ctrl alt del, but if I boot
to SSD and select it via an EasyBCD boot option, it boots. I tried using
AOMEI to rebuilt the flash boot mangager. I told me the boot manager looked
OK, but I had it write it again. Made no difference. I don't understand
this weird booting behaviour.
Switched to RAID
and did a reclone, this time my standard clone (54 Gbyte) to PNY flash
(on USB port). It ran 11 hours and was only at 70% when I shut it down!
Most of the files seemed to be there, but I could not get this rump clone
to boot from USB 2 (or 3). Why so slow? I need to check out the flash in
detail, an earlier quick test seemed to slow down at the 70% point too.
I ran a (crude)
boot speed test: 64 Gbyte PNY vs an old 8 Gbyte flash. I put a (proprietary)
200 Mbyte bootable WinPE on both and checked the boot times. Good news
is that the 64 Gbyte PNY flash booted much, much faster than the 8 Gbyte
camera flash. While I didn't time it, the PNY was probably about x10 faster
(6 sec vs 1 min).
Procedure for a booting USB flash clone
I repeated
the cloning to the 64 Gbyte flash thumb drive, so I would have a procedure
that I know works. Never mind that at least at present with my hardware,
the clone runs so incredibly SLOWLY that it is unusable. It is a clone
and it does boot and run, so it serves an archive function.
The clone is
made with Casper 8, which automatically when cloning (Copy mode) writes
the MBR. Here I only clone the c:\ OS partition, because I know from repeated
tests with several drives that this is all that is needed for a clone to
boot and run. It is not necessary to do anything else to make it bootable,
no command lines, not using the boot write feature of EasyBCD or AOMEI/Casper
(though it doesn't seem to hurt).
To get the
clone to boot the following procedure works: Set the bios sata mode to
the same state as when the clone was made (at this point I have only confirmed
the AHCI mode works). For the clone to boot plug it into a USB port on
the motherboard, not a USB card, because the card is unlikely to
be set up early enough in the boot process to support booting through its
ports. In my case I only have USB 2 ports on my motherboard. Hopefully
my clone would run faster if I had a machine with native USB 3 ports, but
I have no way to confirm this.
The trickiest
part (with my present complex setup) is how to select the flash drive as
the boot drive. There would seem to be an obvious way and a much less obvious
way, but the obvious way doesn't work and the the less obvious way does.
The obvious way is at start calling up the bios boot order menu and selecting
the PNY flash drive. The flash drive is on the boot menu list, so the bios
sees it, but when selected this way an immediate 'ctrl alt del' message
pops up.
But this less
obvious way to select flash clone does work: From the bios boot menu I
select my baseline AHCI drive, which is the SSD (lower partition). I have
previously set up in this partition a dual boot type menu that includes
an entry for the 64 Gbytes flash, which has been updated to reflect is
current drive letter. Wen the dual boot menu comes up, the 64 Gbyte flash
is chosen and this works. What is the difference between the two selection
methods? I don't have a clue, even though I have read a lot about boot.
When the 64 Gbyte flash drive is chosen from the boot menu, the boot process
doesn't even start, 'ctrl alt del' message come up immediately.
Explorer's crappy files sizes
I spend a
lot of time looking at directory sizes. I can't believe how directory sizes
in Explorer can be so far off. It comes up with the size very quickly so
it must be doing some sort of estimating. I doubt it's a real count. A
big error really fakes me out when I am checking a new clone.
I had just
moved my Crucial M500 SSD to an external enclosure, and I recloned the
lower partition to the upper partition. A quick check showed the two temporary
system files (xxxx.sys) totaled about 10 Gbytes, and I know they are not
copied, so I expected the 31.2 Gbytes (bytes used) of the lower partition
would yield a clone of size 21.2 Gbytes. Instead I find Windows telling
me the clone is 16.3 Gbytes. Was 25% missing? My goto check is JDiskReport,
and I had it do a scan of both directories: 30.9 Gbytes vs 20.9 Gbytes.
What a piece of crap Windows is!
---------------------------------------------------
New perspectives on cloning to SSD
Found this
post on sevenforums with some interesting new perspectives. Poster cloned
System and OS partition, made system partition active with diskpart and
it wouldn't boot. Here's the reply. Three things jump out. Suggests System
partition can be dumped, which is consistent with my experience. He is
recommending doing the clone via an image. And he makes the case
for getting rid of the hiberfile.sys file, though in my experience
the OS creates it as soon as a clone is used.
step 1. move the bootmgr to C - Bootmgr
- Move to C:\ with EasyBCD Then you do not have to mess with the system
reserve partition
step 2. create 1 (one) aligned partition on the
whole SSD with diskpart as described in my tutorial linked above by Andrew
step 3. Make an image of C - make sure the partition
(not only the data) you image is equal or smaller in size as the space
on your SSD partition.
step 4. dump the image into the SSD partition you
created
step 5. change the boot order and the thing should
boot correctly.
step 6. stop defrag for the SSD and get rid of
the hiberfile - unless you use hibernation.
http://www.sevenforums.com/backup-restore/223287-how-do-i-clone-system-partition-onto-new-drive.html
In Windows7,
you may have the 100MB active boot partition. The easiest way to deal with
that is to 'move the bootmgr to the C: partition' using EasyBCD. That you
do on your HDD before you transfer anything to the SSD. Then you do not
have to worry about it and you need only transfer the C: partition to the
SSD. An interesting tutuorial on how to do that is at link below.
Copying
the bootmgr from the 100MB active partition or the recovery partition to
C:\ is extremely simple with EasyBCD. You can download EasyBCD from this
website. The bootmgr will not be moved from the original location - it
will only be copied to the C:\ partition. The C:\ partition will be activated
and the 100MB partition will be deactivated.
1) Choose BCD
Backup/Repair
2) Change
boot drive
3) Perform
action
4) next screen
with show 'New boot drive as c:\' Ok/cancel
http://www.sevenforums.com/tutorials/209885-bootmgr-move-c-easybcd.html
Here's what is lost with no System partition
Warning
When you copy
the bootmgr from the 100MB System Partition to the C:\ partition, you loose
the Windows Recovery Environment on that system. It is recommended you
make frequent images to protect your system.
How to handle the d:\ Recovery partition
There may
be more partitions on your factory HDD e.g., the Recovery partition and
a Tools Partition. Those you should not transfer to the SSD because
of space constraints. I would back them up e.g., with an imaging program.
The Recovery Partition you can also burn to DVDs.
Verify SSD partition alignment is correct
Correct means
with edges on multiples of 1024, which I presume aligns the partition boundary
with ICs. If you want to verify that the alignment is correct, you use
these commands:
Diskpart
List disk
Select disk n
List partition
You should see a result like this:
Partition ### Type
Size Offset
----------------- ----------
------- --------
Partition 1
Primary 59 GB 1,024
KB (article)
Partition 1
Primary 13 GB
128 KB (my SSD result, OK)
Partition 1
Primary 59 GB
31 KB (my 64 Gbyte flash result. I wonder if this
odd offset it part of the problem it it so slow.)
but 64KB or any number divisible by 4 is also good. The
offset has to be divisible by 4.
My 13 Gbyte
partition is the system partition and is 99% free! Not sure if I meant
to set it at 13 Mbyte or if there was a restriction at the time when I
was using trial Casper 8. Should fix this.
Creating a 100 Mbyte partition on SSD for System
Command
line commands to Creating a 100 Mbyte partition on SSD for System. Author
says Disk Manager has problems going this small. I aligned my SSD partitions
using AOMEI and it turned out the SSD System partition was about 150 Mbytes,
so AOMEI set the size to be 256 Mbytes.
Diskpart
List disk
Select disk n (where n is the number that was given for
your SSD in List disk)
Clean
Create partition primary size=100 align=1024
Format fs=ntfs quick
Active
Exit
Summary geek way to 'clone' without clone software a HDD
to SSD
On HHD use
EasyBCD to copy boot partion from System partition to c:\OS. This
apparently does not affect HHD's ability to boot because its System boot
stuff is not changed. Now only the c:\ OS partition needs to be moved to
the SSD. The recovery partition can simple be backed up as an image.
The OS system
transfer is done by way of an image. (Why he doesn't say). Either
using image software or Window's image make an image of HDD c:\ OS partition
to an external disk. Now the bootable image recovery program is needed.
It is used to recover the image to the SSD. Here's the work around for
the fact that the recovery program may refuse to recover to a smaller drive
than original (even though data will fit):
Note:
Most free imaging programs cannot shrink the originating partition to fit
into the usually much smaller C: partition on the SSD - even if the amount
of data in that partition would fit. In that case you will need to shrink
the C: partition on the HDD prior to imaging it. The HDD C: partition must
be smaller or equal in size to the designated partition on the SSD. For
that operation I also recommend (free) Partition
Wizard (downloaded) program because Disk Management might not be able
to shrink it enough.
To to the move
from HHD to SSD automatically he recommends Paragon
Migrate OS to SSD ($20). It does everything for you alignment, deals
with the 100MB partition, transfers C:, shrinks the originating partition,
etc. All you will have to do is change the boot sequence.
Note: Before
you activate the SSD, it is recommended to set the BIOS to AHCI. Best time
to do that is just before you change the boot sequence. Once Windows7 is
running, you make the corresponding settings in the OS. Here is a tutorial
on how to do that. Many people claim that there is a significant performance
gain with AHCI. I, however, did not see that. But it may be different from
system to system.
Interesting ideas here
---- With
the image method the bios sata mode does not appear to be central. In fact
an image transfer is probably the work around needed to get my standard
(optimized) clone to the SSD even though it is not visible with sata mode
set to Raid. I could experiment here copying to the upper SSD partition.
Running some new cloning tests (6/13/14)
The general
idea here is to work from within the AHCI environment (from SSD lower partition)
and either image or clone the standard working clone #1, made under RAID,
to an AHCI drive and to see if I can get it to boot under AHCI.
From SSD (under
AHCI) I had Casper make an image of my working #1 clone from 500
Gbyte drive with the idea that I would restore this to the upper partition
of the SSD drive. This procedure does not work. The problem is that
Casper while it can make an image of a partition it will not restore this
image to a selected partition. It only will restore to a selected (physical)
drive, and it states that its restore will wipe out all the partitions
on the drive. Casper is not the tool for using images to move things!
OK, onto step
two, have Casper do a clone of working clone #1 from the SSD to (newly
created) middle partition of Enclosure. The real objective it to try and
move working clone #1 to SSD, but to be safe I will start with AHCI enclosure.
Nope, like before my RAID created clone won't boot with bios set to AHCI.
Bootable
USB flash Windows repair thumb drive
For some stupid
reason the only media option Windows 7 provides to write its bootable
repair 'disk' is a DVD. However, a bootable USB flash version can
be more convenient. For one thing it can be left plugged into a spare USB
port and selected from the boot menu when needed. If a fast enough flash
drive is used (little tricky to find), it can be just as fast (or faster)
to load than a DVD. But there is a little problem, Windows won't write
it, you have to make it yourself. There are many videos and articles on
the web on how to do this. There are essentially two ways.
1) The easiest,
certainly the most straightforward, is to first burn the DVD. The DVD files
are then copied to the flash drive, but first some low level commands are
used to make the flash drive bootable. This amount to nothing more than
creating a (single) 'primary', 'active' partition on the flash drive. (It
may also need to be formatted.)
Simple
way to prepare USB repair flash drive so it will boot
This is generally
done using the Command box (Disk Part utility), but I don't see why it
can't be done using the disk management screen. A quick test shows this
works. After first writing the USB flash repair, I formatted it (once quick
and once full), which erases everything. Disk management screen then showed
the formatted drive was (still) active and healthy with an assigned letter
(bootable USB requirements). So I just copied back the (five) repair environment
files, and it booted fine.
Figuring out what makes a USB flash drive bootable
from DiskPart sequence
In reference
after reference (see below) I see the same set of DiskPart commands
run in the command box (as administrator) that will make a flash drive
bootable. The first commands are just the mechanics of selecting the right
disk. The guts of the diskpart boot prepare sequence is:
* a) 'cleaning'
(quick format works)
b) 'primary partition'
* c) 'active'
(use AOMEI partition assistant)
d) 'format'
So what's unusual
about this? Surely not 'primary partition' and 'format', this is just a
normal partition. It smells like the 'added' steps a flash USB drive needs
to bootable is to be cleaned (erased) and made 'active'. And from some
tests I ran I am pretty sure this is right. When I left out either step,
no boot. One test was inadvertent. I copied my bootable PNY flash to a
new camera flash and it wouldn't boot. I tracked this down to the partition
was not 'primary'. In a second test I found a previously written to primary,
active flash drive would not boot unless it was formatted ('cleaned') before
the files were written to it.
I
found out when I bought a new flash card for my camera that just copying
over my booting PNY flash drive to it didn't work. It would only boot after
I made it 'active', and for this I needed AOMEI, because Windows diskmanager
page had it grayed out. However, when I put the card in my camera, formatted
it, and then tried the same procedure again, it didn't work! I now suspect
that 'clean' (reformatting) is an essential step. It is. After a quick
format and recopying over the files, it booted.
http://www.wikihow.com/Make-a-USB-Bootable
2) The other way,
the hard way, but which will be the only alternative if a laptop does not
have a DVD drive, is to scrounge up the needed handful of files, which
all exist in the OS but are scattered about (some with different names!),
rename them as required, and copy them to the flash under the required
folder names (boot and sources). There are only six files on the Windows
7 repair DVD and all six exist on the PC, but in two different directories
and in some cases with different names. The guts of the repair environment
is in the file boot.wim (334 Mbytes) and this goes in the 'source' folder.
The other five files are all small: bcd, boot.sdi, bootfix.bin go in the
'boot' folder, and bootmgr goes in the root. That's it. You don't need
to explicitly write an MBR, just copying these files to an active partition
will make the USB removable flash bootable. Maybe one of the files is a
camouflaged MBR, I don't really know.
Below is a
hard to find manual procedure for making a USB bootable repair tool using
just Windows 7. I tried it and it works. It makes a bootable USB repair
media, exactly the same as what Windows 7 writes (only) to a DVD. Test
with my PNY 64 Gbyte shows it boots as fast, maybe faster, than the repair
DVD. (It occupies only about 1/3rd of a GB)
Turns out all
you need to do to make a bootable Windows 7 repair USB flash drive
(with Startup tools, system restore, etc) is set up a couple of directories
on a newly formatted flash drive, and then copy five files from
Windows 7 to the right folder locations. One file needs to be renamed,
but otherwise no complications, no command inputs to make it bootable.
These five files in the right directories with the right names do the trick.
Five files for repair media and their source in Windows
7
Just copying
these five files to a (newly formatted) flash drive (removable media) make
it bootable. Creates a bootable USB flash drive that brings up the
Windows recovery environment. (This needs to be manually assembled in Windows
7, but in Windows 8 Windows will do it for you and write the repair flash.)
root
bootmgr (375 Kb)
c:\Windows\Boot\PCAT
('bootmgr' in Recovery partition root)
boot
('boot' dir on Recovery partition)
BCD (256 KB)
c:\Windows\Boot\DVD\PCAT
('BCD' in boot on Recovery partition)
bootfix.bin (1 KB)
c:\Windows\Boot\DVD\PCAT\en-US
('boot.sdi' in boot on Recovery partition)
boot.sdi (3 Mbytes)
c:\Recovery folder and its (only) subfolder (long random name)
(not in Recovery partition)
sources
(not in Recovery partition)
boot.wim (165 MB)
c:\Recovery folder and its (only) subfolder (long random name)
(rename from Winre.wim)
(Recovery partition in 'preload' directory has
about 100 xxx.wim files totaling 10 Gbytes)
-- After you
formatted the USB stick, create on it two folders named 'boot' and 'sources'
-- Open c:\Windows\Boot\PCAT
and copy the bootmgr file (375 Kbytes) to the root of the USB flash stick.
-- Open
'c:\Windows\Boot\DVD\PCAT' and copy the BCD file (256 Kbytes) to the 'boot'
folder on flash stick
-- Open 'c:\Windows\Boot\DVD\PCAT\en-US'
and copy the bootfix.bin file (1 Kbyte) to the 'boot' folder on USB flash
stick.
-- Open c:\Recovery
folder and its (only) subfolder (long random name). Inside are two files:
boot.sdi (3 Mbytes) and Winre.wim (165 Mbytes). Copy boot.sdi to flash
'boot' folder. Copy Winre.wim to flash 'sources' folder renaming it 'boot.wim'.
http://www.7tutorials.com/create-usb-memory-stick-system-recovery-tools
I tried booting
into the 11 Gbyte HP Recovery partition on the 500 Gbyte drive by adding
it to the the EasyBCD boot menu (under Raid). As I noted above, it has
a lot of the same files (but not all) as the Windows repair media, so I
thought there was a chance it might boot, but it doesn't.
---------------------------
I liked the
64 Gbyte flash stick I bought from PNY ($27), fast and lots of capacity.
I am probably going to leave it as bootable USB Casper recovery flash drive,
which allows a Casper image to be recovered. (A Caper image is far to be
preferred to a Windows image.)
When I wanted
a bootable USB flash drive for Win7 repair, I bought another 64 Gbyte PNY
flash drive ($25). This was probably a mistake, because I now find in the
boot menu if I have both PNY USB flash drives plugged in, I can't tell
them apart, and there appears to be no way to rename how they show up in
the boot menu. 64 Gbytes is far, far more capacity than is needed for Win7
repair, which is just a few hundred Mbytes but the extra capacity can be
used to archive data and (Casper) image backup. It can't be used for a
clone (also) because a clone backup needs its own partition (everything
in the partition is replaced by the clone). But in Windows 7 a USB removable
flash drive cannot be partitioned and be bootable, so it either
holds a clone or the Win7 repair environment, it can't hold both.
As a bootable
USB Win7 repair drive, it has exactly the same files as the Windows
7 repair disk, which the computer writes, and I know this because after
making the USB flash bootable I copied over the repair DVD files to it.
As to speed the PNY flash loads the repair environment as fast if not a
little faster than repair DVD.
With my (quad)
USB 3 card I now have a 10 USB ports on my machine, so I plan on leaving
this flash drive plugged into one of the original (bootable) USB 2 ports.
It can then be called up from the boot (Esc) menu when needed. It will
further simplify running the procedure to reset the Windows 7 trial arm
counter, which requires booting into the Win7 repair environment to run
a batch file.
Simplified way to make a Windows recovery USB flash
I reconfigured
my Windows recovery 64 Gbyte flash by cloning Windows to it. I ran a test
to see if I could reconfigure it back to the bootable Windows recovery
flash the easy way. All I did was go into the disk management screen and
(quick) format it. When format ended, it still was an active health partition,
so I just copied back the five files (in correct folder format) that I
had saved. That worked, it booted fine into the recovery environment. Now
I suppose it's possible the MBR survived the quick format, so a better
test might be to repeat it after a full format. Tried it, and this worked
too.
Command prompt diskpart 'clean' command
-- From the
diskpart prompt, type clean and press Enter. The drive's partition, data,
and signature is now removed. You will return to the diskpart prompt. Warning:
Once you type clean and hit enter the drive will be erased. No warning
will be provided. Now the 3TB+ drive can be re-initialized, partitioned,
and formatted.
An article gives
this Command prompt procedure to make a USB flash Windows install drive.
It makes USB flash drive bootable and copies all the files (3.2 Gbyte)
either an install Windows DVD or from an xxxx.iso Windows image file.
Diskpart
List Disk
Select disk x
(clean)
(select disk x)
(create partition primary) list
partition (it may already list as 'primary')
select partition 1
active
(format fs=ntfs)
(assign)
assign a letter
exit (exit Disk Part)
d: cd boot (d: is letter of windows DVD drive)
cd boot
bootsect.exe /nt60 e: (e: is letter of USB drive)
create boot sector on USB drive
exit (close command box)
(copy all files from Windows 7 DVD to USB drive)
http://bootableusb.net/install-windows-7-usb-drive-easy-way/
Adding other stuff to recovery media
I added the
above five programs to my (new Windows) bootable clone and surprisingly
it boots into the recovery tools just like all the other stuff were not
present. And it none of it seems to be accessible even using the command
prompt.
How does System file checker (sfc) work?
I thought
I understood how system file checker (sfc /scannow) worked, that it compared
system files against those in the d:\recovery partition. For fun I tried
it on my SSD which has no recovery partition and it ran (apparently
normally)! What is it comparing the system files to? Found a lot of wrong
answers, but the right answer appears to be that a backup copy of Windows
files appears to be built into Windows itself, and that is what sfc is
checking aganst. The d:\ recovery partition is vendor dependent, mine coming
from HP, and appears to be an image of the disk as it leaves the factory.
bloated with crap software.
The Windows
7 backup files appear to be here: c:\Windows\winsxs. This subdirectory
is huge (6 to 10 Gbytes) with a size about half of c:\Windows, where most
of Windows appears to be. The \winsxs subdirectory of c:\Windows\ is all
long cryptic folder names. On my new Windows it has these properties: 5.7
Gbytes, 10,000 folders and 42,000 files. In my standard clone #1: 10.6
Gbytes, 14,000 folder and 59,000 files. This folder grows with time because
it hold archival copies of all the patches Windows make. You can roll back
a patch because the OS can pull the old version out of this folder.
-- Windows update KB 2852386 in Windows 7 machines
with SP1 allows some of the old in winsxs to be deleted. Right-click
on your C: drive, choose Properties, Disk Cleanup, then Clean up System
Files. Look for the entry marked Windows Update Cleanup. Windows Update
Cleanup will remove all of the very old entries in WinSxS. On my old Win7
SP1 machines I tried, and I found 1.2GB to 3.2GB of wasted space just waiting
to be cleaned up.
Hitman Pro booting flash drive for FBI lock virus recovery
One of the
anti-virus programs I have had for a long time (Hitman Pro) has a new feature
(Kickstart), it will write a bootable flash that brings up their program
allowing the ordinary user to recover from an FBI take over virus, i.e.
if they have made the flash in advance or have access to another PC to
download and write the flash. They are promoting this heavily with two
YouTube videos, one on how to write the USB flash drive and a second on
how to use it to recover. They even have a long user manual for it. They
said you can include your own files too but I now suspect they are not
accessible during the boot process.
So in new Windows
I had it do its thing with my 64 Gbyte flash. It reformatted the flash
to Fat32 and added its three programs, which I verified looked OK. And
it doesn't work. The instruction were to go into the boot menu and select
flash. It has two options and then up comes my EasyBCD options. I tried
them all combinations and no boot. I reentered the flash into EasyBCD menu,
still no joy. I had EasyBCD make the flash bootable, still won't boot.
The only other
thing I can think of is to uninstall EasyBCD (for a test). Well that didn't
work either. Even with EasyBCD gone dual boot menu still comes up and works.
EasyBCD is just a boot editor for Windows built in dual boot capability.
Getting rid of dual boot
This is not
that easy, but I found a good tutorial on how to use EasyBCD to do the
job. It looks like the procedure is to delete what ever boot entries you
want to get rid off. But dual boot is still active in Windows so in step
4 select 'BCD backup/repair' to 'Reset the BCD'. Apparently this removes
ALL boot selections. (I found out earlier that EasyBCD can leave your system
so it won't boot.) So the essential last step (step 5) is to add c:\ as
the (only) boot entry. I am going to try this.
-- Now that
we removed one OS, we have a surplus entry in the bootmgr. We will remove
this entry with EasyBCD. As you can see in the picture, the operation takes
only 4 clicks.
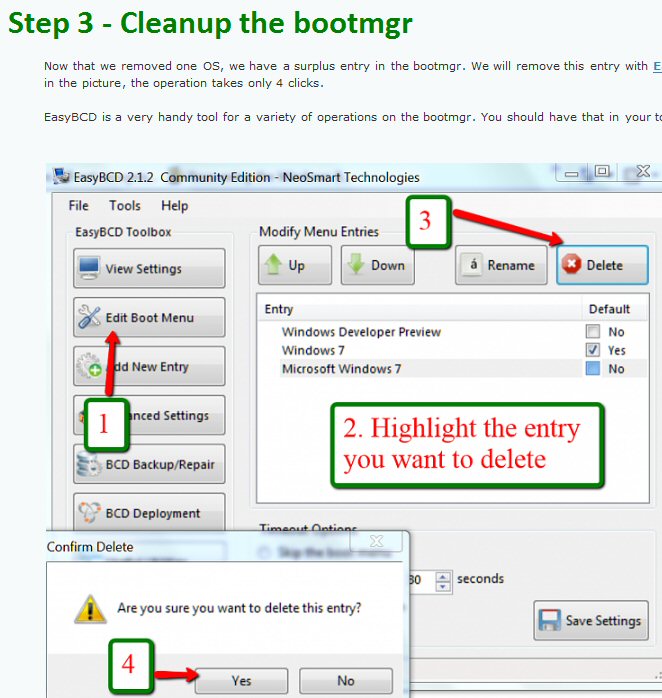
-- If you stop
at this step, the MBR is still in a double boot configuration and when
you boot, the BIOS will present you the black screen where you have to
choose the operating system - although only one operating system is present.
This is not a disaster, but it is an unnecessary step that requires your
intervention.
-- The next
two steps will reset the MBR to your current OS and then your system will
automatically boot into that. Important: You absolutely have to execute
both Steps 4 and Step 5. If you only do Step 4, your system will not boot
any more!
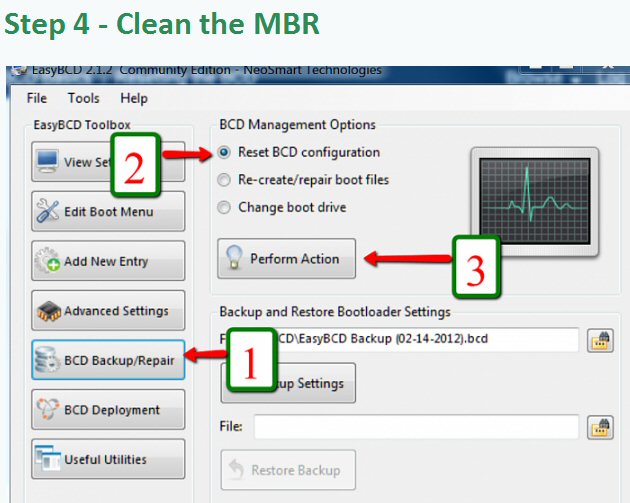
After (above)
step 4 EasyBCD warns that ALL boot entries have been deleted and that (at
least) one boot entry must be added or the system won't boot, and that
is what Step 5 (below) does.
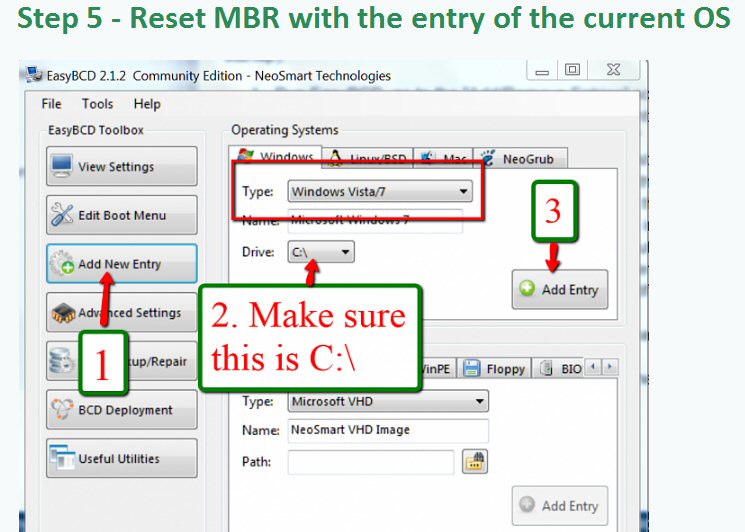
http://www.sevenforums.com/tutorials/210983-dual-boot-delete-os.html
I did above
steps carefully with the result that I still could not boot into any of
my AHCI options! Not a clue why this heavily promoted recovery flash does
not work. I could boot into my default Raid drive. I looked up how I recovered
before (search 'trap') and found I needed to use Windows repair disk, so
out it came.
Using Windows repair DVD to restore AHCI drive boot
While running
the Windows repair DVD did (eventually) reestablish a working boot to get
back into AHCI drives, this program is a nightmare to use, a piece of shit.
I kept notes on how this process went. I reset the bios to AHCI and was
unable to boot, so I popped in the Windows repair DVD. It trundled for
10-15 minutes looking for Windows installations, of which I have many,
and told me it added boot options. Here are the new boot options it added
(I called up later in EasyBCD). Note all seven of them have
exactly
the same name, and there is no other info provided to figure out what is
what! They, however, are not the same, they each boot (or try to boot)
to a different drive or partition. Are the Microsoft guys who write this
stuff just brain dead. You have ten seconds to chose. Good luck!
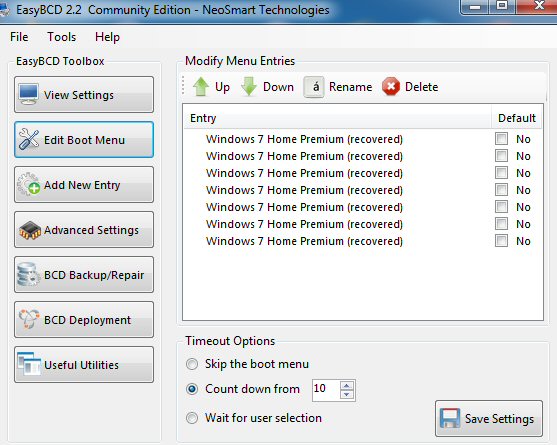
Seven different boot options created by Windows repair,
all with the same name! (Yikes)
I had some
hints as to what these seven pointed to as I had clicked an 'information'
button on the earlier screen telling me new boot entries had been created.
This gave the drive letter and drive size of each entry. The drive letter,
unfortunately, tells you nothing because drive letters get reassigned.
Drive (partition) size is displayed of course as crudely as possible (Kbytes
without commas), and while it is in the ball park for sizes as displayed
in Explorer they do not match. For example, startup displayed one drive
at 112 Gbytes, I guess correctly this was the SSD lower partition, but
Explorer gives its capacity at 118 and 110 Gbytes. After a boot (to the
3rd entry hence shown below as c:\), from EasyBCD I extracted what Windows
repair had done. Here are the seven boot options in order (above). I have
marked the bios sata setting needed for them to boot (bios setting under
which they were created).
AHCI
q:\ Enclosure upper partition
AHCI
i:\ SSD upper partition
AHCI
c:\ SSD lower partition
RAID
p:\ k drive OS (USB drive)
RAID
w:\ Enclosure middle partition
RAID
g:\ working clone #1 (500 Gbyte drive)
RAID
f:\ archive clone #1 (500 Gbyte drive)
-----------------------------------------------
RAID (missing) u:\
j drive OS (USB drive)
The first drive
was the default, and after ten seconds my first boot was to the AHCI clone
on the enclosure upper partition. From sizes I guess the 3rd boot entry
might be SSD lower partition, which is really where I wanted to boot, so
I restarted and chose the 3rd boot entry.
OK, let's looks
at what Window repair did. Not counting recovery partitions I have 8 partitions
with OSs. Repair found seven and missed one. With bios set to AHCI repair
it put the three AHCI drives first. Good! The last four were clones
created under Raid and will only boot with the bios set to Raid. Note however,
that startup put first in the this category an OS clone on a USB drive!
Are the people who write this code so stupid that they don't know that
Windows 7 can't boot to a USB fixed drive, which is what option p"\ is,
or can't figure out a hard drive is connected via a USB port? The information
screen also showed a recover win.re to an 11 Gbyte recovery partition,
but for some reason that is not included in the boot option list. Why?
More on Windows repair
Playing around
I tried some different combinations of file on the 64 Gbyte clone. Recovery
partition has a lot of similar files so I started there. Could not get
the recovery partition to boot. I deleted most of the files (some
could only rename) and added in the boot files from the recipe. I got a
boot with the recover xxxx.win. It started with a validation screen: had
to enter name and #, but when I entered my Windows ID and my guess at a
name, it said wrong. It asks for a name? How the hell am I supposed
to know the name I used when the machine was new? Magical jelly bean does
include a name and I used that, but still no go.
Product key (cd key) and Product ID
As usual with
Microsoft nothing is ever simple, the OS key code notation is a mess. Microsoft
in a popup windows to validate my new version of windows calls the code
needed: "product key", but elsewhere it is often called the "cd key" (why
I have no idea!). The 'product code' or 'cd key' is a 25 alphanumeric string,
five blocks of five, xxxxx-xxxxx-xxxxx-xxxxx-xxxxx.
What is confusing
is that there another long numeric string called the 'product ID'. Magical
Jellybean has both, and confusingly labels the (Windows 7) product key
the 'cd' key. (I think I entered the ID in the validation popup window,
whereas it was probably looking for the 'cd' (product key). The product
ID (computer) is tied to the Windows 'product key' at install so that the
copy of windows cannot not be moved to another machine.
I then changed
the xxxx.wim file to the recipe xxxx.wim (renamed boot.wim), and I got
a normal boot into the recovery environment. It told me I had startup problems
and added four (identically named) boot options, not one of which would
boot. All four were OS clones made under Raid and one was on a USB drive.
Startup repair add a USB drive as a boot option (first no less!) and three
more sata OS that were cloned under Raid. God, Windows is such a piece
of crap. Not only does it not check the bios, it doesn't even check if
a windows installation is on a USB hard drive!
Utilities in .wim files
I noticed
the operational files in the Windows repair/recovery environment are .wim
files. Looking into the HP recovery partition I see it also is made up
almost entirely of .wim files. Turns out .wim is a Windows image file
format that is highly compressed. I found a free unzip utility that can
also extract files from .wim images: UnzipLite from Amnis Technology (needed
to strip crap it was bundled with). A look into HP recovery partition showed
nothing useful, just a list of numbered files.
Boot Disk Explorer Demo
Opening boot.wim
(not sure from what Windows recovery source I got this) shows a directory
of files including several .exe utilities. The first one I clicked ran.
Boot Disk Explorer Demo (by LSoft Technologies) has some useful features
missing from Windows explorer, one of which is folder size. Folder size
is not included in Explorer default view because it can take a lot of time
to calculated folder size (30 sec for C:\windows which has most of windows
files), but it should have been included as an option. It is not. Boot
disk explorer has an icon to calculate file size, which it just adds to
the directory view. This is a useful disk management too, however, for
large folders it is slow, it took 5-10 minutes to calculate c:\windows
with 12 Gbytes of files.
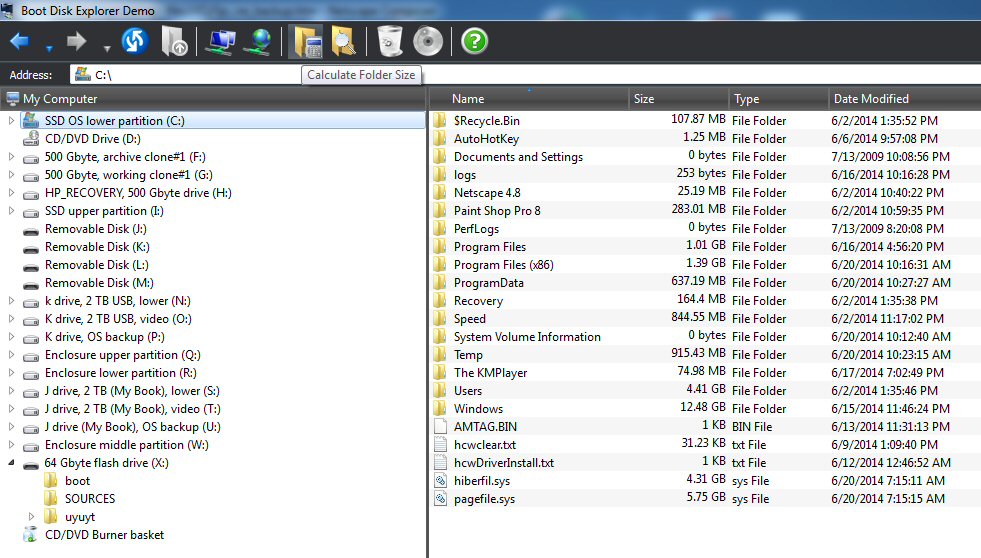
Boot Disk Explorer Demo (from boot. wim)
showing calculated folder sizes and 'calculate folder
size' tool tip
Compare to same directory in Windows Explorer
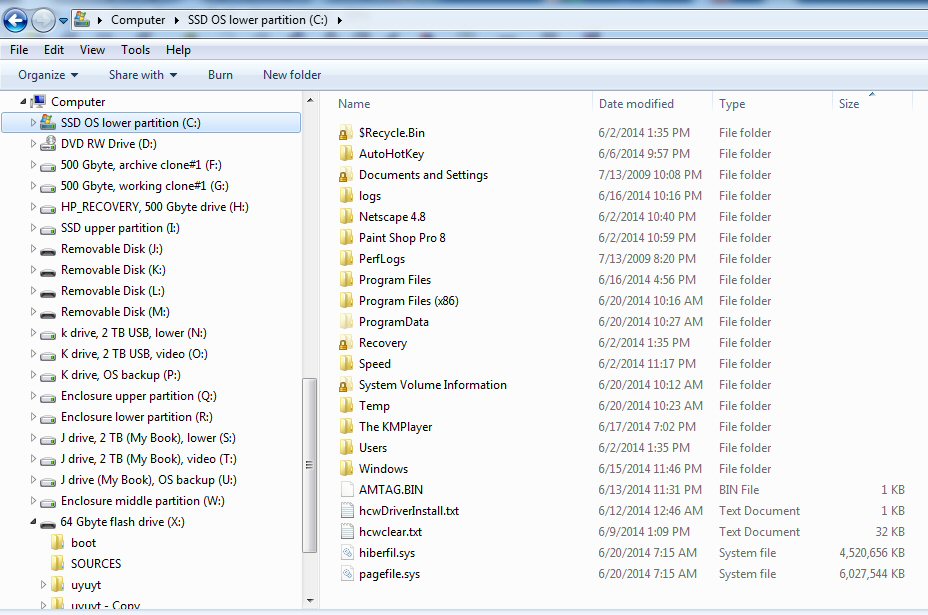
Boot Disk Explorer
has other useful features too. It has two delete functions that I suspect
may be useful when Windows refuses to delete a file or folder due to permissions
(crippled to only delete files <32k in demo version). Notice normal
Explorer (above) shows some folders, like 'Recovery', locked and it will
not open them, but Boot Disk Explorer will open them. Boot disk also includes
a disk burner. LSoft Technology makes a suite of computer boot recovery
tools that it sells under the name Active@Boot Disk. I recovered a directory
of their utilities from a .wim file on my computer and put a shortcut to
it on my desktop. Their partition manager (Partman.exe) includes a disk
editor, a disk SMART utility, and shows what's in the boot sector (with
valid and invalid values marked).
Windows experience index
Just became
aware of built-in Windows utility provides some useful information for
checking the performance of an SSD and tailor the system to the SSD. Type
'Windows experience' in Start search box, then select 'Check the Windows
Experience Index' (5 min). It gives a performance number for primary hard
disk, but according to an article I learned about this says it should detect
its an SSD and setup for it: "Click 'Re-Run the Assessment' and it should
turn off defragmentation and turn on TRIM", however, there Windows gives
no evidence that it has detected an SSD or changed anything. Looking at
the defrag page again I see no indication that the SSD has been excluded
from defraging, nor do I see a way to (permanently shut it down).
I ran the Windows
Experience comparing my 7200 rpm 500 Gbyte drive with SSD. Disk rate index
went up from 5.9 (HDD) to 7.6 (SDD), whatever that means since 7.9 is apparently
the allowed maximum, but Aero performance with SSD fell to 3.6 from 4.3
(HDD), so who knows. A more realistic comparison is timing how long Explorer
properties takes to show the number of files in the biggest Windows directory
(c:\windows). For the equivalent size (13 Gbytes) SSD was x3 faster than
the HDD (5 sec vs 15 sec).
Checking Windows is properly set up for SSD
-- To double check
that it all went as expected, head to your Start menu and type "defrag"
in the search box. Click on "Disk Defragmenter". Click on "Configure Schedule"
and hit "Select Disks". If all went well, Windows will realize it's on
an SSD and your SSD won't even be an option in this menu (if you're on
Windows 8, it will show up in the list as an SSD instead, and defragmentation
will be disabled).
OK good, SSD (both partitions)
is missing from the list of disks to defrag.
-- Lastly, we'll
want to make sure TRIM is turned on, which keeps your drive from slowing
down over time. Open up a Command Prompt and type in:
fsutil behavior query DisableDeleteNotify
It will either give you a 0 or a 1 as a result. If you
get a zero, that means TRIM is enabled. If you get a 1, make sure you have
a TRIM-compatible SSDyou may have to Google your SSD's model number to
find out.
OK good, return was a '0',
so trim is enabled
Getting
rid of two large .sys files (6/25/14)
(update) I
got rid of two huge .sys files (pagefile. sys and hiberfile.sys) which
were bloating the size of my c:\ OS and clones by 10 Gbytes.
* hiberfiles.sys is used when a computer hiberntes. I got rid of this file
just by turning off hibernation, which I don't use on a desktop machine.
* pagefile.sys is needed as disk overflow for ram, but it doesn't need
to be on the c:\ drive. Using Windows advanced setting for 'virtual memory'
I move it to a small partition (on 500 Gbyte drive) I created called Sys.
I let all clones share the same location, which so far has worked out OK.
After moving
pagefile.sys, I began to wonder if the move was causing a performance problem.
I noticed that when viewing a sequence of Bing images in Opera 12, after
a few images, a new images would not load correctly. Opera had never had
a problem like this before. Do images go first into ram and then spill
into pagefile.sys? I really have no idea. I ran a test and moved pagefile.sys
back to its original location, and it made no difference, also other browsers
had no problem with the moved pagefile.sys, so the conclusion is moving
pagefile.sys is not to blame. It looks like it is just another site that
Opera 12 has problems with, and the time is a coincidence.
I have seen
no problem with moving pagefile.sys to its own partition. I think it's
a good change that helps further lean out OS partitions and make cloning
faster.
--------------
I was going
to make an image backup of my new Windows configuration and was surprised
when Windows told me it would be 34 Gbytes. For some (idiot) reason Windows
image includes the two large working, i.e. temporary, .sys files: pagefile.sys
( 6 Gbytes) and hiber.sys (4.5 Gbytes). This is 10 Gbytes of bloat added
to 20 Gbytes (OS, program and data files). I say idiot because my cloning
software excludes them.
Pagefile.sys
is the place where if ram fills up it will be swapped out to, and by default
it is set to the size of ram, which in my case is 6 Gbytes. Hiber.sys is
used to store ram when the OS hibernates. Hibernate is used in portables
when lid closes, I never use in in my desktop. I have seen articles on
how to shut it down, but so far nothing has worked. However, I did stumble
on the article below that shows how to move the pagefile.sys to another
drive. Since I suspect I never use it this would just slim down my image.
The article even argued that putting pagefile.sys on a different physical
(sata) drive could speed things up, because it could work in parallel with
the main drive.
http://ask-leo.com/what_is_pagefilesys_and_can_i_move_it.html
Thinking about
this, the cleanest thing to do would be to make a little partition on the
500 Gbyte drive for these files. 15 Gbyte should be fine, because the total
size of these two files is pretty much fixed at 10.5 Gbytes. I did this,
but not best choice because I now have too many partitions on this drive
and my archive clone got converted to a logical drive, meaning I can't
boot from it (minor loss). Probably better would be just to expand the
Recover partition and put the .sys files up there. (The article only showed
how to move the pagefile.sys.)
Getting rid of hiber.sys file
Took some
trial and error because the recommended syntax didn't work (powercfg.exe
-h) nor did the help syntax, but the command below appears to have been
accepted. Yes, this worked, on a reboot hiber.sys file is gone.
powercfg hibernate off
(to turn it back on: powercfg hibernate on)
New Window image backup --- subtitle: Windows is such
a piece of crap
With my new
AHCI Windows 7 installation on SSD working pretty well, and trimmed down
to 20 Gbyte with removal of the two .sys files (10 Gbyte), I decided for
extra insurance to have Windows do an image backup. Windows checked out
all my many drives and brought up a list of candidates asking me on which
drive (partition) I wanted to store the image. I quickly picked one and
it didn't take too long (15 min or so) to write the image. Next day I decided
to check out if the image backup was OK, so I boot into the recovery environment
with my 64 Gbyte flash drive.
Guess what
Windows recovery can't find the image, the image Windows just wrote the
day before! What a piece of crap Windows is. For example, if the recovery
environment has limitations accessing certain type of drives, which may
be understandable, then any competent company would built in these limitations
into its image writing code. It would either check out the types of drives
on the system to see if the recovery environment could 'see' them, or at
the very least warnings would be put into the clone process on how to choose
the location for the image. Microsoft does neither. This is twice this
has happened to me with Microsoft image backup. To figure out what works
a customer has to engage in tedious, time consuming, tests of image backup.
On my second
try I copied the earlier image to several drives to see which the recovery
environment could find. This time several showed up, but I was still afraid
to pull the trigger and do the restore because I couldn't figure out from
the popup boxes whether it would restore to only the selected partition
or whether it would wipe out other partitions on the physical disk. Nor
is there any mention in the popup boxes of whether or not it can restore
to to partitions larger or smaller than the original.
The opening
screen of Windows image restore says "Everything on this computer
will be replaced by the restored image'. Taken literally this means every
partition on every drive connected to this computer is going to be altered.
I don't think so, but can't be sure, don't want to take the risk. Can you
say dumbed down? How about including a 'more detail' button that would
explain what really happens? Nah!
I did a Google
search to read about Windows image restore and come up with several pages
from Microsoft. Still clear as mud. The only real information I found was
the "disk that you're restoring the backup to (must be) the same size or
larger than the disk that you backed up." Whether other partitions on the
physical disk being restored to are wiped out, or affected in any way,
is never mentioned.
Windows image backup (partially) decoded
Watching image
backup in action I have been able to figure out a few things. The bios
was set to AHCI both when the image was created and when the recovery environment
was run. Two reasons drives are missing. The recovery process first goes
looking for Windows installations, but I find it only sees those created
under AHCI. I had two OS clones on a sata connected drive that had been
cloned when the bios was set to RAID. Neither of these Windows OSs were
found.
I have two
USB drives each with an image. One USB drive was native USB 2 drive and
the second a USB 3 drive connected via a PCI card. Recovery only offers
to restore from USB 2 image. The reason here is pretty obvious, the recovery
environment (not too surprisingly) does not support PCI cards, so if an
image is going on a USB drive, it has to be a USB drive connected to the
motherboard. Summary:
a) Only Windows OSs made with the current bios sata setting will be visible
b) Any drive connected via a PCI card will not be visible
But I can't
explain this. Later I put an image on the 64 Gbyte flash drive. Microsoft
pages say specifically that an image can be stored on a USB flash drive,
but when images are searched for the flash drive image does not appear,
and this is same USB flash drive that is booting my recovery environment!
How hard would
it be to put up a warning about these limitations when the clone is make?
The fact that there is nothing is proof (to me) that Microsoft obviously
doesn't give a shit. I find it offensive as an engineer that Microsoft
routinely ships out the door half ass working software. Clearly Microsoft
has no concern whatsoever for it customers. We see in action an abusive
company who gets away with this shit because of their defacto stranglehold
on the computer OS market.
What the hell does Window image restore do?
What the hell
does the Window image restore process do? My next question, after all the
problems detailed above in finding an image to restore from, is how much
damage a restore will do. In other works does image restore reformat just
the partition being restored to, reformat the whole physical
drive (wiping out other partitions on the drive), or (god help us) reformat
multiple drives? This is a simple question, but just try and find the answer.
I watched a few restore Youtube video and everyone says it's simple and
works OK, but they are always working on a portable with a single hard
drive and a single c:\ OS partition. I have like ten partitions on six
different drives connected to my computer. However, I did pick up a few
tidbit from the videos.
One computer
technician guy said when he restored he always had to check the box allowing
reformatting, he thought it was required, so he wasn't sure why there was
a check box here. I went back and booted into the recovery environment
from my flash drive to look at this point. Since I have put images all
over the place the recovery code has found three of them: on SSD upper
partition, on esata drive and on USB 2 drive. On the first screen is the
latest 'recommended' image (on esata drive) to restore from, but when I
click next I find the reformat box grayed out. Windows can't restore from
the image that Windows just recommended I restore from! Can you believe
this shit. So I try selecting another image and again the reformat box
is grayed out. Only on the third image is it not grayed and will actually
work! Why will the other two images not work? I have no freaking idea on
the enclosure esata image, but would understand the upper SSD image not
being OK, if the whole physical SSD was going to be reformatted.
Windows
image restore is a piece of crap
Avoid Windows
image
restore at all costs in a dual boot setup. After clicking the reformat
box, I see I can click a box that lists drives to exclude, drives
not
to be reformatted. Yikes every one of my drives is here (even my booting
flash drive from which the recovery environment is being run!), so it looks
like accepting the default and to restore one OS partition Windows would
wipe clean every other drive on my system! This is freaking unbelievable,
but that is what the popup boxes seem to say.
Reformats 'by default' every hard drive on your computer!
Got a ton of pictures
and music on USBs drives connected to your computer, then kiss them goodbye
if you are a first time user of Windows image restore, because its default
is to format every hard drive is sees even non-bootable USB drives and
flash drives. When I noticed this in the popups I found it hard to believe,
because it was so freaking unbelievable, but it's true. This heinous behavior
of Windows is papered over in forums. Here's a posting from an expert giving
advice on using Windows image restore:
"One
note of caution - look for a place where it mentions excluding disks!!!
And then exclude all drives other than your SSD. Or unplug every drive
except the SSD and the one that has the image before you boot into the
CD recovery disc." (Not so simple if you have multiple drives inside plugged
into sata ports.) (TomsHardware.com forum)
Now there is this
question: After an image is selected, where it is going to be written.
Obviously this is not a problem in a simple one hard drive, one partition
system, but in any other system it is super important to understand where
the image is going to go, and what is to be lost, before proceeding. And
I can't figure this out either from the popup boxes. The final review box
before beginning says the image is to be written to: '(long random number)
c:\'. It's going to be written to the c:\ drive? What the hell does
this mean? We are operating in the recovery environment. I have a bunch
of clones on different hard drives and partitions all of which when booted
into become the c:\ drive. Windows image restore popup boxes simply do
not indicate in any clear way where the image is going to be written to!
The only (crude)
control you seem to have is to 'exclude' disks to be formatted. So the
only thing I can guess is that if you are real careful and exclude
all drives but one, that Windows will reformat that whole physical drive,
wiping out all its partitions and write the image there. (I am unable even
with a Google search to verify that restore wipes a whole drive.)
Windows reinstall from HP disks has same re-format
risks
When you reinstall
Windows using manuf disks, it looks like you face the same (hidden) risk
that auxiliary hard drives will be wiped clean. A recovery of your computer
to the state you bought it is accomplished by your hard drive being re-formatted
and an image from the manuf DVD or recovery partition being restored.
I read somewhere that HP uses a windows image. This explains the cryptic
HP instructions that before you begin everything needs to be disconnected
from your machine (except mouse and monitor). They say this hardware removal
is so the recovery can proceed. The never reveal what I suspect is the
awful truth, that all connected internal and external hard drives,
like on a USB port, risk (or is certain) being wiped clean!
This Windows image
restore is a piece of crap, and wildly dangerous if you don't have a bare
bones system. Just a final tidbit I picked up from a video, which may or
may not be right. This guy showed that when the image was written Windows
indicated it would run 30 days and then needed to be activated. Then he
dropped this bomb saying when he tried to restore from an image made 40
days ago he got an error. This sounds weird, but I wouldn't put it beyond
Microsoft that images (probably of Windows in 30 days trial period) are
only good for 30 days!
Casper for image
backup
I own Casper
8 having purchased it for cloning, but it does image backup too, so I tried
giving image create/restore a test run. I verified that it will both create
and restore at the partition level. I created an image of just the
c:\ OS partition on the SSD (14 min), and then restored it (20 min) to
the upper partition of the enclosure drive. The other two partitions on
the enclosure drive were unaffected. Though the Casper warning language
here was not clear, hinting that whole (physical) drive might be wiped,
but it really means the whole of say q:\ drive will be wiped, and this
is just one partition.
I ran this
Casper image test from within Windows. To make a Casper image backup robust
I need to be able to boot into the Casper recovery environment. My memory
was this required downloading a bootable Casper xxx.iso from them and burning
it to a DVD. I search the Casper site and found what I needed was called:
"Casper 8 Startup Disk Creator", but was puzzled when I could not find
it as a download in Support, but pdf documentation on how to use it available
for download was there. I started Casper Copy to see if it was hiding there.
Nope. All very odd. I did a google search for the phrase and
found it available for download from an outside source that said the download
was 'ad supported' by bundled utilities in the download, but that they
could be declined. Well it now at least made sense "Casper 8 Startup Disk
Creator" was a source of profit for Casper, but I put this down as a black
mark against them.
(update)
I later found
out that "Casper 8 Startup Disk Creator" was sitting on my hard drive all
the time, but it's really hiding and the problem at Casper is that they
don't explain on their site how to find it. I found it when I clicked,
Start, All Programs, Casper 8 folder. Casper 8 appear in the Start list
of programs twice, it is on the opening (current) screen too. But if I
click that all I get is a list of recent clones I have made.
"Casper 8 Startup
Disk Creator" is slow, downloading some huge Windows environment to work,
and wrote out the xxxx.iso, and I also had it put the environment on my
64 Gbyte flash and make it bootable. It occupies about a 1/2 Gbyte of space
and runs a sort of low resolution version of the normal Casper copy program,
which includes image restore.
Can Casper recover Windows 7 image on Vista portable?
With my 64
Gbyte USB flash having both a bootable Casper environment and a Casper
image of my Windows 7 OS I tried plugging it into my Vista portable to
see if could move over Windows 7 (as a test) to the machine. I had little
expectation that this would work when I looked at the bios of this 2008
HP Vista machine. It's bios options for sata are just on/off (legacy devices).
There is no choice of RAID or AHCI under which my clones were made. Still
I gave it a try.
I first had
to carve out a 40 Gbyte partition to have a partition to recover the image
too. Disk management doesn't seem to exist on Vista (its apparently there
except Search doesn't find it. It's there: Start, Computer, properties,
management) so I installed AOMEI partition to do the partition job. Casper
booted up fine, and I was able to use it to recover the Windows 7 image
to the new partition. So far, so good. The root of the partition
looked like any of my (new) Windows 7 clones, except this one was from
a Casper image. To get to the partition at boot time I installed EasyBCD
and made the new partition a boot option. Wouldn't boot, instant failure.
However, I tried running several files from the new partition and most
ran OK.
I
just had an idea that might get around the bios difference. Install Casper
and have Casper make a clone of my Window 7 partition to a newly
created partition I need to carve out first.
Windows 7 tests on Vista portable
Windows trial
time was down to 2 days (no rearms), so I reset clock and presto 28 days
to activate (jees). I adjusted the partitions so I had Windows 7 on a 60
Gbyte partition and had a free 60 byte partition. The latter is a logical
(won't boot) partition, because only three active (bootable) partitions
on the hard drive are allowed: Vista OS, Vista recovery partition, Window7
test. (I suppose I could make the recovery partition a logical partition).
I used Casper
8 to make a clone of my nearly bare Windows 7 installation on the Vista
portable to my newly adjust 60 Gbyte partition. I couldn't get the home
network connection to work (always permissions block!), so I just copied
the Future Systems, Casper 8 folder (only 128 Mbytes) to my 60 Gbyte flash
driver. Casper 8 ran fine directly out of the flash drive. I later just
copied over Casper 8 and it still runs fine. This Windows 7 already had
some of my programs so I pulled some shortcuts to the desktop and downloaded
Opera so I had a real (scaled down) working Windows 7 computer, and recloned
it.
Boot to a 'logical' partition
Only three
active partitions are allowed, more partitions become logical partitions.
I have read that the only real difference is that you can't boot to a logical
partition. Really? My Window 7 clone partition is the fourth partition
on the laptop drive, so it is a logical partition (confirmed both by AOMEI
and Windows disk management). For fun I added it to the the boot menu using
EasyBCD and tried to boot to it, and (surprise) it booted to the clone.
I confirmed in explorer that the booted c:\ drive was in fact my newly
cloned copy of the Windows 7 partition. There must be some fine print that
if the the drive has a MBR you can boot to logical partitions. I will have
to research this, but there is no doubt that I was able to boot to a Windows
7 clone on a logical partition in my old Compaq Presario C700 laptop.
I little research
shows this is right (surprising others too). Logical partitions can indeed
be bootable, so clones on logical partitions are OK
Clone saves my (download) ass!
Knowing that
there was some risk in downloading 'Casper 8 Startup Disk Creator' from
an ad supported downloader I did took a precaution, I restarted Windows
and in the triple boot menu selected to boot to the upper SSD partition.
Boy did this turn out to be a smart idea. Ordinarily declining download
options works OK, but this time something went terribly wrong. One utility
(zip -7?) ignored the decline and (half) installed anyway wanting a reboot
to finish its install. I ended up with a blank white spot in the center
of my screen, which kept coming back. When I found the Casper program I
wanted was in my All programs list, I suspected it may have been there
all along.
Since the OS
corruption was confined to the SSD upper partition, all I needed to do
to recover was to reboot back to SSD lower partition (my new Windows home)
and do an (incremental) reclone (typically 1 min). Turns out the rogue
download had so messed up the upper SSD partition that the incremental
clone failed with message the upper SSD partition could not be read. No
problem. I went into disk management and formatted the upper partition
(few seconds), then did a lower to upper SSD (full) clone, still only 2-3
min since all SSD moves read/writes and a lean c:\ drive. Not only was
this a slick recovery from what amounts to a virus attack, but as a bonus
I ended up getting rid of the Windows bloat that disk creator program normally
leaves behind. Without a clone the fall back would normally be system restore,
but not only might some recent programs be lost, but it might not even
run properly since the OS was so messed up.
This was an
example of where having (and intelligently using) a clone can really save
your ass. Use clones for risky downloads!
Good descriptive names for partitions
I have been
living with my six hard drives and more than a dozen partitions for weeks
now. Going in one question was, was this practical? How do you keep all
these hard drives straight. The answer I found was, with good names no
problem.
At one point
I focused on the letter assignment, picking logical combinations. For example,
since learning the alphabet as a child, I still think of j, k as natural
pair with (of course) j coming first. I have two 2 Tbyte USB data drives,
one to backup the other. Labeling them 'j' and 'k' drives makes it clear
both that, a) they are a pair, and b) 'j' is the prime data drive and k:\
it's cloned backup. So I included 'j drive' and 'k drive' into the drive
names and assigned j:\ and k:\ to their lower partitions. I also included
enough information in the names so I can physically identify the drives.
I looked at assigning high letters, say x, y, z, to upper partitions, but
this didn't work very well.
Over time as
I cloned and recovered and switched between my two sets of clones running
on different bios settings, Windows made some changes to my letter assignments,
which I had so carefully chosen, and I found out it didn't really matter.
The key is to have good, descriptive partition names. With 'j drive' in
the name I know it's my main data drive. Explorer lists partitions in the
order
of their assigned letters, so tweaking drive letters to make multiple partitions
on a single drive have adjacent letters will insure the list together in
Explorer. (Looking at the names below of my current partitions, I see that
'Sys files' partition, which I recently created, could be better named,
it should at least indicate which physical drive it is on.)
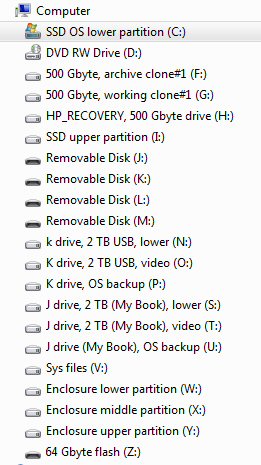
Triple partitions on external drives show clearly:
two USB data drives (j drive, k drive) and experimental
(Enclosure)
(1 Tbyte internal drive not connected at this time)
Weird partition name change by Windows!
In mid July
while doing a lot of rebooting to check out the idea of speeding a new
Window installation by copying over of shortcuts I noticed that both partitions
of my SSD all of a sudden had the same (exact) name [SSD OS lower
partition]! This is a serious problem when I am doing a lot of work with
a clone. The upper partition has long had the name [SSD OS upper
partition]. What the hell happened, I sure as hell didn't change the name,
which means good old Windows probably changed it (behind my back), though
I suppose there is a slight possibility that Casper 8 changed it, as I
had done several clonings that day. I found the name change in Explorer
and disk management, but the names in the EasyBCD dual boot were Ok.
From Explorer
I couldn't be sure which was which, but I had chosen the names well. The
names reflected the location of the partitions. This meant I could go into
disk management and figure out which was the clone (upper partition) and
from there I was able to reset its name.
HP documentation --- About SATA Hard Drives and Controller
Modes
-- In RAID
mode, the SATA controller enables both AHCI and RAID functions when the
computer boots.
(This is so confusing. What does it mean to say, in Raid mode the AHCI
'functions' are enabled? Elsewhere AHCI functions are described as
hot swapping an native queing.)
-- If you want
to use IDE mode, the SATA Controller (or SATA1 Controller) can be set to
[Disabled] . This prevents Windows from looking for the SATA controller
driver.
-- If you are
installing multiple hard drives and using RAID mode, connect one of the
drives to the lowest numbered port (SATA0 or SATA1), then connect the remaining
drives to ports on the same controller. On some motherboards the SATA ports
are color coded. Connect the drives to ports of the same color.
Troubleshooting sata controller
-- If the
computer displays the STOP 0x0000007B INACCESSABLE_BOOT_DEVICE error message
after you change the SATA Controller Mode to use either Advanced Host Controller
Interface (AHCI) or RAID, the disk driver in Windows 7 and Windows Vista
is disabled. This driver must be enabled before you change the SATA Controller
Mode of the hard drive. To automatically resolve problems with the
STOP 0x0000007B INACCESSABLE_BOOT_DEVICE error message, click the Microsoft
Fix it Solution:
-- If Err1Err3
is shown or a blue screen opens displaying a Stop Error 07xb when starting
the computer, the Sata Controller Mode BIOS setting is set to the wrong
setting. To resolve this issue, refer to the HP support document, Stop
Error 0x7B or Err1Err3 when Starting the PC .
Digital River Windows ISO downloads
Legal, virus
free, and completely free to download, provided by Microsoft. Will run
for 30 day (up to 120 days with arm reset) without need for a Microsoft
product key. Windows 7 with SP1 available.
One purpose
of these files is to provide a clean, bloat-free version of Windows 7.
Another is to run a test version of Windows 7. Still another is to change
Windows 7 language or between 32/64 bit. A Windows key is not tied to the
bit version of Windows 7. Total file size is 3.1 Gbytes. In about 10 minutes
I was able to copy all the files from my burned xxxx.iso DVD to my 64 Gbyte
flash. While the 64 Gbyte flash is setup to boot into the Casper environment,
I think I can just run its Windows 7 install (it has a setup.exe file)
to install Windows 7 on a new 40 Gbyte partition of my Vista Compaq portable.
Windows 7 minimum
requirements: 1 Ghz processor (1.8 Ghz), 1/2 Gbyte ram for 32 bit/64 bit
Windows, 16/20 Gbyte disk space for 32/64 bit Windows. and DirectX 9 graphics
device with WDDM 1.0 or higher driver. My Vista portable meets these requirements
for 64 bit Windows 7.
Vista portable now dual boots Windows 7
I first tried
to run setup.exe from the flash stick on Vista and got an error message
that the version of Windows I was running was not compatible. (whatever
that means). I then tried Windows install DVD which I had burned from the
DVD. This is bootable, so I booted into it. After a strange opening (needed
to type '1' for it to start), it proceeded to boot and installed Window
7 on the 41 Gbyte partition where I had a clone. I was able to specify
the partition to install to, but not whether 64 bit or 32 bit Windows was
to be installed. I found out later it installed 64 bit Windows.
I thought I
was installing on the new (blank) 40 Gbyte partition I had carved out,
but it turned out to be a logical partition. Also I had trouble separating
the 40 and 41 Gbyte partitions because the partition names and sizes seemed
to disagree. Anyway it installed over my clone leaving the Vista partition
alone.
The install
says if there is stuff in the partition on which it is installing (there
was), it will gather up the files and directories and save them in Window.old
directory. That's sort of what it does, but as usual with Windows
the gathering up is half assed. What it actually does it take the files
it find in specific directories like Programs, Programs (x86), User, etc
and puts them in Windows. old. I had a half dozen programs and data directories
in the root (Netscape 4.8, Paint Shop Pro 8, Speed, KMPlayer, etc) and
they were left totally intact in the root. So what is billed as a clean
install in fact ends up getting (partly) merged with files and directories
already in the partition! This is not necessarily a bad thing, and this
extra stuff can be deleted fairly easily, but it's not clean. Typical
Windows.
2nd clean Windows 7 install on desktop
I was able to use
the Digital River ISO on the 64 Gbyte flash to made a 2nd clean install
of Windows 7 on my desktop, putting in the enclosure upper partition (again
creating a merge of the Windows install and the existing clone files there.
Once EasyBCD set up the dual boot I was able to boot into the new install.
The new install starts with 30 days before activation, whereas my previous
install from the DVD is now about to use up its (first) 30 day trial period.
When this bloat
free Windows desktop appears, it is really sparse (see below). There is
exactly one icon on the desktop (Recycle Bin) and three icons pinned to
the start bar (Explorer, IE (with internet access already set up) and Media
Player).
Bare desktop from xxxx.ISO Windows 7 install
I wondered
what would happen if I saved a clone of my SSD partition there. The version
of Windows 7 from which it was made has 1 day to activate. When I copied
it to the new Windows 7 installation with 30 days to activate, would I
(in effect) reset the activation calendar? Answer is no, after the clone
the Enclosure partition new Windows 7 also showed just 1 day remaining
in the trial period.
A startup limitation
of a bare (non-OEM) Window 7 installation is that the install DVD contains
only generic drivers. That means the screen resolution can't be adjusted
properly, the 2nd monitor is not supported, the auxiliary USB 3 ports don't
work and very likely the sound too (I didn't check). To get all this hardware
built into the motherboard and on PCI plug in cards working drivers are
needed. I was able to obtain the motherboard video and audio drivers from
the HP web site (need to know the exact model #).
When I cloned
my highly tweaked new Windows (worked on for a month) to the brand new
Windows installation, suddenly the screen resolution was fixed, because
it brings with it the missing drivers. Not too surprisingly the clone also
(apparently) contains within itself the 'activation day count' of the OS,
because the time remaining went from 30 days to 1 day instantly. No one
ever points this out, just blandly saying you have 30 days to checkout
a newly installed Windows 7. I guess this rule doesn't apply if you use
clones.
At one point
I wrote this: [One can conceive of a series of clones that would bring
in various functions to a new OS install. For example one might just contain
the hardware drivers for that hardware and perhaps shortcuts to Windows
function that make the PC usable (my computer, sndvol, varies directories
keyed to drives, disk manager, regedit, system restore). A higher level
clone could add to the previous a suite of basic programs (sans data).]
As I reread this, it just nonsense. Clones are not 'additive', which seems
to be what is implied here. A clone fully replaces the contents
of a partition (to which it is written), there is no getting around this,
it is the nature of clones.
Windows activation
overview
Microsoft
takes great pains to very tightly restrict the use of Windows and prevent
it from being pirated. This leads to some onerous restrictions on the some
user, which (surprise!) has specifically hit me. When I bought an SSD (solid
state drive) to use as my main drive, I found none of my Windows
clones would run on the SSD. The cause of this turned out to be the SSD
required
a change bios sata setting from RAID to AHCI to work. The bios change was
needed to even make the SSD visible because there is some sort of conflict
between AMD hardware and an SSD under RAID. I searched for weeks for a
way to get around this bios change and to make my old clones work, but
without success. To get Windows on the SSD I was forced to do a new install
of Windows after changing the bios to AHCI.
This was possible
because I had a bootable Windows 7 DVD that I had burned from an xxxxx.iso
download of Windows 7 Home Premium obtained from the official Microsoft
distributor Digital River. This clean xxxx.iso install will run for a 30
day trial period without activation, but I found out that Microsoft allows
the trial period to be extended three times, so a total of 120 days without
activation is possible. I don't for know for sure, but I doubt that I could
have reinstalled Windows from my HP recovery disks with the bios set to
AHCI. The reason is that I read that an HP recovery DVD is really just
doing a 'Windows image' restore, and I have tried to restore images with
different bios setting from which they were made without success.
How
to extend the trial period FOREVER
Microsoft
states the Windows 7 (unactivated) trial period is 30 days, but in fact
the 30 day trial period can be 'officially' extended three times for a
total trial time of about four months. Microsoft hides this fact from the
great unwashed by stating that Windows MUST activated within 30 day trial
period. Various tricks online claim to be able to extend the Windows 7
trial period beyond the official max of 120 days. I found one of these
tricks (reseting the rearm count) actually works for Home Premium! In my
playing around with the clock I discovered a 2nd way to extend the trial
period.
Reset the rearm count (every 6 months)
The best method
of extending the trial period I discovered online is a little involved,
but I have tested it and it works! The story is that Microsoft in Windows
7 introduced a bug that when the registry entry containing the rearm count
was deleted that the trial was reset. Microsoft's 'fix' for this bug was
to lock the registry entry, but someone soon figured out a way around the
lock. A batch file run from the Windows recovery environment resets the
rearm count (and deletes the product key). Once the default xxxxx.iso product
key for Home Premium is reentered, the rearm count is found to be 5 and
a new trial period of 30 days begins, so it looks like this little exercise
gives a six month extension of the trial period. Articles say it can be
repeated indefinitely.
I have tried
this on two machines, and it worked both times. Continuing to run in trial
mode does require that every 30 days the trial be extended ('rearmed'),
but this only requires either typing a single line [' slmgr /rearm'] in
the command prompt window or (easier) clicking the command box '30 day
rearm' which I have pre-programmed to pass this command [Properties, Target:
c:\Windows\System32\cmd.exe /c slmgr /rearm]. In addition every six
months a little procedure must be run to reset the rearm count back to
five plus '30 days to activate' for another six months of trial period.
(six month update) After running (rearmed) Windows
7 for six months on two machines, the 'rearm count' had been counted down
from 5 to 0 by the monthly rearm resets, and my last 30 days to activate
was just about up, so it was time to run the 'reset the rearm count' procedure
(below) to get another six months. Using the description I had originally
written up everything went smoothly on my old portable machine, but after
an hour of trying I was stuck on my HP desktop machine. The description
had just said navigate to the c:\root to the batch file (c:\reset_rearm.bat),
which six months ago when I set this all up I had placed in the c:\ root,
but how? The 'Load Drivers' window in which I was operating was only looking
for 'setup' filetype and this couldn't be changed, so directories coming
up were partial or empty.
I finally found
the batch file, but in an unexpected directory, not in the c:\root. I then
tried to run it by hitting the window's Open button, another mistake. All
this did was bring up a window saying the file wasn't a driver. A key step,
which I forgotten to document because it seemed obvious at the time but
not so obvious six months later, is highlight the batch file then right
click it. This brings up a list of options that includes: 'run as administrator'.
From there it was quick to finish, just rebooted and my normal Windows
7 desktop comes up. On the desktop click the 'insert key' command box that
I had preprogrammed six months ago, and in a few seconds it reports the
(Home Premium) product key had been sucessfully installed. A click of my
'rearm check' command box verified I now had a rearm count of 5 and Computer
Properties showed '30 days to activate. I had another six months of Windows
7 trial period. To avoid this hassle in the future I have rewritten the
'reset rearm count', filling in the missing steps and added warnings for
the traps.
----------------------------------------------------------------------------------------------
*** Reset
rearm count (3 step) procedure:
1) Insert Windows
repair disk, or select WinRE from boot menu, to boot into Windows recovery
environment. The steps
below will open a directory window to allow navigation to find batch file:
reset_rearm.bat
a) click (default) 'keyboard'
b) after few minutes system will respond: 'Problems Found', Do you want
to do repairs and restart? Click No
c) click 'Load Drivers', (insert media) Ok
(directory screen will come up)
d) click 'Computer' to see all directories, then navigate to directory
with batch file (reset_rearm.bat) listed.
This can be tricky since in WinRE environment directory letters are reasigned.
Even though I had pre-positioned
this .bat file (with 'secret sauce') at c:\root I found it at 'SSD OS Lower
partition (k:)' (not at c:\ nor at
x:\root)
2) Right click
batch file and select 'Run as Administrator'
(Do not click 'Open' button)
A window in background will open, batch file will run, and the window will
quickly close.
3) Reboot
(normally) to Windows 7 desktop
(Windows 'not genuine' may appear in lowr rt corner)
a) (easy) click command window 'insert key'
(Earlier I had set this up to re-install the 25 digit product key)
or b) (hard) open (as administrator) command box (my desktop opens
it at c:\windows\system32) and manually type:
slmgr /ipk RHPQ2-RMFJH-74XYM-BH4JX-XM76F
To verify the
procedure worked click 'rearm check' command box to check the rearm count.
It should now be 5. (Note the 'rearm check' and 'insert key' command
boxes are safe to run at any time.)
----------------------------------------------------------------------------------------------
Adjust the PC clock
The simplest, but
somewhat cludgy method, which I have never seen online but discovered through
my own testing, is simply to keep turning back the system clock so the
date stays within the 30 day trial period. It's quite amazing that this
works, but for at least for short time periods my testing shows it does
work.
License limits 'installs'
Microsoft
Windows license limits the number of Windows installs on a particular
machine and that limit is one install per license. Clones I don't
think are affected by the Microsoft license restrictions because they are
just (exact) copies of a single install, not really much different from
image backups, which is built into Windows. However, for reasons described
above I was forced by bios and hardware limitations (AMD processor)
to do a 2nd install of Windows (from xxxx.iso download) to get Windows
installed and running on my new SSD. Microsoft's attitude is I suspect
tough shit, they don't care my 2nd Windows install was triggered by my
Windows clones refusing to boot after a bios change. Two installs, then
I need a 2nd license (at about $100 a pop) if I want to keep both sets
of clones active.
Internal drive loophole
However, there is
a curious loophole that I have identified (have never seen this in print).
Microsoft license documentation defines a 'computer' as a device with internal
storage. No internal storage, no computer! OK, so all I would need to do
the uncomputer my computer would be to remove all its internal drives.
With esata ports and esata enclosures this is possible. My primary SSD
drive is already run this way, externally mounted.
To activate Windows
permanently
a 25 digit COA license key must be entered and registered with Microsoft.
A new install of Windows can be run without entering a COA key for a 30
day trial period, and if you know how to do it (using command prompt),
it can (legally) be extended for three more months.
More lies from Microsoft
Microsoft says on
an official 'Activate windows on this computer' page for Windows 7 says:
"You must activate Windows within 30 days of installation." (italic
emphasis added). This is a simple declarative sentence and a strong one
('must'). It is also a freaking lie! The IT guys know this is not true,
but apparently Microsoft doesn't want the great unwashed to know about
extending the trial time, so they choose to lie. I don't like to be lied
to!
Multiple Windows COA keys
I had assume
that my HP computer had one Windows product key, the key that a keyfinder
like Magical Jelly Bean reports, but this is not right. Most machines have
multiple Windows keys associated with it, two or possibly three. If like
most people you bought your machine from a large computer manuf (like HP),
that manufacturer uses a volume Windows license which he uses on millions
of computers. So every HP Windows 7 Home Premium probably has the same
exact windows key that has been used to activate its copy of Windows and
is stored in the bios. This is the Windows key that a keyfinder program
like Magical Jelly Bean will find and report. (The fact that this is a
widely used key is easily confirmed by entering this key into Google.)
This volume key has limited utility to the user, though a Youtube video
claims the volume key retrieved by Magical Jellybean can be used to support
an install repair (essentially an 'upgrade' install of the same operating
system). The volume key cannot be used to activate a clean xxxx.iso
install of Windows. (I tried it, it doesn't work.)
However, every
computer has a 2nd Windows COA key that Microsoft requires the manuf provide
to the customer. This Windows COA product key is on a sticker somewhere
on the outside of your machine. This key code on the sticker is a unique
Windows key code. It is a license to use Windows that you have paid for
when you buy a Windows computer. This unique Windows key code can be used
to activate a new Windows install from xxxxx.iso, or so I read, I have
not yet tried to activate Windows yet with this key code. The product key
sticker on portables is subject to wear and tear, and this can be problem.
If the key code on a bottom mounted sticker become unreadable and
you haven't recorded the number and put it aside, apparently you are screwed
as neither the manuf or Microsoft will tell you the number nor will they
issue you a new number. But Microsoft's has an answer, just shell out $100
and buy a new license.
Possible 3rd Windows COA key
If you install
Windows from an xxxxx.iso DVD, then a 3rd Windows key is associated with
your machine. xxxxx.iso versions of Windows have their own default COA
key, which for a given version of Windows are all the same. This default
key is what Magical Jelly Bean will report with OS derived from xxxx.ios
install. It cannot be used either to activate its version of Windows. (I
know, I tried it and it does not work.)
New Windows 7 licenses are severly limited
Even ignoring the
high cost try and buy a new Windows 7 license. Here you run headlong into
Microsoft's monopoly power. Microsoft you see doesn't want you using Windows
7, at least not for long, or not on new machines. They have decided for
you, you ignorant customer, that you must be strongly encouraged (forced)
in the future or a new computer to use Microsoft's new OS Windows 8, so
to that end they have greatly restricted the type of Windows 7 license
you can buy.
Retail or OEM license
There have long
been two types of customer (purchasable) Windows licenses: a retail license
and an OEM license. With a retail license (most expensive) while you are
still allowed only one install, if you buy or build a new computer, you
can move that single install to the new machine. You can't buy a retail
license for Windows 7 anymore, Microsoft doesn't sell them and somehow
Microsoft prevents a second hand market from developing too.
The OEM license
restricts the single install of Windows to a particular computer.
Microsoft has a secret formula for determining what constitutes a particular
computer, but it is thought to be tied (mostly) to the motherboard. The
product key code on the sticker on your computer is an OEM license, allowing
you to put a (single install) of the same Windows OS system only
on this same computer. You can still buy an OEM license for Windows 7 (essentially
only from Amazon), and this license will 'lock' Windows to the first machine
on which it is activated. At least for a few more months Microsoft is allowing
computer manufs to install Windows 7 on new machines, so a few models with
Windows 7 are still available from major computer vendors.
There was also something called the 'Windows
Anytime upgrade', but this is gone too. Apparently the 'anytime' irony
is lost on Microsoft.
Windows 7 for new machine
So at present there
are only two ways to get a new computer and run Windows 7 on it. One, buy
a new computer with (bloated) Windows 7 pre-installed. You will obtain
a (unique) OEM key code for that particular machine. Two, buy a DVD with
[Windows 7 + key code] from Amazon. This option is billed as Windows 7
for computer builders and costs close to $100 (x64 bit Home Premium). However,
there is a trick that can reduce the cost to $80. Buy the 32 bit version
of Home Premium and put the DVD aside. Its key code can be used to activate
the xxxx.ios 64 bit Home Premium. How long xxx.iso versions (from Digital
River) will continue to be available is anyone's guess, I have seen nothing
on this. However, both of these can be obtained now and set aside for use
on a future computer.
Digital
River xxxx.iso windows 7 repository
Articles about
the Microsoft Digital River Windows xxxx.iso depository for Windows 7 versions
point to HeiDoc.net (updated July 2014) for links into the depository.
Most of the notes below come from HeiDoc.net site. Search of HeiDoc.net
for 'Windows 7 Home Premium x64 SP1' gives the following links (in English).
These are 3.1 Gbyte downloads so can take an hour. Search results July
2014 are below. These are the same (two) x64 Home Premium builds I found,
downloaded and burned to DVD in March 2014.
X17-58997.iso (newer)
X17-58996.iso (32 bit Windows 7)
X17-24209.iso (older)
Here are heidoc.net links into Digital River Windows repository:
http://www.heidoc.net/joomla/technology-science/microsoft/14-windows-7-direct-download-links
Burn xxxx.iso to DVD with Windows 7
I had read
that built into Windows 7 was the capability to burn an xxxx.iso
file to DVD. A DVD image xxxxx.iso file can't be 'copied' to DVD to work
it must be 'burned' to the DVD. (This Windows 7 feature should be handy
because everytime I download a DVD burner, I get a boatload of crap.) It's
there, I finally found it, but its well hidden. During this time my internet
access was down, so I spend an hour looking. It is called: 'Windows Disc
Image Burner' and, of course, 'Start, search' knows nothing about it. Here's
how to access it: right click the xxxx.iso file, then 'Open with' and one
of the options is 'Windows Disc Image Burner'.
-- "Digital River
is Microsoft's service provider for e-commerce. Basically every product
that Microsoft sells in their online stores worldwide is delivered via
the Digital River servers. You'll find the full list of all available Windows
7 disk images here (HeiDoc.net), in many languages, both with and without
SP1 integrated, both 32 and 64 bit versions."
-- "Digtal
River provides these downloads via Microsoft Azure. Since this is an official
download channel, you can be sure to receive setup files that are virus-free,
secure, legitimate and untouched. Downloading the files from Digital River
is absolutely legal and completely free of charge. Without a legally obtained
product key however, any Windows 7 installation will only run for 30 days.
Afterwards, it needs to be activated, or the evaluation timer be reset."
-- "Once you've
completed your download, you can burn it to DVD using any DVD writing software
that supports writing disk images. If you already run any Windows 7 version,
it's also possible to write the ISO image to DVD just by double clicking
it."
-- "Should
you want to use the DVD images permanently, and don't own a product key
yet, you can order a Windows 7 OEM or retail version (retail no longer
available) from Amazon. The OEM reinstallation versions contain a DVD with
a product key just like the retail versions. They are significantly cheaper,
but lack a proper box packaging, and don't include technical support by
Microsoft. The OEM key will work with the Digital River downloads,
so you can just pick the cheapest one. Sometimes better editions are the
cheaper ones, so all of the following links to Amazon offers might be worth
checking. I've already tried to find good deals for all editions and linked
to them here:"
-- "The original
versions of the SP1 integrated DVDs don't allow any non ASCII characters
when assigning the computer name, which has been fixed with this update".
(This explains multiple versions with SP1 in repository, and means both
versions are OK for me)
-- "If you
already have a valid key and are downloading the ISO to re-install a fresh
copy of Windows, make sure you match the version of Windows that you download
with the version of Windows covered by the key; a Win7 Pro key will only
work on Win7 Pro, for example. Keys that are valid on the original version
of Win7 are also valid on SP1."
Summary
of activation tools from the command window
All control
of Windows 7 activation and trial period including: checking, rearming,
possible workaround extensions, etc is done via the command window. All
the commands related to activation are included in this essay, but I wrote
about them as I discovered them, so they are scattered about. Below I have
gathered them up so they can be conveniently used. (Many commands begin
with 'slmgr', which stands for 'software license management tool'.
.vbs suffix is Windows script) (To open the command windows in Search box
type 'cmd', right click cmd.exe select 'Run as Administrator'. This is
supposed to be an alternate way, but I don't think so, as it opens in the
wrong directory: type 'cmd' and press Ctrl + Shift + Enter.)
slmgr /rearm
(alternate sysntax: slmgr -rearm slmgr.vbs -rearm)
Get another 30 days of trial, reduce the rearm count by 1
trial initial value is 3
slmgr /dlv
detail trial information including time remaining and rearm count
slmgr /xpr
date and exact time remaining in trial
c:\reset_rearm_count.bat
(batch files contains three lines of text below. This batch file run from
the Win recovery environment
will reset the arm count. It wipes out the default xxxx.iso product key,
which must be reinserted.
My tests show this resets the rearm count to 5, which seems to mean an
extension of near six months.)
:: comments
reg load HKLM\MY_SYSTEM %~dp0Windows\System32\config\system
reg delete HKLM\MY_SYSTEM\WPA /f
reg unload HKLM\MY_SYSTEM
slmgr /ipk RHPQ2-RMFJH-74XYM-BH4JX-XM76F
(reinsert the default xxxx.iso Home Premium product key)
I had assumed
there was only one default product key for each version of Windows 7, but
according to the site below that may not be true. It lists a different
number of keys for each version of Windows 7 with Home Premium having the
most keys. For Home Premium the key above is listed, but it also has eight
more, but for all I know these eight may just be unique keys someone scrounged
up.
Cracked software
--- https://www.facebook.com/softwareslinks/posts/824741180884938
Command prompt windows shortcut
To make accessing
the command prompt window easier I added a shortcut to it on my desktop
(right clicked cmd.exe, selected Send to desktop). This opens to the c:\windows\system32
directory and says 'Administrator' in title. I read this is confirmation
that it is opened with administrator rights. If I just open cmd.exe, it
opens to a different directory (c:\users\don), which from what I read it
probably does not have administror rights, but my tests show at
least some of the commands work here too.
Activation details
How does activation
work? I have only dipped my toe into activation, so all I really know is
what I read. There appears to be three ways or three levels to Windows
activation: online, automated telephone, and talking in person to a Windows
activation person. In forums guys who are home computer builder, or who
change their motherboard, frequently report online activation fails, and
they end up having to activate by talking to someone in India. When I (inadvertently)
tried to activate using the Windows HP volume key, after it failed a screen
came up asking if I wanted to phone activate, but the screen has NO PHONE
number. Typical Microsoft asking if you want to phone activate and then
hiding the phone number! My suspicion here is that access to a human activator
is restrited to retail licenses or perhaps unique (sticker) windows keys
that fail in online activation.
And what's
the deal with automated phone activation? How does this make any sense?
If you are going to call up and talk with a machine, why can't the same
algorithm be implemented in online activation? Of course it could, but
this is probably for some reason easier for Microsoft, but less convenient
for the customer, but Microsoft as an effective monopoly doesn't care what's
convenient for the customer.
-----------------------------------------------------------------------------------------------------------------------------------------------------------------------------------------------------------------------------------
(here starts my original discussion of activation)
Time to learn
about Windows 'activation' about which I know next to nothing. The new,
bloat free Windows 7 I installed from the xxxx.iso DVD using my Windows
product key will run 30 days (evaluation period) without activation. I
would like to keep it running, but of course not kill my clones. A question
about Windows 'deactivation' was answered my a Microsoft representative
this way:
-- There is
no such thing as deactivation, nor is it required. You can move a purchased
copy of Windows from one computer to another (and just reactivate it on
the new one) if what you purchased is a retail version. If you purchased
an OEM version, its license ties it to the first computer it's installed
on, and it may never legally be moved to another.
This implies
that you can buy one retail version of Windows, install it on all the machines
in your house and even lend it to your friends to install on their machines
too, or how about reselling it? This doesn't smell right. There must be
some number of activations, or identifying of the person, involved. It
alos implis that my OEM product key should allow me to run both versions
of Windows 7 on the same machine.
-- How many
Computers Can You Install One Windows 7 License On? If you purchase
one (1) Windows 7 edition, you may install and activate it on just one
(1) computer. If you are so inclined, consider Microsoft Windows
7 Home Premium Upgrade Family Pack (3-User) for installation on up to three
(3) computers in your household.
-- The Windows
7 Family Pack ($149) is a copy of Windows 7 Home Premium that you can install
on up to three PCs in your home. How many product keys do I get with the
Family Pack license? You will receive only one product key that will activate
up to three PCs running Windows 7 Home Premium.
Obviously a
lot of this (so called) Microsoft infomation on activation in contractory!
-- I have seen
this question answered for Windows 7, but I am wondering if the same holds
true for Windows 8.1--I recently installed a legal copy of Win 8.1 on a
machine I built and I now want to use that machine with Linux and install
my copy of Win 8.1 on a new build. Is this possible? Ans:
--
You can indeed do this but only if you have a full retail non-OEM version
of Windows 8.1. You also might have to activate by phone.
-- According
to Microsoft you can uninstall the license key on the first computer, this
frees the license up in Microsoft's servers, and then install it on the
second machine. If you're not able to run the command to uninstall the
license key on the first computer then you can call in, explain the situation,
and they'll issue a new license key. (This does not apply to OEM
licenses.)
-- How to uninstall the license (without reformatting) so you can go back
to it: At the command prompt, type:
slmgr.vbs -upk (slmgr -- software license manager. Not
on list of Windows 7 prompt commands!)
Hit Enter, this will uninstall the product key from the
computer and set it back to trial mode, you are now free to use it on another
computer.
-- Once you
have transferred to the new machine, you might need to reactivate by telephone:
Press Windows key + X then click Run (Windows 8 way to get to command prompt),
then type:
slui.exe 4
Next press
the 'ENTER' key. Select your 'Country' from the list. Choose the 'Phone
Activation' option. Stay on the phone (do not select/press any options)
and wait for a person to help you with activation. Explain your problem
clearly to the support person.
-- To view
the current licensing status in details type:
slmgr /dlv ('slmgr' refers to:
Windows Software Licensing Managment Tool) (slmgr.vbs is a Window script)
Above (slmgr
/dlv) command works. Contains four URLs related to certification and licensing.
Also there is something called: 'Windows rearm count' and my value is '3'.
It is explained below this means the 30 day trial period can be extended
three times for a total of 90 days.
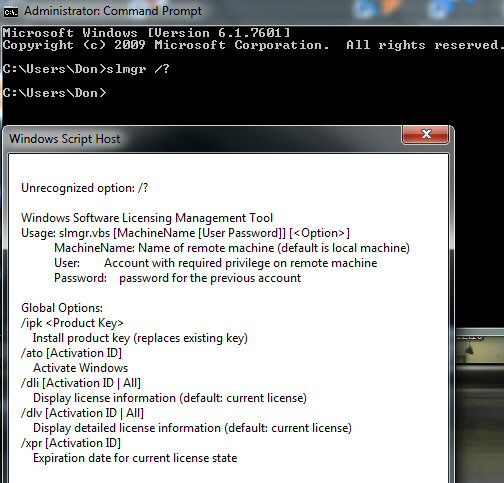 .
.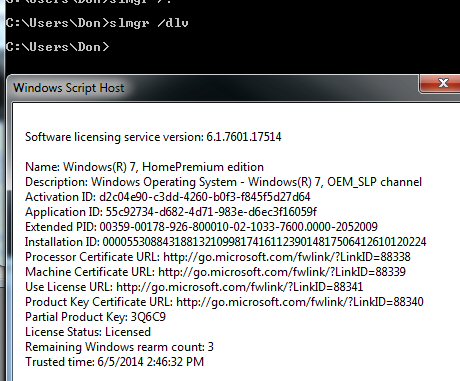
Re-arm
Window (extend trial period for another 30 days)
-- I have
Windows 7 and see "remaining windows rearm count : 3". Does this mean that
I can re-install and activate windows 3 more times? Ans: It means you have
up 3 more times to extend the activation grace period. Which means you
can do without activating for 90 more days (120 days total). Click Start,
type: cmd, Right click CMD then click Run as administrator. At the command
prompt type:
slmgr.vbs -rearm
(alternate sysntaxs: slmgr -rearm, or
slmgr /rearm)
-- You can
do this 3 more times after which you will have activate the license. Use
this only when you are in situation where you are unable to activate immediately,
such as no Internet or no telephone.
-- Rearm count
does not matter if you copy of Windows is activated (mine says 'permently'
activated), but if you have a retail license you would like to transfer
to another system, you can uninstall the product key and set it to trial
mode if you want to transfer the license.
-------------------------
This is interesting, Windows does not just shut down
when trial period is over. This says it still runs but with a black desktop
background and pop up annoyances.
-- After installing
Windows 7, and before activation, the operating system will run in an Initial
Grace Period license status for 30 days. When this grace period expires,
users can rearm Windows 7 for an additional 30 days, and do this up to
3 times, effectively allowing the OS to run legally for 120 days without
a genuine product key.
-- When a user
uses up all three available rearms, the only option left is to enter a
genuine product key to activate Windows 7, or leave the operating system
in a crippled, non-genuine state. Users will then be subjected to
certain annoyances such as black desktop background, repetitive notification
messages stating that this copy of Windows is illegal or counterfeited,
and a reminder to register the software at login. (no mention of the PC
shutting down)
**
Windows 7 bug allows rearm count to be reset
Reset arm
count roughly every six months, when rearm count gets to 0 and days getting
low
To check rearm
count --- Desktop command shortcut (slmgr /dlv)
To remove
the product key --- slmgr /upk
Summary --- reset arm count procedure
1) boot windows
repair DVD (or boot windows repair 64 Gbyte flash stick) (or select
WinRE from boot menu)
2) get to
c:\root:
-- (click to select keyboard), searching for Windows installations (5-10
min)
-- problems found, do you want to apply repairs and restart? click
No
-- click 'Load Drivers', (insert media) Ok
-- Explorer windows defaults to (x:), click 'Computer to make all directories
are visible, navigate to SSD lower partition c:\root
3) run (as
administrator) file: c:\reset_rearm.bat
4) reboot
to OS, ('not genuine' text will appear lower rt
corner)
5) command
box shortcut: slmgr /ipk RHPQ2-RMFJH-74XYM-BH4JX-XM76F
(reinserts product key and 'not genuine' immediately gone)
(Note Windows does not 'call home' when this product key is accepted, so
it must be built into the xxxxx.iso file.)
I ran this procedure
many times while working to get the shortcuts working and making sure the
steps (detailed above) to the c:\root are correct, so I see no reason this
procedure cannot extend the trial time without limit.
I have tried
this on two machines (Vista portable and SSD in desktop) and it works!
In my first test I ran the rearm count (slmgr /rearm and slmgr /dlv) down
to 2. Booting into the Win recovery environment I ran the batch file with
the secret sauce (below). Rebooting into Windows it now displayes 'not
genuine' (and I suspect in an hour or so the screen wallpaper would turn
black, but I didn't verify this) probably because the batch file has deleted
the default xxxx.iso product key. Reinserting the product key (slmgr /ipk
RHPQ2-RMFJH-74XYM-BH4JX-XM76F) gets rid of the 'not genuine' text. A check
of the rearm count shows it changed to 5 (!) plus the days of trial reset
to 30 days. It looks clean. It takes a few minutes to do this, but with
a rearm count of 5 it only need be done every six months. (I verified that
I could issue the rearm command five times, adding 5 x 30 days to the original
30 days for a total of 180 days.) This need only be done on the primary
OS. Cloning preserves the primary OS rearm count because it is just an
entry in the registry.
I ran into three small issues
a) I couldn't
get to the Win recovery environment with access to the c:\ root directory
(on either machine) from the boot options. On the desktop I was able to
get to the batch file using its Window repair disk, but not on the Vista
machine (of course the repair disk was made on a different machine). In
the command window I couldn't get to the c:\ root, the directory root was
x:\. (I hadn't figured out the 'Load Driver' trick yet.) What did work
on the Vista machine was booting from xxxx.ixo install DVD and choosing
repair.
b) In both
cases I used a slightly tricky way to get to the batch file in the c:\
root. (In the command window in a Win recovery environment the directory
is weird, meaning it is different from explorer, so I am not sure a c:\
root batch file would be visible.) In the repair environment after selecting
the partition with the desired OS I clicked don't run repair allowing me
to get to 'load drivers' button. This opens a normal explorer type directory
allowing access to the c:\ root, and here I right clicked on the batch
file and selected (administrator) run. There is no immediate confirmation
that it has run.
c)
The format of the product key command is not clearly shown in help (slmgr
/ipk xxxxx-xxxxx.....), also it is tedius to type. I typed it in from a
paper crib note. Works either lower or upper case and with '-' between
the five character blocks. If entered correctly it reports product key
accepted. (Note I later automated this with a shortcut, so it's now a single
click.) (I also at the time did not realize that by right clicking Windows
paste can be used to insert command box text.)
A couple of people
have written little graphical programs that supposedly implement the above
count reset procedure (google 'windows 7 crack'). I also came upon an entirely
different way of reseting the counter, even more techy than this procedure
(starts by turning off 'protection serves').
-------------------------------------------------------------------------------------------------------------------------------------------------------
Simplifying
reset rearm count procedure
While the
above procedure to reset the rearm count works, it's kind of long and techy.
I set out to simplify it.
1) My first
breakthrough was I found it was easy to automate simple command box commands.
The properties of desktop shortcut to the command box can be used to pass
it a simple command. This means with a single mouse click I can check the
rearm count and with another shortcut reenter the default product key.
2a) My second
goal was to simplify getting to the Windows repair environment. I wanted
to avoid having to pull out the repair DVD from its envelope. My first
thought was to put the repair environment on a bootable USB stick. I tried
this and it worked. I figured I could just leave it plugged into one of
the original USB 2 ports in the rear and select it at boot time. To allow
this USB stick to be clearly identified in the bios boot screen I was going
to buy a new USB flash drive from a different vendor than PNY and to buy
a super fast one to speed loading.
2b) However,
I didn't see why I couldn't boot the repair environment from the hard drive,
but in several hours of searching (Google and Youtube) I couldn't find
out how to do it, or even if it was possible, but I did eventually pick
up enough clues that I was able to make it work. First clue was that the
Windows repair environment is just a single file winRE.wim. Second
clue, which I picked up from a YouTube video, is that the WinPE tab allows
a xxx.wim file to be added to the boot menu. My first idea was to
search out winRE.wim and put in a new partition and point to it with EasyBCD.
I did this and it worked, but when I found the file winRE.wim is routinely
installed by Windows in a hidden directory (c:\recovery), I just changed
the EasyBCD boot menu entry to point to the existing winRE.wim file on
the c:\ drive.
Command box shortcuts
Later simplified
the above procedure by adding two shortcuts to desktop. A desktop shortcut
can not only open the command box, it can also run a command. Any text
following 'slmgr /c' in the shortcut properties is treated as though it
was a command typed in. Two (or three) shortcuts suggest themselves here:
1) Check rearm count
c:\Windows\System32\cmd.exe /c slmgr /dlv
2) Renter the product key
c:\Windows\System32\cmd.exe c/ slmgr /ipk RHPQ2-RMFJH-74XYM-BH4JX-XM76F
3) Rearm for another 30 days
c:\Windows\System32\cmd.exe /c slmgr /rearm
4) System file check
c:\Windows\System32\cmd.exe /k sfc /scannow
(/k keeps windows open)
Boot to Windows repair environment on hard drive
In a later simplification
I found a way to select from the boot menu the Windows repair environment
file (WinRE.wim) that already exists on the hard drive. This eliminates
the need to insert a repair DVD or repair flash drive. Windows repair environment
is just a single file (winRE.wim, 165 Mbytes) and Windows 7 routinely puts
in on the hard drive during install in the (hidden) c:\recovery folder.
Turns out that EasyBCD has a special tab ('WinPE') that can point to this
file
and will add it to the boot menu. So to get the repair environment I now
just need to restart and choose the 'WinRE repair environment' option,
no DVD or flash drive required.
Command box tricks
There is an
obscure issue with setting up the command box desktop shortcut: how to
be sure it has administrator rights. There are tons of articles on how
to open a (temporary) command box with administrative rights, but very
few on assigning administrative rights to command box shortcut. I created
my command box desktop shortcuts by selecting from the right click window
of cmd.exe 'Sent to, Desktop (create shortcut)'. I read somewhere that
this grants administrator rights to the shortcut, but the only way I know
is to check the shortcut. My shortcuts have administration in the title,
but I am not sure what this means.
There are a
lot of ways to open a command box: keyboard shortcuts, mouse clicks, desktop
shortcuts. Here are keyboard commands:
Winkey + R, 'cmd', Enter
(via Run)
Winkey, 'cmd', shift + ctrl + Enter
(via Search) (supposedly this opens with administrative
rights)
Here is a screen
capture of command boxes that I opened seven different ways. Notice
two different directories open. The left four, including my normal command
box short and a copy of that desktop shortcut, open in the c:\windows\system32.
Those on the right, which include boxes opened with keyboard commands [Winkey
+ R, and Winkey], open in c:\users\(local name). (For some crazy reason
this version of Windows open in the r:\ directory rather than c:\. Who
knows why). Do all of these have administrative rights or only those on
the left? I am not sure. All say Administrator in title. The four on the
left open in the directory of cmd.exe. The claim in an article is that
keystrokes [Winkey, 'cmd', shift + ctrl + Enter] will open with administrative
rights, but it is one of the boxes on the right.
I need a test
command that will only run in an administrative box. I think I found
it. According to this ref
most command prompts don't need elevated rights, but one that does is 'sfc'
(system file checker). The article says it will throw an error message
if run from a normal command prompt. So I tried [sfc /scannow] without
selecting 'Run as Administrator' and from c:\users\don. The result is it
runs. This test seems to indicate that on my machine (at least) all the
command prompts below are probably elevated. Maybe this is because I am
an administror on my machine. Even when I type [Winkey + R], which references
says does not have elevated rights, the OK box that pops up says: "This
task will be created with administrative privilages".
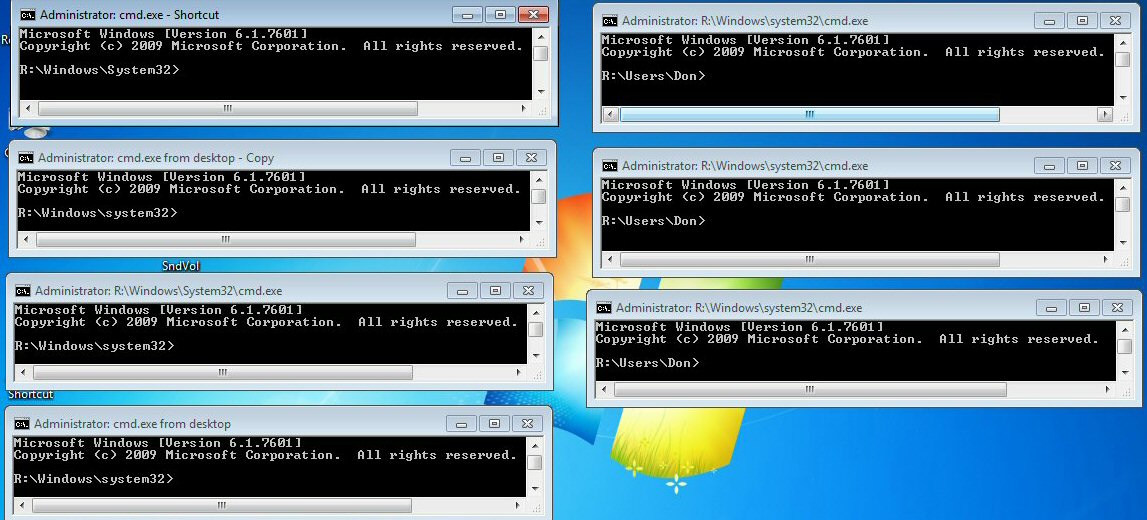
Command boxes opened seven different way all with
admistrative rights (screen capture)
My test indicate the boxes on right also have administrator
rights.
On reason I
am confused about administrator rights is that online references are contradictory.
For example, the reference below on opening a shortcut to a command box
with administrative rights, claims that command boxes opening in the directory
c:\users\ (local name) do not have administrator rights. But a different
(similarly authoritative) article on keyboard strokes to open a command
box claims that [Winkey, 'cmd', ctrl + shift + Enter] will open a box with
administrator rights, yet it is one of the boxes on the right. The article
below points out that in properties of the command box shortcut you can
specify it run as administrator [Shortcut tab, Advanced, Run as Administrator].
I found some of my shortcuts had this box checked and some did not (I checked
them all, can't hurt), yet all opened to c:\windows\system32.
http://www.sevenforums.com/tutorials/3718-elevated-command-prompt-shortcut.html
------------------------------------------------------------------------------------------------------------------------------------------------------
(Earlier text)
At present
this appears to be the most interesting, meaning the most likely to work,
idea to extend the Windows 7 trial period. I have not tried it, and it
will take a little time as you need to boot up into the recovery environment
and have premade the batch file, though this is a one time thing. It should
be possible to see if it works by just checking the rearm count before
and after. According to the recipe below it should reset the 'rearm count
to 4'.
-- Through
a Windows Product Activation (WPA) vulnerability that Microsoft introduced
in Windows 7, it is possible to reset the remaining rearm count back to
4. There is no limit to the number of times that the rearm count can be
reset, meaning that a user could theoretically run an unlicensed copy of
Windows 7 forever, without the need for proper activation, and without
applying any activation hacks.
This WPA vulnerability
is related to a WPA registry key which contains the Last Rearm Time.
When the WPA registry key is deleted, the whole licensing status of Windows
7 is re-initiated to the Initial Grace Period as if Windows 7 has just
been installed. The deletion of the WPA registry key is achieved via the
following command:
reg load HKLM\MY_SYSTEM %~dp0Windows\System32\config\system
reg delete HKLM\MY_SYSTEM\WPA /f
reg unload HKLM\MY_SYSTEM
I have put
the text above (using Notepad run as administrator) into the following
batch file (in c:\ root)
c:\reset_rearm_count.bat
slmgr /ipk
RHPQ2-RMFJH-74XYM-BH4JX-XM76F
(need to reinsert the default Home Premium xxxx.iso product key)
Given the importance
of this WPA registry key, Microsoft has locked it (and its sub-keys) from
been modified or deleted in a normal user session. The only way to run
this command is within the WinRE (Windows Recovery Environment) or WinPE
(Windows Preinstallation Environment).
The way this
is done is before hand write a batch script file, which is just the three
lines above saved to a file in the c:\ root named: xxxxx.bat. At boot use
F8 (advanced boot options) get to System Recovery Options to get access
to a command prompt, then get to c:\ and run the batch file by typing in
its name. That's it.
http://www.mydigitallife.info/how-to-reset-available-remaining-rearm-count-in-windows-7/
http://www.itfunk.com/2013/01/09/resetting-rearm-count-in-windows-7/
SkipRearm --- An easy way to extend trial period?
My test shows
this does not work (well maybe or maybe not, see below) for Windows
7 Home Premium --- I found 'skiprearm' at location in registry location
shown and changed it to '1'. When I enter the rearm command (slmgr /rearm),
the activation days did not change. I repeated the prompt command, and
it appeared to work 2nd time in that trial days increased to 30, but a
check check of the rearm count (slmgr /dlv) showed it had decreased from
3 to 2 as it normally would. When I recheced the skipRearm value in the
registry, I found it had gone back to its default value of 0. Thus there
is no hint that changing the SkipRearm value does anything helpful. (It
sounded too simple to be true, and it is.) A lot of people responded
to this post saying it worked, but I don't see how they would know this
(without waiting months), there is nothing to check.
-- Found an
easier way to extend the trial period (to nearly a year) that only requires
a change to a single registry value. In regedit navigate to:
HKEY_LOCAL_MACHINE\SOFTWARE\Microsoft\Windows NT\CurrentVersion\SoftwareProtectionPlatform
In the right-side pane, change value of SkipRearm to 1. (My
current value of 'SkipRearm' is 0)
-- You should
now be able to use the 'slmgr -rearm' command (correct format is 'slmgr
/rearm') for another 8 times (8 more months) so that you can skip the activation
process for another 240 days. So you will get 120 + 240 = 360 days of free
Windows 7 usage.
http://www.gohacking.com/use-windows-7-without-activation/
Caveat --- There's a caveat to this trick that my tests
may not have picked up. The recent site below (June 2014) claims it does
work for Window 7. It says (or implies) that it may only work after
the trial period has been extended three times and the rearm value driven
to zero, that that is the time to apply the registry tweak.
http://www.oxhow.com/extend-windows-7-trial-period-up-to-one-year/
HKEY_LOCAL_MACHINE\SOFTWARE\Microsoft\Windows NT\CurrentVersion\SoftwareProtectionPlatform
In the right pane, find out the value SkipRearm. Now double-click on it
and change the value from 0 to 1. Press OK.
Now you can
apply the slmgr -rearm command for 8 times more. So, you can extend the
trial period to extra 240 days.The total extended trial period is now 120
+ 240 = 360 days.
** Note: At
first, apply slmgr -rearm command for 3 times then apply the registry
tweak. After so you will be allowed to apply the (rearm) command again
for extra 8 times. To extend the trial period to exactly 360 days, apply
the command in each 30th day of it. (However, for reason given below I
think it unlikely this will work with Windows 7 Home Preium. I can find
no reference online that it does work with Windows 7 Home premium.)
SkipRearm background
I came across an article that explained what skiprearm is doing in the
registry. SkipRearm was put in in the days of Vista to assist large corporations
who needed extra time to get huge numbers of PC up and activated. The idea
was they would change this registry value to 1, then issue the prompt rearm
command to get 30 more trial days. With skiprearm at 1 the rearm count
would not change (hence skiprearm). On the next reboot the skiprearm
registry value would automatically change back to 0. The article said tests
had shown this 'skipping' would only work 7 times, so with the rearm initial
count of 3, a total of ten months of trial period could be obtained.
OK, so far
so good. Now the caveats. The author of this old article said it was not
clear if it worked for Vista Home, as it was a business fix and was known
to work for the more expensive version. Whether it works for Window 7 Home
Premium is anyone's guess. (But recent articles
But knowing
how it is supposed to work I did a second (more careful) test. I changed
the skipream value, rearmed, and rebooted twice. After the rearm command,
a popup box said it had been successful. After each reboot, I checked the
days remaining and the rearm count. Neither changed. All that happened
is on the first reboot the skiprearm value was reset from 1 to 0 (default).
In spite of telling me the rearm was successful, the days remaining never
changed (stayed at 26), so it just appears that changing the skiprearm
value caused the rearm not to work.
Another possible activation trick -- RemoveWAT
(from a poster)
'For those that has their validation days expired, download 'RemoveWAT.exe
2.2.5.0', and run it. Requires only system restart. that will remove the
watermark (and and the black wallpaper).
Translation:
'RemoveWAT' is a a 2010 program from Hazar & Co that claims to remove
Windows activation. (Some virus scanners flag it as malware, but it is
not surprising that even if it does what it is claimed to do, it might
look very suspicious.
----------------------------
Programs that claim to bypass Windows 7 activation.
'Windows 7
Loader' by Daz (free) http://windows7loadernew.com/
-- Windows
Loader v2.2.2 (from a forum post) The safe and easy way to activate
Windows. This is the loader application that's used by millions of people
worldwide, well known for passing Microsoft's WAT (Windows Activation Technologies)
and is arguably the safest Windows activation exploit ever created. The
application itself injects a SLIC (System Licensed Internal Code) into
your system before Windows boots; this is what fools Windows into thinking
it's genuine. (Utilities like this have a limited lifetime because
Microsoft uses its 'updates' to diaable these utilities.)
Posters indicate
because it runs at boot it interfers with getting into Safe mode (F8).
-- During safemode
Windows doesn't care about whether the OS is licensed or not as the "software
protection" service which handles licensing, isn't running. You can be
running without SLIC emulation, past grace period, with no rearms and it
will boot no problem. It has been like this since XP. With XP past grace,
or with damaged or missing OEMBIOS files normal mode won't let you login,
but safemode would. (I booted up in Safe mode and indeed activation status
is not shown.)
---------------------------
-- Is that
rearm count recorded within Windows, or online? In other words, if one
formats a drive and does a clean install, does the rearm count start over?
Ans: Yes, rearm starts over after clean reinstall.
-- By the way,
activation is not a one-time-only thing Microsoft allows for periodic
reactivations of a given product key. Unless youve done several reactivations
in a relatively short time, you should have no trouble. But if you do,
just follow the remedies listed in the Activation Failed dialog box. As
long as your product key is legit, Microsoft will work with you to resolve
an accidental activation mishap.
-- Activate
by phone. Follow the instructions on the screen and phone. (see screenshot
below)
A) (step 1) Call the toll free activation phone number from step 7 nearest
your location.
B) (step 2) Enter the ID numbers on your phone keypad when asked to do
so over the phone.
NOTE: These numbers are generated by your PC and provide information about
your product key.
C) (step 3) Enter the confirmation ID numbers given to you over the phone
into the "Windows Activation" wizard.
D) When finished, click/tap on Activate.
How does activation really work?
My activation
issue is I would like to run two 'instances' of Windows 7 on the same PC.
Can I do this with one product key? I despair of finding the answer to
this online, because what I am doing may seem weird. But it's not weird
as one version of Windows runs with bios set to RAID and the other with
bios set to AHCI. The RAID version derives from the original HP factory
install disks for my particular machine model and has been debloated and
highly tweaked. The AHCI version is a bloat free version I installed to
run my new SSD. It is derived from a (legal) Microsoft xxxx.iso file of
Windows 7 (with SP1) that I downloaded and has different programs installed.
Magical Jellybean keyfinder
I ran Magical
Jellybean keyfinder in both versions of Windows and compared them. Jellybean
on its web site says it reads the Windows 'product key', which it curiously
calls the 'cd key', from the registry. Surprisingly I found 'product key'
and 'product ID' (and 'registed owner') to be the same on both versions.
(This would be explained if I entered the 'product key' when I installed
new windows. I would need to look back in this essay to see if I noted
this.) The 'product ID' I suspect is encoded into the motherboard as it
shows up on the main Windows page. (Correction: I read that Windows comes
up with the Product ID using info about the computer, very likely using
an algorithm based on CPU, memory, etc that displays on the Windows page.)
There are two differences: name of the computer is different and 'Registered
Organization' which is blank in my install and 'Hewlett Packard' in the
factory install.
So does the
computer name matter? My guess is no, that Microsoft in valication is just
linking (25 digit) 'product key' to the 'Product ID'. The Jellybean screen
hints this is the case.
More on Activation
I am concerned
that if I activate a new install of Windows 7 it might affect my older
installs. I think the risk is minimal, but Microsoft is such a bastard
company, and the documentation so poor, it makes me pause. Also I have
not yet figured out anyway to search this problem. I have installed Windows
7 three times on my desktop (plus once on Vista portable) from two sets
of disks in last few months under two different bios sata settings. And
does each and every clone need to be activated? I bet it does, or alternatively
I reclone an activated version. Yesterday I had one day remaining on my
trial. Today Windows Activation says, "You must activate today", so of
course I am going to wait and see what happens.
Only one copy of Windows per license
I was right
to be concerned. I finally found information on this point. A poster asked
if he could have three installations of Windows with his single license
on the same hardware. Answer of Microsoft engineers was no. For
three installations on the same machine he needed three licenses (at $100
a pop)! A Microsoft engineer actually wrote this: 'If you partition your
hard drive, it is a new computer.'
Microsoft's
narrow definition of 'computer'
Don't have
the reference at my fingertips but I noticed an interesting quirk in the
legalese of Microsoft's license agreement. A quirk that appears to me to
open up a huge legal licensing loophole. It concerns Microsoft's definition
of 'computer'. Microsoft defines a 'computer' as a device with internal
storage. See the flaw? With the advent of esata ports external drives can
boot and contain the OS. My primary SSD drive is in fact not inside
the case of HP desktop case (and never has been). It resides in an external
2.5" enclosure that is connected to the motherboard via an esata cable.
I could just as easily remove the (secondary) HDD drives that remain inside
and put them in esata connected enclosures too. I already own a 3.5" fan
cooled esata enclosure that I plan to put one of my new HDD drives in.
One reference
claimed there was no such thing as 'deactivation'. However, I later read
that the job of one Windows update was to check out the status of Windows
activation to see if had been tampered with, if known workarounds had been
applied. If found, it then did (in effect) deactivate that install of Windows
telling users it was not a legal copy (or outside the trial period).
Windows
can
deactivate itself. A poster showed a Windows message saying his copy of
Windows would deactivate in 3 days, probably because it sensed it was running
on new hardware. Windows is thought occasionally makes a check of the hardware.
What it checks it a big secret, but one supposed activation trigger is
the MAC address.
Wikipedia MAC address
A media access
control address (MAC address) is a unique identifier assigned to network
interfaces for communications on the physical network segment. MAC addresses
are used as a network address for most IEEE 802 network technologies, including
Ethernet. Logically, MAC addresses are used in the media access control
protocol sublayer of the OSI reference model.
MAC addresses
are most often assigned by the manufacturer of a network interface controller
(NIC) and are stored in its hardware, such as the card's read-only memory
or some other firmware mechanism. If assigned by the manufacturer, a MAC
address usually encodes the manufacturer's registered identification number
and may be referred to as the burned-in address (BIA). It may also be known
as an Ethernet hardware address (EHA), hardware address or physical address.
This can be contrasted to a programmed address, where the host device issues
commands to the NIC to use an arbitrary address. A network node may have
multiple NICs and each NIC must have a unique MAC address.
On my new install
I have not turned on Windows updates. My install came with SP1. I hate
the idea of Windows fooling around changing the OS when I am making clones.
And was really pissed off when without an user input it just permanently
disabled gadgets. Gadgets (clock and calendar) continue to work on my new
install. I am fully prepared with anti-virus knowledge and tools to protect
my own security. I'm also a little pissed that my latest install yesterday
with its 30 day trial period had nearly all the trial days wiped out my
cloning to it.
Disable
'automatic activation'
I stumbled
on another twist that Microsoft runs with Windows 7 activation. I installed
for a brief test the 32 bit version of Windows 7 from the DVD I bought
from Amazon. I bought this Windows 7 install DVD primarily to get a new
valid product key with no real interest in the DVD that came with it. I
found the DVD wouldn't work on my desktop (bios set to AHCI, is this relevant?),
the install repeatedly stopping after a few seconds due to an "unexpected
error" (as opposed I guess to an expected error!), but the DVD did work
on my old Vista laptop installing a 32 bit version of Windows 7 (with SP1).
When I checked
'days to activate' (in Computer properties), it just said activate now.
I found the rearm count was 3, so I issued the rearm command and the system
reacted as I expected with the command box reporting rearm count now 2
and 30 days to activate. However, when I checked the Computer properties,
I found a different message: 3 days to "automatic activation". What the
hell is 'auto activation'? This is the first time I had ever heard of this.
In the command box it was telling me I had 30 days trial, i.e. which I
thought meant Windows operation without entering a key, but in Computer
properties it was telling me Windows on it own (!) was going to call
home (at long as I was connected to the internet) in three day and activate
windows!
How can 'auto activation' work?
When I think
about this, I don't see how Windows 'auto activation' in Windows
7 can work. To activate Windows a 25 digit key needs to be submitted. Where
does this key come from? The install DVD almost for sure has the
default (non-activatable) key code for Home Premium, but it would be very
unlikely that it knows my unique key code, which is on a sticker attached
to the package. Is it possible every install DVD is different, that
the key code on the packaging, has been entered into the DVD? While possible,
it seems unlikely to me. How then can Windows in three days 'auto activate'?
OK, in three days it could put up a window demanding that I enter my unique
key code, but what if I leave it blank? Does windows then go 'non genuine',
blackening the desktop? If so, then the message the command box reports
that I have 30 days to activate is a lie? Does Microsoft lie? (I wouldn't
bet on their honest.)
'Auto Activate' fraud (8/22/14 update)
Today I downloaded
the 32 bit version of Windows 7 from Digital River, burned it to DVD and
installed it (on a small partition on my junk drive on my desktop machine).
Prior to installation I unchecked instant activation box. I got the same
3 days to 'auto activation' with the command box rearm check conflicting
telling me I had 30 days in the trial. I did a rearm, the rearm counter
dropped to two, but unlike above, properties of Computer still reported
three days to 'auto activation'. So I ran some tests playing with the system
clock. What I found was advancing the clock a little at a time 'auto activation'
dropped eventually to 0 days, and then with further advances 'auto activation'
disappeared and the properties message changed to the normal '26 days to
activate'. There was no hint during these tests that there was any attempt
to call home, nor did the 'not genuine' message ever appear.
What does this
mean? I think it means the '3 days to auto activation' message is a fraud,
a scare tactic, or more accurately a freaking lie by Microsoft! Above I
asked how 'auto activation' in Windows 7 can possibly work, and the answer
is it can't work! The only product key built into the installation is the
default Windows 7 product key, which millions of computers have, and this
product key cannot be used to activate Windows 7.
Yikes. 'Automatic activation'
is totally arrogant behavior by Microsoft. In my case I don't want the
OEM key tied to this old computer which I was just using for a quick test.
I bought the key for use on a future machine. If it activates on this machine,
it 'uses up' the OEM product key, effectively destroying its value for
me, because the key will become locked to the motherboard of this old laptop
and as an OEM key it could never be moved to another machine.
So in two days
the value of my nearly $100 key purchase is about to go down the drain,
thanks to Microsoft and their abusive activation restriction and gimmicks,
so did a google search to see if there was anyway to disable 'automatic
activation', and there is! Now much turned up in the search, but a forum
posting contained a link to a an old Microsoft page where they showed how
this could be done in Vista by changing a single entry in the registry.
The registry key given (maybe it was for Vista) did not work for Windows
7, but the Windows 7 name is similar enough that with a registry search
I found the Windows 7 equivalent. I tried it, changing value from
0 (active) to 1 (disable), and it worked. Computer properties changed from
2 days to automatic activation to 30 days trial.
The Windows 7 registry key to enable/disable automatic
activation is below: ('SkipRearm' is one level up)
HKEY_Local_Machine\software\Microsoft\Windows NT\CurrentVersion\SoftwareProtectionPlatform\Activation
Manual (data name) [change value 0 => 1 to disable
automatic activation]
Windows 8 auto activation
Microsoft
has totally eliminated the 30 day trial period for all versions of Windows
8. Windows 8 auto activates immediately (or in 10 days), and there is no
mystery here. During install it asks for a 25 digit product key, no key
and the installation stops. When installation is complete and if the computer
is connected to the internet, then on its own it immediately calls home
and auto activates. On forum poster unaware of this 'feature' of Windows
8 did an install on a test machine to check hardware compatibility and
the damn thing auto activated on him tying his Windows 8 to the wrong computer.
A lot of poster too are very annoyed by what they view as a bug. If drivers
need to be installed on a new machine that has auto activated, it is not
uncommon for the change in hardware to trigger Windows is 'not genuine',
so requiring them to call Microsoft to activate a second time!
Microsoft activation site
Found a link
on a forum to this Microsoft site, which has a huge number of Q&A about
activation.
http://www.microsoft.com/oem/en/licensing/sblicensing/pages/licensing_faq.aspx#fbid=bpLAvc4PXTY
Excerpts:
-- Generally,
an end user can upgrade or replace all of the hardware components
on a computerexcept the motherboardand still retain the license for the
original Microsoft OEM operating system software.
-- How
does Microsoft product activation work?
A. Product activation works by validating that
the software's product key, required as part of product installation, has
not been used on more PCs than is allowed by the software's license. The
product key and the product ID (created from the product key used during
installation) are sent along with a "hardware hash" (a non-unique number
generated from the PC's hardware configuration) to the Microsoft activation
system during activation. Activation is completed either directly via the
Internet or by a telephone call to a customer service representative. Most
customer service centers are open 24 hours.
(Translation:
Microsoft must keep a record of product keys that have been activated.
When a key is submitted for activation, it must be checked against this
record. This is the only way I can figure that Microsoft can tell whether
or not the product key has been previously used on a different PC.)
-- (System
builder reselling a returned computer with Windows activated. System builder
is advised to reinstall Windows) The new end user must see and accept the
Microsoft Software License Terms and enjoy (Oh, yea!) the Out-of-Box
Experience. The end user should not have any problems using the same product
key to activate the software again, because the computer system configuration
hasn't changed.
-- (If hardware
on a resold computer has changed) Microsoft recommends that you instruct
the end user to use the telephone call center activation method rather
than the Internet method, so the user can talk to the customer service
agent and explain what happened. The call center personnel have been notified
that this may happen and can reactivate the software using the new PC hardware
configuration data.
-- There is
a 30-day grace period before a Microsoft OEM system builder Windows desktop
operating system needs to be activated. (Typical Microsoft lie, omitting
the crucial information that the 30 day trial period may be extended.)
-- Microsoft
might ask you to validate after Windows activation, when you request
a genuine Windows download from the Microsoft Download Center, or when
requesting a non-security-related download from Windows Update. (Translation:
even though you are running activated Windows, Microsoft here seems to
give themselves the option to recheck your Windows instalation anytime
you request a download, calling it 'validation'.)
-- There
are only two ways a customer can get a Windows desktop operating system
on a new PC:
* OEM system builder software preinstalled on a PC
* Retail product
(Well if this is taken at face value, how is it that
the sale of Windows 7 DVDs with product key at Amazon is (presumably) legal?)
My activation adventure
In the last
few minutes I discovered several things about Windows 7 activation. Coming
back from lunch at 1:30 pm I discovered the clone I was using had suddenly
had a black desktop background and a small text message was diplaying in
the lower right corner saying this 'xxxx build of Windows is not genuine'.
Switching to another clone, which was in the 3rd install, I found it OK.
In prompt window I typed the single line to reset (rearm) Activation and
give me 30 more days [slmgr -rearm]. It's that simple and sure enough it
now showed I had 30 days to activate. In another clone the 'not genuine'
text message had appeared, but the desktop background had not changed.
I read on a Microsoft page that exceeding the trial period results in not
only black wallpaper and 'not genuine' messeage in lower right corner,
but also that every hour the PC shuts off.
For fun I reset
the PC clock by one day never thinking it would work. It does! Yes, Microsoft
really is this stupid. Now my SSD lower partition was OK and again saying
'One day to activate'. In the two clones with the 'not genuine' text message
it went away. In the one clone where the desktop background had gone block
I was able to reset it. All the clones I didn't rearm say one day to active,
so the PC clock is universal.
Summarizing
* Activation
period does not end at midnight.
* Activation
period does not end at (exactly) the same time for various clones
* Activation
extension has to be done separately for each clone
* Activation
time can be extended by the simple means of setting back the PC clock!
slmgr /xpr (shows exact clock/calendar time at
which trial expires)
Extend
trial time by changing the clock date
This method
for extending the trial period does appear to work, but it is cludgy as
it messs up the PC clock. I did some systematic tests to see what effect
changing the PC clock (time in the lower right corner) would have, if any,
on activation and got some interesting results. I set out to see what would
happen to the trial period if the PC clock, meaning the date in the lower
right corner was changed. I did these test on activation using a clone
derived from an xxxx.iso Windows 7 install on a partition on my Vista portable's
internal drive. Fooling with the clock is an old technique that supposedly
doesn't usually work anymore. Software is is claimed have other ways to
figure the trial period, one being that there is supposedly a log of clock
time changes.
However, my
tests show not only can changing the clock extend the Windows 7 trial period,
but if the trial period has been exceeded and the system has gone into
the 'Windows not genuine' state, the trial period can reentered. In other
words setting back the clock works seems to work like a charm, and as far
as I can tell there is no limit to how long the trial period could be extended
this way.
Here's the
details of my tests. In my first test the (real) trial period was just
about over, so after updating the clone, I corrected the clock (activate
today), then one day forward. Sure enough in a few minutes the desktop
screen turned black and the lower right hand corner said my copy of windows
was not genuine, but programs still worked. I then reset clock back about
a month to see what would happen. Now the computer properties reported
27 days to activation, but the desktop background stayed black. I suspect
I could just have reset the desktop, but instead I rebooted to the clone.
The clone had not had been active when the clock went forward, and I found
its desktop was OK, so I recloned the clone and everything was back as
before, 27 days to activate.
Starting from
the trial period I did two additional systematic tests. First I adjusted
the clock to a month too early, i.e. before the trial began. At
first nothing happened, but I let the computer sit, and in an hour or two
the screen went black and the not genuine message appeared. For fun I tried
resetting the wallpaper and it did reset, but it didn't hold, in another
hour or two it went black again.
Now the key
test. I readjusted the clock forward so the time was within the trial period,
i.e. within 30 days after I had done the original install. Immediately
the 'days to activate' corrected to the time dictated by the clock (25
days), but the 'not genuine' text remained. I didn't let it sit, instead
I rebooted and this got rid of the 'not genuine' text message. However,
the screen remained black, but I understand this. Outside the trial period
Microsoft periodically (maybe once an hours) sets the wallpaper to black.
If the trial period is reentered, by a rearm or playing with the clock,
Microsoft makes no effort to change the wallpaper back, that is the users
job, so I reset my wallpaper. That was about 24 hours ago with the PC on
all this time, and clearly the trial period has been reentered.
Bottom line --- Never seen this mentioned online, but
my tests show that Windows trial period can be extended by the simple procedure
of setting back the computer clock. However, in general this is inconvenient
because your files cannot be ordered by date properly. My tests even show
that setting back the clock (combined with cloning) can reverse the 'Windows
not genuine' state, pulling it back into normal operation of the trial
period.
Why does this clock thing work?
It's tempting
to say Microsoft is incompetent, but it may very well be they aren't trying
very hard. Outside the trial period they could easily just shut down the
OS, but they don't. All that happens are cosmetic changes (black background)
and annoyances (not genuine text and popups to activate now), programs
continue to run Ok. I read that the PC will shut off once an hour, but
I let it run quite a few hours outside the trial period and did not see
this. Maybe there is a building series of annoyances as the days go on.
Didn't test this. One time while outside the trial period I did lose internet
access for no obvious reason. I ran the Windows 7 troubleshooter and it
fixed it and the problem never resurfaced. Whether this was the deliberate
annoyance or not I don't know.
Outside the trial
period and with 'not genuine' showing a popup windows said activate today.
This directly contradicts what I read on an official Microsoft page that
a product key
cannot be used to active a 'not genuine' version of
Windows!
While outside
the trial period I entered the rearm command (slmgr /rearm) in the command
window. I wasn't sure what would happen using this command after
the trial period had expired, but it reported rearm was sucessful. Sure
enough I found I again had 30 days on the trial and the 'not genuine' message
disappeared, but good old Microsoft, after deleting my wallpaper they don't
bother to restore it. I had to manully go in and restore it, even though
it was the default wallpaper from the xxxx.iso install.
Bottom line --- A rearm command can be used after the
trial period has entered, i.e. with black screen and 'not genuine' message
showing, and it will reactive the trial with an additional 30 days.
=============================================================================
Key can be invalidated
-- ** The worst
that can happen is that the key is invalidated by Microsoft, and that any
computer that uses it displays a notification that "This copy of Microsoft
Windows is not Genuine"... and needs to be reinstalled every 30 days, and/or
can't be updated, etc. So, you can invalidate the new install and your
old install. Essentially, you can make the OEM product key invalid for
any and every installation.
Computer may come with a fresh key
-- When you get
your laptop and start using it, there is one product key on the sticker
on the bottom of your laptop... and your laptop is currently installed
with a DIFFERENT product key called a Volume License product key. This
is a single product key that the laptop manufacturer used on thousands
of laptops when they made the hard drive image for mass production. However,
the manufacturer is required by law to provide you with a UNIQUE and individual
product key, since you are also purchasing a copy of Windows with
your laptop. So, provided you haven't had to reinstall Windows yet, you
actually have never used the OEM key on the sticker.
(EDIT This
is easy enough to confirm yourself. Just download any keyfinder software
that will pull the MS product key for your installation from your installation,
and compare it to the OEM product key on the sticker. If you have never
reinstalled Windows on that machine, you will find them to be different.
Go Ahead. Try it. Use RockXP or ProduKey or Magical Jellybean.)
So... Can you
use the OEM product key on a second installation of Windows, provided you
have NEVER used it on the computer it came with originally? Yes. Is this
recommended? No. You know why? What are you going to do when you need that
OEM product key for the computer it came with? Oh... don't give me that
"It's not gonna happen." Don't blow off the real probability that your
hard drive is going to fail in a year or two... and you will be kicking
yourself because you didn't make the recovery discs that you were supposed
to (or they don't work right like so many people complain here about).
... and of course, as has been pointed out very succinctly... it is illegal
too.
-- The keys
you are referring to are not volume license keys but SLP keys, see en.wikipedia.org/wiki/System_Locked_Pre-installation.
Your argument that one might need the personal key to reinstall Windows
on a machine that was running the SLP install before is also weak, as you
could just use the generic SLP key again if you need to reinstall (unless
the motherboards got replaced).
-- One key
is licensed for use on one system at a time. Using one key on multiple
systems is a violation of the terms for use and illegal.
-------------------------------------------------------------------
Windows COA keys (7/19/14)
Here are several
(25 digit) activation keys. I had just assumed these keys were unique,
but a little gooling shows otherwise. The cheapest way to buy a new OEM
Windows 7 Home Premium key is to buy a 32 bit version on Amazon that comes
with a key, then use the key to activate a 64 bit Digital River Windows
7 x64 bit Home Premium xxxx.iso.
#1 and #2 come
from own machine, pulled from registry by Magical Jelly Bean from various
installs, both labelled 'Windows 7 Home Premium Sevice Pack 1'. My old
windows install from HP disks and most of my new Windows install from (bloat
free) xxxx.iso Windows have key #1. But for some reason a test Win7 install
from xxxx.iso has key #2. Don't know why the difference I have two xxxx.ios
disks of different builds, and it's possible I installed from them both
and they have different keys. (I might have have done my first bare install
from HP disks or recovery disk, I would need to read back in this essay.)
(#3) From what I read (below) I should have my own unique COA key
on sticker on my cabinet. There might be a sticker on left side and there
is one on the bottom. Unless I pull out the machine I can't get close enough
to read either of them.
The solution
was to use my camera in macro, flash mode. This allow the inaccessible
stickers to be read, and when I found the COA key (Proof of License --
Certificate of Authenticity), it provided good documentation for it. The
Microsoft license COA key turned out to be on a small sticker on the left
side (lower rear).
#4 was suggested
in a YouTube video to activate an upgrade install of Windows. They seem
to be saying (2011) universal key that will activate the Anytime upgrade.
In the video they first input key #2 doing an 'anytime upgrade', then to
activate it they input key #4.
1) HP volume key. This appears to be the default
key HP uses on all its Windows 7 Home Premium machines. There are
hints in forums that if you use this ket to try and activate a reinstallation
of the OS, the activation may fail, that you need to use the unique COA
key on the machine.
4FG99-BC3HD-73CQT-WMF7J-3Q6C9 --- 'Installed from OEM media'
2) Microsoft site says this is the default xxx.iso trial
key. A windows video calls is Windows 7 Anytime Upgrade key
RHPQ2-RMFJH-74XYM-BH4JX-XM76F --- 'Installed from Full Packaged product
media'
3) My unique Windows 7 Home premium key on desktop sticker
from Microsoft sticker on left side panel (rear, lower) of my HP desktop
machine. This key should activate Home Premium x64 with SP1 (3.2 Gbyte,
bloat free) available free for download from the (Microsoft) Digital River
Windows repository (Heidoc.net).
XXXXX-XXXXX-XXXXX-MTQRW-Y6CMW
4) Suggested in YouTube video as Windows 7 Activation
key from an anytime upgrade (#2 above). (In a google search this shows
up in an Asus Windows 7 Home Premium machine.)
Youtube video 'How to get Windows 7 Home
Premium Free' (http://www.youtube.com/watch?v=_rpJq3HU6QU)
a) RHPQ2-RMFJH-74XYM-BH4JX-XM76F -- Upgrade key
for Windows Anytime Update
b) Start window: 'Windows anytime upgrade' , enter Windows anytime key,
takes 1 min to 'verify key'
10 min upgrade takes place, which appears to preserve programs, 30 day
trial
c) 7JQWQ-K6KWQ-BJD6C-K3YVH-DVQJG -- Windows activation key
d) Start window: 'Windows activation', enter Windows activation key
Ok, from another
site I see what these are are the keys to support a Windows Anytime Upgrade.
Intended as an upgrade from Window 7 Starter of Home Basic to Home Premium.
I read Windows anytime upgrade as of 2014 are long gone, and the intended
upgrader here already was starting from a (presumably) activated lower
Windows 7 version. When I try this, entering in Start window: 'Windows
anytime upgrade', I am directed to a screen asking for an 'upgrade key'
(25 digits).
--The licence
installed by the OEM OS disc is called a Volume Licence Key (VLK), these
are used by OEM's to make it easy to install legitimate product on millions
of PC's. (This appears to be the key Magical Jelly Bean is pulling out
of my older install on HHD and my newer install on SDD.) The COA sticker
key is the
unique single user license that has to be distributed
with the PC as per their agreement with Microsoft. Record the COA key somewhere
safe as the stickers tend to get unreadable over time.
-- ** Legally
you only have one key. If you lose your OEM install disc, you can use a
non OEM disk to install the OS and then use the key on the COA sticker
to install and activate. (This has the ring of truth) (The argument here
appears to be use the HP OEM key (#1) to activate trial windows Magical
Jelly Bean says were 'installed from OEM media' and use the COA (side)
unique key for a non-OEM installation.)
I try and activate new Windows (7/16/14)
After
a lot of reading about activation, I took a stab at activating my install
of Windows Home Premium under AHCI on SSD. As insurance I first disabled
Windows updates on my old RAID Windows. I also uninstalled what is referred
to as an activation update (KB971033) that I found installed. I wanted
to work on a clone, so I next cloned my baseline SSD lower partition to
the SSD upper partition and Enclosure HDD in upper partition. I then rebooted
to the SSD upper partition. If Windows activation was successful, I only
need clone it back to SSD lower partition. I made two attempts and neither
succeeded.
I used for a key
what magical jellybean reports for this Windows installation (#1 above).
I now understand that this is volume key that HP used on all its Windows
7 Home Premium machines. I see online some conflicting opinions as to whether
this would work. The online consensus is that it won't work, but a few
suggest if it has not been used before on a particular machine it might
work (maybe with telephone activation). However, the consensus view is
that the COA (Certificate of Authencity) Windows key, which Microsoft requires
an OEM builder to affix to the computer case, must be used.
Failed with
error code: OxCOO4E003 --- License evaluation failure
On a Microsoft
site I saw this error code might mean the key is OK but needs to be entered
again, so I did and again it failed. On the failure with see idiot Microsoft
in action. It suggest 'Contact Microsoft by Phone' giving a link. When
the link is clicked there is no phone number! In fact finding the telephone
# for Microsoft Windows activation is not easy. I stumbled across an 800
# in one posting (didn't write it down) and that is it.
Windows phone activation
This comes
in two flavors human (in India) and automated. Apparently before you get
to someone human you get an automated phone activation system. I read you
need to give it 8 (or 9) six digit numbers. (I don't know what this is,
it doesn't fit the ID number.) It then spits back numbers that you write
down.
Point of confusion
Some say if
you reinstall from HP media (with bloat) then you don't need to enter a
key and activate, because the new install will read the registry and know
its a reinstall. I installed my SSD version of windows in March, but I
just don't remember which of several disks I used. I have four sets: disk
I purchased from HP, recovery disks I later made, and two xxxx.iso builds
I downloaded from Digital River, and in addition I have recovery disks,
which may be able to restore from the recovery partitions that are on my
hard drives.
The point of
confusion is that magical jelly bean reports the SSD Windows version was
installed from an OEM source. I remember only that the starting install
for the SSD was bloat free. Did the xxxx.iso ask for a key and I entered
the OEM HP volume key that magical jelly bean read from the registry. I
don't remember. Further amping up the confusion. This week I did a test
install of Win7 (just to play around with how to quickly set it up) using
one of my xxxx.iso DVDs (from Digital River). Magical jelly bean reports
this key as #2 above and reports it comes from 'Full Packaged product media',
which elsewhere I see means retail. There are only two basic categories
of key: OEM and retail. I read key #2 of my xxx.iso test install is the
default key of Digital River .iso versions of Home Premium, which makes
sense.
Anytime upgrade procedure doesn't work for me
For fun I also tried
the Anytime upgrade procedure described in the YouTube video (see above)
and (not unexpectedly) after seeming to accept the anytime upgrade key
it soon halted and asked for a new key, saying the anytime upgrade key
I entered was not applicable for my computer. This is either because I
was trying to 'upgrade' Home premium to Home premium or all anytime upgrades
are gone. (Typical Microsoft, when the 'upgrade' procedure started it didn't
say what it is upgrading to! Apparently you are supposed to know this is
built into the key you entered.)
A further test could be done to try key #4 on the my test version of Win
7 (not in good shape) that already has the first key of the video. A poster
to the video said that in fact this key #4 did work to activate his xxxx.
iso (Digital River) install, and I believe his comment was recent.
Remaining activation options
I have two
remaining options to activate my Windows install on my SSD. First choice,
which I expect will work, is to dig out the COA key from the HP desktop
case. Second ($100 option) is to buy on Amazon a DVD with (OEM) key. Using
this will lock its Windows 7 to my hardware. It would be better insurance
to buy it and put it aside in case my hardware fails and I need it to install
Windows 7 on a new machine (replacing Windows 8). Which is probably a long
shot as long as Windows 7 machines continue to be sold, but at some point
in the not too distant future this will end.
No activation leads to 'reduced functionality mode'
-- The only
changes I've noted so far are:
Windows Update is limited
Microsoft Security Essentials refuses to update
I get a very annoying window almost every time I switch between apps
I see a new dialog when logging in telling me I may be a victim of software
piracy
I get a "This copy of windows is not genuine" on my wallpaper
From Microsoft
-- Genuine
Windows is a recurring process that checks your product key to ensure it's
being used with the hardware it was paired with during activation.
-- If you
have to activate Windows again on the same computer, you don't need to
buy a new product key.
-- Can I use
my product key on more than one computer?
You
can't use the same Windows product key to activate Windows 7 on more computers
than the Microsoft Software License Terms allow. Usually, the license terms
allow the product key to be used on only one computer. If you use your
installation disc or a USB flash drive to install Windows 7 on a second
computer, you'll need to buy an additional copy of the same edition of
Windows 7 to obtain a new product key.
-- If you can't find your product key, you might need
to buy a new one.
My customer bought a new PC and wants to move the OEM software
from the old PC to the new one. Can't users do whatever they want with
their software?
A. No, the OEM software is licensed with the
computer system on which it was originally installed and is tied to that
original machine. OEM licenses are single-use licenses that cannot be installed
on more than one computer system, even if the original machine is no longer
in use. The Microsoft Software License Terms, which the end user must accept
before using the software, state that the license may not be shared, transferred
to, or used concurrently on different computers. System builders must provide
end-user support for the Windows license on computers they build, but cannot
support licenses on computers they didn't build. This is a fundamental
reason why an OEM System Builder License can't be transferred.
Supposedly a way to activate Windows
This guy claims
uninstalling an activation update ( KB971033) before 'slmgr -rearm' caused
the status to change to 'Windows activated'. Some report this works, but
not for others.
-- Go to Control
Panel > Uninstall a program > Click View installed updates
1. Remove the activation update KB971033
(not installed)
2. Turn off automatic updates so KB971033 does not auto-install
-- Turn off Windows
Updates
Go to Control Panel> Windows update > Change setting and select "Never
check for updates" > OK
Type in > slmgr
-rearm then reboot your pc.
-- If you have
a genuine key, and you are using it on the exact same hardware then it
should reactivate every time. Note that if it is an OEM (Original Equipment
Manufacturer) license, you cannot change the motherboard as this will cause
the key to be deactivated.
Do clones preserve Windows activation?
Stumbled across
an interesting forum discussion about clones sometimes needing to have
Windows reactivated. One guy says he has done like 100 clones for customers
doing disk upgrades and 95% of the time he says the cloning does not preserve
the Window activation, it need to be manually reactivated after the cloning.
Another guy
who
does cloning with Casper reports the opposite, that in dozen of clones
Windows activation was preserved every time. He puts it down to Casper
doing something different, but really none of them knew. All my RAID clones
with Casper 8 preserved the Windows activation, but apparently this may
not always be the case with some clone software. In reading instruction
of several software cloning packages I don't remember this issue of loss
of Windows activation ever being raised.
Risks to activating my new Windows installation
My take away
from the research below is this: I think it is likely that if (or when)
I try to activate the new Window installation (now in trial period) on
the SSD, it is likely that Microsoft will do one of two things. Either
they will activate the new Windows and then later attempt to reach in disable
my old Windows installation, or two, they will refuse to activate the new
Windows until I deactivate the old Windows thus freeing up the product
key. They already know from HP OEM activation and will know to which HP
motherboard it is tied.
The reason
I think this is that a license (product key) only allows one Windows installation
per PC. If I first disabled Windows updates in the old Windows, I could
probably prevent its deactivation, but options are fewer in the second
case. A possible work around in both cases would be as a first step to
clone the old Windows (with Casper 8). This old Windows is activated and
my tests show that Casper 8 preserves Windows activation, so even if I
were to deactivate Windows product key, I don't see why a boot into an
(activated) clone shouldn't in effect restore activation! I don't see what
could possibly be preserved in a Microsoft deactivation of an install of
my old Windows that would not be reversed by booting to an activated clone.
-----------------
From what
I read about Windows activation there seems to be a real risk that things
will get screw up when I try to activate my new Windows installed under
AHCI, with the worse case being that my HP OEM code being disabled. I need
a plan.
* Can Windows
be activated without being online? Microsoft says yes, but you need to
contact Microsoft by telephone. The utility below may be a solution.
* Maybe I can
prevent my RAID clone from being deactivated by prior to contacting Microsoft
I disable Windows updates. The only way it could then be disabled is locally,
but I don't see how the two bios versions of Windows can talk to each other.
* Puzzling
thing I don't understand is that when I use Magical Jelly Bean keyfinder
it reports that the 25 character 'key' is the same on my trial period SSD
as on my activated HP OEM reinstallation. What does this mean? (Seems like
a good thing.) How did this information get into the SSD since it was installed
with an xxxxx.iso DVD. I don't remember it asking for a product key, but
maybe it did.
* Maybe buy
a $95 OEM Windows 7 at Amazon. It may not longer be sold after fall 2014.
Buy now and hold in reserve? (Once used it will be locked to the motherboard.)
Buy only if I run into problems?
The utility
below may just fit the bill for my unique situation where my old clones
would not work with my new SSD without a change in bios setting. The result
being I have a 2nd installation of Windows 7 under a different bios setting
for the SSD, but on the same PC. I want to activate the new Windows installation,
and don't see why I should have to enrich Microsoft $100 for a new OEM
key (Amazon) when the cause of the problem is some sort of bug that prevents
the SSD under AHCI from being visible to my clones made under RAID. My
HP OEM license should be OK, it only a 2nd installation because my original
clones made with bios set to RAID would not work with the bios set to AHCI
that the SSD requires.
Activation plan
1) Try activation
software (by Josh Cell Software)
2) Wait three
more month running out the rearm count
3) Prior to
activation turn off Windows updates on my RAID clones to keep Microsoft
from researching in and deactivating them (research this)
3) Use my
HP key to activate new Windows
Utility to capture and reload Windows activation
On forums
I have seen two references to a utility that might be very helpful to me.
It (claims to) capture activation information from an activated Windows
installation and save it in a file. It can then can later use this information
to activate another installation of Windows without contacting Microsoft.
The program has been well reviewed.
Advanced
Tokens Manager v3.5 RC5 by Josh Cell Softwares
7Tokens
Manager (by Josh Cell) --- How To Activate Windows 7 Offline, Jun 15, 2011
By Usman Khurshid (old rev)
--
Activating Windows 7 is always a headache if you have to activate it multiple
times because Microsoft imposes a restriction on Windows 7 activation that
it can be activated only once. If you want to re-install Windows
7, youll need to activate Windows 7 again which is a really tedious task
because youll have to call Microsoft support in order to make them believe
that youre the owner of that Windows 7 copy and have the right to re-activate
Windows again.
-- Windows
7, fortunately, saves all the activation information locally in the PC
making it easier for us to be able to backup the activation information
and restore it whenever we wish to. The only restriction is that the backed
up activation information will only work on the same PC when restored.
(http://joshcellsoftwares.com/products/advancedtokensmanager/)
(downloads here)
(http://www.techrepublic.com/blog/windows-and-office/review-manage-microsoft-licenses-with-advanced-tokens-manager/)
(review)
It claims to do
what I want
-- This application is able to make the full backup of all activation data
stored on the computer for a trusted restore without damage or
modification of the activation system. Stores all activation details for
a trusted activation restore. (what's a 'trusted restore'?)
-- Use the same backup to restore the activation status infinitely on the
same hardware.
-- Online and Phone activations will be instantly activated after restore.
(This is what worries me, but may be benign.)
From techrepublic review of the program:
-- Basically, this utility does one thing and one thing only. It backs
up your Windows license activation for safe-keeping so that you don't have
to make the dreaded call to Microsoft again.
-- When you run a backup on the utility, it takes a snapshot of your tokens.dat
file in Windows and creates a backup, ready to be restored any time you
go to rebuild the system. For those who are curious, the tokens.dat file
contains all the Windows and Office activation information and it is digitally-signed.
-- Advanced Tokens Manager essentially takes the place of a series of command-line
operations that can be considered inconvenient to less technically-savvy
Windows users. Commands like slmgr and the like
Testing Advanced Tokens Manager v3.5 RC5 (7/6/14)
I gave the
this activation utility a try, but no joy. It gave an error and did not
change the activation of new Windows on SSD (still in trial period). It
downloaded without a problem. Its instruction are nearly impenetrable,
but it is extremely easy to use. When it runs, it save activation information
in a file (in its root directory). When run again with a saved activation
file, it asks if you want to activate using stored info, saying it will
take about five min (which it does). It leaves a log showing the ten or
so steps it goes through and whether each is successful.
I ran the tests
on clones to minimize risk. I also disabled the internet. I power up in
my activated Windows derived from the HP Windows disk (I bought) on 500
Gbyte drive under RAID. That went OK. It displayed my 25 Windows product
key matching the key Magical Jelly Bean reads from the registry.
I then copied
its directory with the save activation file to a clone os the SSD under
AHCI, and proceeded to power up in this clone. I then ran the program again,
it trundles five min and threw an error saying it could not activate with
the stored activation. However, when I looked at the log I found every
step was successful until the end when it just said it could not activate
(with no explanation). I ran the program a second time with same result.
It might be
that the activation failed because I had the cable modem powered down.
The instruction said 'Online and Phone activations will be instantly activated
after restore.' Not sure that this means. Does this mean Windows will be
contacted after restore? I don't want to do this yet as I have three more
months of trial time. However, this may be benign. The log shows
that the first thing the restore does is disable the internet, and the
last step it to reenable it. Of course, another cause of the failure may
be an incompatibility between the two Bios settings, though I would think
Windows activation would be independent of this.
This failure
is a disappointment as this would have been a neat (risk free) solution
to activating my new Windows under AHCI bios. Further disappointment is
that it doesn't give any hint as to why it fails to activate after going
through nearly the whole process successfully.
Forum posting on Windows 8 activation
I like the
tone of this 2012 forum posting on Windows 8 activation.
--
As some of you may or may not know, Windows 8 brings many changes to the
activation system that is used to protect the software from piracy. While
effective, most of them just serve to be a royal pain to legitimate users
of the software.
There is no
longer a 30 day grace period before you have to activate, the software
demands activation right after installation. Microsoft, being the
sneaky people that they are sometimes, tried to remedy this by having the
system 'auto activate' right after install without notifying the
user!
I can think
of more than a few different reasons as to why this is a negative change.
The biggest reason is the fact that installing some drivers will actually
cause Windows to think that you have changed your physical hardware and
force you to re-activate (some versions of Intels RST drivers do this
especially). Another scenario where auto activation is bad is in
a test lab environment where you are constantly re-imaging machines and
dont necessarily need to worry about the system being activated or not.
So this guide will be especially useful for those people, and anyone with
a technet account since over the last year Microsoft have reduced your
activations by 70%. This will help you conserve your activations
so you dont end up having to call Bob at Microsofts activation call
center and explain yourself.
Please note,
that an unactivated system will flag itself as non-genuine, so if you need
to test Windows Update or anything else that checks the genuine status
of the install, you will need to activate, but you can do that manually
when YOU see fit, not when Microsoft feels like doing it for you.
So without further ado, here is how to modify your install media so Windows
will NEVER activate by itself without your consent. (His procedure is to
too techy for me. He creates an unattend.xml file that tells the
install what to do, and this .xml file will be used to tell the installer
to disable automatic activation. The .xml file needs to be inserted into
the .iso file.)
Another poster on Windows 8 auto activation
-- We are now forced to enter a key during install.
For those who test their O/S to see if Microsoft's site has all your drivers
for your motherboard by running Windows Updates it's going to activate
whether you want it or not; beware. (This guy was just trying out Wind
Available
versions of Windows 7 (July 2014)
What versions
of Windows 7 are still available for sale and where? A quick search with
Google shows (as usual with Microsoft) totally confusing names. And it's
worse. When I push into items, often they aren't available or the price
changes.
http://www.heidoc.net/joomla/technology-science/microsoft/14-windows-7-direct-download-links#
Product key trick
A Windows
install video referenced a site called 'Heidoc.net'.
It has index of available Window 7 xxxx.iso downloads available from Digital
River, Microsoft's official distribution channel. They point out that a
product key specifies only the type of Windows 7 (Home premium, etc). The
same key can be (legally) used to activate Windows 7 both 32 bit and 64
bit versions as well as Window 7 in other languages.
Money saving trick in shopping for a product key
Because of the availability
of xxxx.iso files free for download (from Digital River), what you are
really shopping for is a product key. Heidoc.net points out the same product
key will activate either a 32 bit or 64 bit version of Home Premium xxxx.iso,
so buy the cheapest. This leads to a money saving trick. I had been looking
only at 64 bit versions of Windows 7 on Amazon, but Amazon also sells a
32 bit version of Home Premium, and at $79 (free shipping) vs $96 for 64
bit, $17 cheaper. Just put the 32 bit disk aside and use the $79 key with
a Digital River 64 bit version of Windows 7 (with SP1), which I have already
burned and installed, now in the trial period. (Prices are not stable on
Amazon, just a week later the 32 bit has risen to $85 and the 64 bit to
$99.)
The cleanest info
is on Amazon, where it says that the retail version of Windows 7 is not
being sold anymore, just the OEM version, and that's pretty much consistent
with what I found looking at Staples, Walmart, and Amazon. The only real
choice is the $96 Amazon Home Premium OEM, which is a [DVD + a product
key]. (Nope, see above) Even this is not totally clean with a few users
complaining that product keys did not come or were defective. The first
time the product key is used to activate an install that product key is
locked to that motherboard, so becomes worthless if that computer dies.
However, purchasing
this 32 bit key might be a good investment. (I ordered it, sold by Majestic
Quality.) With this key plus a DVD burned from downloaded xxxx.iso Home
Premium with SP1 (done), you have an archive that would insure that you
could put Windows 7 on your next computer. It would for example allow you
to purchase a Windows 8 machine and replace it with Windows 7 (though getting
the right drivers might be a little tricky).
I posted this comment (7/25/14 to a 3/13/14 review
of 32 bit OEM Windows on Amazon)
"Actually
you don't need to PURCHASE the 64 bit version to get 64 bit windows. The
unique Windows product key in this package should activate either 64 bit
or 32 bit windows 7 home premium. What you need is the 64 bit Windows 7
home premium OS on a DVD, and it is available FREE from an authorized Microsoft
archive in the form of a downloadable xxxx.iso file (3.2 Gbytes). This
file is burned (by user) to a DVD, and you use it instead of the 32 bit
DVD in this package. It will run 30 days without activation and this key
should activate it.
In
other words what you are really purchasing here is the Windows 7 home premium
product key, since Microsoft makes the actual Windows 7 code freely available
for download. Note Microsoft is not really giving away anything here, since
these downloads need a key to activate them after 30 days. xxxx.iso downloads
are well known in the IT community but are little known to the general
public. To find out about them do a google search for 'Heidoc.net' and
'Digital River'. Some degree of computer skill is needed to navigate this
process."
Amazon
Microsoft
no longer offers Windows 7 Home Premium fully packaged retail product (FPP)
only OEM versions. If you're confident in your installation abilities and
don't need Microsoft Technical Support, Amazon sells Windows 7 Home Premium
System Builder OEM 64-Bit and also a 32 bit OEM version (cheaper). Otherwise,
Microsoft retail product has transitioned to Microsoft Windows 8.1 - Full
Version.
** 79 Windows 7 Home Premium
SP1 32bit (OEM) System Builder DVD 1 Pack (New Frustration-Free Packaging
Packaging)
310 reviews, Sold by TopChoice (free shipping)
* 96 Windows 7 Home
premium with SP1 64 bit System Builder OEM
-- System Builder OEM Windows is intended for Pre-Install on a new PC.
(what the hell does pre-install mean?)
-- This OEM Windows product IS NOT an upgrade product. This Windows product
does not come with Microsoft support
and requires a clean install, which is complicated and will not save anything
currently on the computer.
95
Windows 8.1 System Builder OEM
106 Windows
8.1 Full version
Staples (links to Royal discount)
Some versions are
described as Full OEM! What the hell does this mean?
108
Windows 7 Ultimate retail (When you push into this the price is 5,700
for a 30 pack, limit quantities!!)
74
Windows Professional SP1
90
Microsoft business edition retail (Vista)
102
Windows 7 Home premium with SP1 32 bit OEM
105
Windows 7 Home premium with SP1 64 bit OEM
250
Windows 7 Home premium Full
Walmart
100
Windows 7 Home premium with SP1 64 bit (version not described!), (not available
in my local Walmart!) Horrible reviews. One reviewer says it is OEM, two
other say it is unusable for normal customer.
Casper image tests
I know from
lots of tests that (Casper) clones made under one bios setting will only
boot with the bios set the same as when it was installed. In other words
it is not possible to use Casper clones to translate my old windows
setup from Raid to AHCI, but I wondered if images might do the job. So
I set out to answer two questions:
* Can a Casper image translate my old windows setup from bios Raid to AHCI?
* Does a Casper image preserve Windows activation?
For a clean
test I didn't use the SSD. I made images/clones and restored only on partitions
on the 750 Gbyte hard drive in an esata connected enclosure. I started
with a new windows clone (under AHCI) on the upper partition of
my Enclosure drive and an old windows clone (under RAID) on the
middle partition of my Enclosure drive. I verified that both of these clones
were bootable when the bios sata setting matched the clone.
I then used
Casper to make an image of old Windows (50 Gbytes), storing it on the upper
partition of the Enclosure drive which had lots of free space. I then changed
the bios sata setting to AHCI and booted up in the Casper recovery environment
from my bootable Casper flash drive. I had Casper restore the old windows
image made under RAID to the Enclosure lower partition (wiping out what
was there). I was hoping that Casper's image restore might adjust the setup
to match the bios setting during the restore. Nope.
The restored
image (successful said Casper) of old Windows (made under RAID) on the
lower enclosure would not boot with bios still set to AHCI. I then
changed the bios to RAID, and the newly restored old windows image on the
lower Enclosure booted. This allowed me the answer the second question.
After having reading that a poster who regularly does (non Casper) image
backups, said Windows activation got lost about 95% of the time, I wondered
if a Casper image and restore would preserve Windows activation. It did.
The restored image of old windows on the lower Enclosure partition was
'activated' just like the clone from which the image was made.
Bottom line: Neither Casper image/restore nor a
Casper clone will translate the old Windows setup made under RAID to the
newer AHCI bios setting. Both Casper clones and Casper image/restore (in
my experience) do preserve Windows activation status.
Existing baseline computer
Here's the
key technical specs my existing Windows 7 desktop [HP Pavilion p6510f]
(bought at Staples 2010 for about $450)
[Used HP p6510f can be bought on Ebay for 274 + 30 shipping (or best offer)]
CPU
2.8 Ghz, quad core (AMD)
Dual monitor support
VGA + DVI digital monitor connector (built-in ATI video support for dual
monitor)
Expansion
6 sata2 connectors (4 free), lots of free slots, rear brackets, and memory
expansion connectors
USB
six USB 2 (on motherboard)
Enclosure
full size desktop (midsize ATX, Height: 38.7 cm (15.23 inches), Width:
17.5 cm (6.89 inches)
Length: 41.4 cm (16.29 inches)
Power supply
250 watt
Customization (mine)
Dual (passive) esata bracket, PCI-E card with four USB 3 ports, 4 => 6
Gbyte memory
(currently have two internal HDD, but I plan move one to fan cooled esata
enclosure)
External
240 Gbyte SSD in external esata/USB 3 2.5" enclosure (my main drive), two
2 Tbyte, 5,400 rpm,
USB data hard drives, new 1 Tbyte, HHD (7,200 rmp) (originally planned
as 2nd internal drive,
but to be moved to external USB3/esata fan cooled 3.5" enclosure)
Buying a new computer -- new thoughts (Aug 2014)
I like my
system now, so what would I need to buy if my existing computer died to
have something about the same? My four external drives (two USB data,
two esata, one SSD and one HDD) could be moved over. (I could leave a clone
on the internal drive of the old machine, so it would still run.)
Buy --- Full
size desktop with expansion capability: spare sata, three rear brackets,
250 watt supply. Fast processor: 2.8 Ghz, quad core (min). Dual monitor
support desired, but not absolutely required (I have not been using it
much lately).
I
am assuming that like most retail PC's it would come with: integrated graphics
and sound support, burnable DVD drive, network card, and wireless support
plus a single HDD drive.
OS: Windows 8 or Windows 7 ???
Modify ---
Open case add one dual (passive) esata bracket. Not essential but probably
a good idea to also add a 2nd dual esata bracket and a quad USB 3 card
(can never have too many USB ports). A 2nd esata bracket would support
adding a 2nd SSD in future. Maybe expand the memory a little (cheap). (While
it's easier to do all internal upgrades at the same time once the case
is open, the only update that needs to be done right away is adding the
dual esata bracket to allow the SSD to be configured as the main drive.)
Result ---
With two external connected esata drives plus the original internal sata
drive I would have mucho partitions on three physical drives, so
plenty of storage for multiple clones, and all these clones are bootable
since these drives are all are connected via sata or esata to the motherboard.
(If anything this is a little overkill, but I already bought a 2nd HDD
and fan cooled esata enclosure for it. The external HDD drive could do
double duty holding clones and data.) Most data (as now) would be stored
on a large USB drive (partitioned to separate video from other data) connected
via USB 3. This primary data drive is backed up by second large USB drive
that holds clones of the primary data drive partitions. (Currently the
backup data drive is USB 2, but in future would be upgraded to USB 3).
Not that important
as they are fixable is the HDD size, memory size (though figuring out what
to buy is a hassle), # of USB ports (3 and 2). (More than 2 USB ports on
front would be a plus.)
OS: Windows 8 or Windows 7?
This is a
critical decision and needs work. I am much less concerned about buy a
machine with Windows 7 pre-installed than I was a few months ago, since
I now know how to install (bloat free) Windows 7 and keep it running in
trial mode. In addition I also have 'on the shelf' a legal Windows 7 Home
Premium Windows product key that I bought on Amazon, which I could use
to permanently activate a new Windows 7 install.
Would it make
sense to buy a Windows 8 machine (more choice) and add in a Windows 7
Would my AHCI clones work on new machine?
Another biggie
in terms of the amount of effort to set up a new machine is whether a clone
made on my existing machine would run there. I am thinking here, of course,
of a clone of my Windows 7 version running in trial mode, which, never
having been activated is not tied to any motherboard. The big unknown
is the BIOS! Windows 8 machine (maybe new Windows 7 machines too?) have
a new type of speced bios. I have every expectation that this will block
moving a clone from my current Windows 7 and having it boot. (Same way
Raid to AHCI killed the clone and I can't move a clone to my older portable
which has no AHCI (or Raid) bios mode.
The big unknown
is that the new bioses have a legacy support mode. How well does this work?
Do some research on this. Also research what bios is available on new Windows
7 models. (Amazon reviews of SSD might be helpful here.)
Off the top
of my head, putting aside the bios uncertainty, a Windows 8 machine (with
its Windows 8 key) converted to dual boot Windows 7 might be fun. I should
be able to run it in Windows 7 mode for as long as I like, yet I would
have Windows 8 available as a boot option to play with and learn. This
might be fun. Am I missing anything here? Research dual booting Windows
7 and 8.
My biggest
concern in buying a Windows 8 machine and planning to run Windows 7 on
it, might be that Windows 7 drivers are not available for it! I suspect
this is unlikely, but still. See if I can research this too. On the HP
support site I checked the specs of the Windows 8 HP ENVY 700-210 Desktop
(below) and it lists drivers for Windows 7, and simularly the Windows 7
machine also has Windows 8 drivers.
HP candidates on Amazon (Aug 2014)
I researched
these two on the HP support web site and they are pretty close to what
I have. I see four sata ports on booth (Ok), both have two monitor connectors
(which doesn't necessarily mean dual monitor support!) and lots of USB
ports (mixture of USB 2 and USB 3) and large power supply. Both have same
four option slots. The cheaper Windows 7 has only two memory slots,
which may or may not be expandable, it depends on how it is stuffed. Don't
know how to decode CPUs yet. The Windows 8 has an AMD with quad core. I
suspect the weak points of the cheaper Windows 7 is a slower CPU. Cores??.
Intel i3 is dual core and i5 is quad core (as is i7) and (maybe) no way
to expand the 4 Gbytes of ram.
Windows 8 $500
HP ENVY 700-210 Desktop Amazon
link HP
support page
Windows 7 $450 (now $400)
HP Pavilion 500-281 (500-205t) Amazon
link HP
support page
New
Windows 7 computer candidate (July 2014)
Windows 7
machines are still sold. At first glance a cheap computer with Windows
7 might seem an attractive alternate to buying a Windows 7 disk. All Windows
7 computers (even refurbished) come with a Windows product key. But upon
a little reflection, if this computer is too crappy to really use, the
key essentially has no value. The reason is that the unique Windows key
on its sticker will be an OEM key. It can only be used to activate Windows
(same version) on that specific computer.
I did a quick
search to look for a modern, reasonably priced, full size (expandable)
desktop with Windows 7 (Home Premium). I found an HP candidate below, which
is currently sold at Amazon and other vendors A medium price machine like
this to be converted into a robust multi-drive clone backup system needs
to be expandable, because it will not come with esata ports or more than
one internal hard drive, which will be an HDD drive. Hence it needs to
be a full size desktop. The Acer is a low end Windows 7 small desktop with
some limited expansion capability (though don't know about sata ports).
$450 (now $400) HP Pavilion 500-281
(500-205t)
Amazon
link HP
support page
$380 Acer VX2631-UR10 Desktop Amazon
link
Is it expandable?
It doesn't
take long to see how poor computer specs are, especially if you are interested
in opening up the machine to add stuff. Try to find out if there are spare
sata ports, sata speed, something about the bios, empty disk bay. This
type of information is almost impossible to come by. It is missing even
from detailed specs. Amazon specs are the worst. As one reviewer complained,
Amazon doesn't even show a picture of the rear of the machine (nice view
of the sides, though!). (Cheap desktops in the 300 range tend to come sealed
up, with no expansion slots, which a picture of the rear of the machine
would reveal.)
Go to HP support page
With
HP machines the best thing to do to assess expandability is to go to the
HP support page. Even the detailed spec here doesn't mention sata connectors,
but if you poke around, you can find a picture of the motherboard. While
the resolution is not that high, you can count the sata connectors. My
existing HP Pavilion has six sata connectors. I see four on the HP Pavilion
500-281. Two are probably occupied, one by the internal hard drive and
a 2nd by the DVD drive. The two free sata will allow two additional bootable
drives to be added, either a 2nd drive internal and an esata external drive
or two external esata drives. A little tight, but probably OK.
You also find
here a picture of the rear connectors and count the memory slots. But even
on this HP support site there no info on the sata speed specs not (importantly)
the bios.
Motherboard comparison -- HP Windows 7 $400-500 machines
Here's the
pictures from the HP support site of my existing Windosw 7 HP Pavilion
p6510f motherboard (three years old) and the 2014 model Windows 7 HP Pavilion
500-281 motherboard. The size of both boards is 9.6" x 9.6" (Micro-ATX).
The major difference in terms of expansion is that the 500-281 has only
four SATA connectors (vs six) and two memory slots (vs four). The rear
expansion sockets are the same. Both have dual monitor outputs. The 500-281
has 8 USB ports (4 USB 3 (two front) + 4 USB 2) vs 6 USB 2. While the 500-281
with 4 MB ram installed supports 8 MB the specs say it is not expandable,
which means both slots have 2 MB cards, so memory expansion would require
(at a minimum) that one of the 2 GB cards be replaced with 4 GB card.
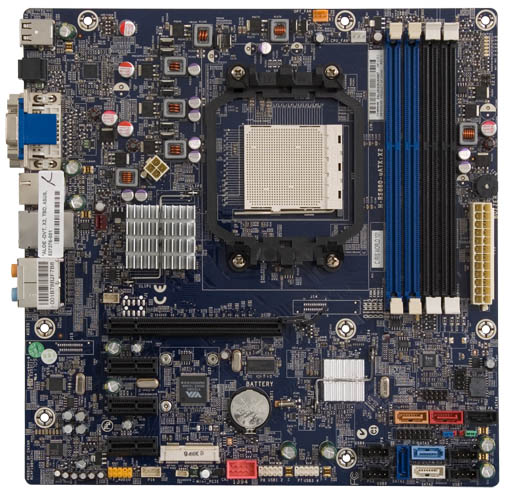 .
. 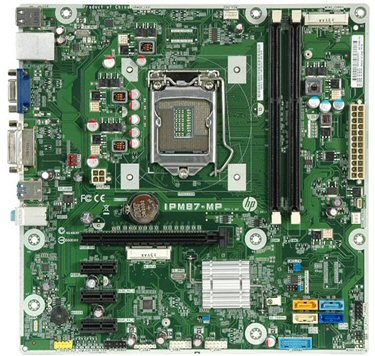
HP Pavilion p6510f (2010, my current machine)
HP Pavilion 500-281 (2014)
Sata connectors are the different colors (with hooked
center piece) in the lower right hand corner of both boards.
There are six on the HP Pavilion p6510f and four on
the HP Pavilion 500-281.
Buy Windows 8 machine and add Windows 7 as dual boot
What about
buying a Windows 8 machine and adding Windows 7 with a dual boot? Off the
top of my head this seems very interesting. I've now searched and moderate
price Windows 7 machines that expandable are hard to come buy. The HP 500-281
above is really all I found. There are tons more choices with a Windows
8 machine. Adding Windows 7 from xxxx.iso DVD should be straight forward.
It could be operated for nearly four months without activation allowing
a good comparison of Windows 8 to Windows 7. I have already purchased an
OEM windows 7 DVD with key that would allow me to activate it. This would
use up my Windows 7 key, but the machine would come with an OEM Windows
8 key.
Moving Windows 7 clone to a different machine
A new machine
brings up the question of whether my now nicely optimized Windows 7 under
AHCI bios could be cloned to the new machine. I am thinking of an unactivated
Windows 7 clone derived from an xxxxx.iso DVD. Once activated I suspect
strongly a clone would not run in a new machine. This would be a way to
avoid buying Windows, so I am sure Microsoft must have shut this down.
I am at this point just not sure how. There must be some point (maybe at
boot) where it must check to see if it is running on the same hardware
it was activated on. (Research this). But I would think an unactivated
version would be OK.
I am pretty
sure another requirement of a new machine is that it have a bios option
of AHCI. From reviews I see of SSD I suspect new Windows 8 machines have
this option. On the other hand there is a new type of bios being used in
new machines, so this may be a show stopper.
There is the
further (and maybe big) problem of drivers. A windows 7 clone from one
machine moved to another machine is going to need drivers. I can foresee
big problems if the clone is looking for a built-in video mode that does
not exist in the new machine. This risk might be lessened if the new machine
is an HP machine like the machine on which the clones were made. One work
around might be to uninstall the HP drives from the clone in the old machine
before moving it to the new machine. The xxxx.iso install comes with basic
drivers, (somehow) go back to these. Then in the new machine go to the
HP site and download the required drivers. (I should research this
general topic.)
Moving clone of Windows 7 install on Vista
portable back to HP desktop test
Just for fun
I cloned my (simple) installation of Windows 7 on my Vista portable to
my 64 Gbyte flash drive. I then plugged it into my desktop machine and
tried to boot to it, after entering the flash memory into my boot options
with EasyBCD. The older Vista portable has a different bios with no RAID
or AHCI sata setting, so I had little expectation that the clone would
boot. I got some strange results.
When it did
boot on first try (under bios setting of AHCI), I was very surprised, and
I found at least some programs were working (couldn't connect to internet).
After a few minutes the 'not genuine' text appeared in the lower right
corner, again not surprising, because I was moving an install (even though
in trial period) between machines. When I checked properties, I found no
days left on trial, but rearm count was still five, so I issued the rearm
command (slmgr /rearm) to give me 30 days. And a strange thing happened,
it never booted again. I changed the bios to IDE, thinking legacy bios
might allow booting, but again no boot.
Limitation on number of boot entries?
I ran into
an interesting boot quirk, something I have never seen mentioned in articles.
When I added the 64 Gbyte flash to the boot menu list using EasyBCD, as
a new entry it showed up at the end, 7th entry. Added successfully said
EasyBCD. Yet when I booted all the original (six) boot entries were there,
but the new one was missing. Verified menu list with EasyBCD, another boot
and same result. Suspecting there might be a limit on the number of Windows
7 boot options, I deleted one of the original six entries, which moved
the 64 Gbyte flash to the 6th position, and now it showed up as the last
boot entry.
The conclusion
appears to be that the maximum number of boot options supported in Windows
7 is six, which curiously EasyBCD doesn't seem to know about.
Bios sata options
My HP desktop
has three bios sata options: RAID, AHCI, IDE. As far as I can tell, my
HP Windows 7 computer came from the factory in 2010 with the bios sata
setting RAID. I say this because I had no reason to adjust this bios setting
and looking at it after my big reinstall of Window 7 a few months ago following
my hard disk developing bad blocks, this is the bios setting I found. The
computer was never actually using a RAID array (it had only one hard drive
with the standard three partitions (System, OS, Recovery). A complication,
which I have never see explained, is that since my computer has an AMD
processor its RAID drives are considered to provide AHCI support, are some
sort of RAID/AHCI hybrid, whatever that means.
All the references
on SSD said the bios sata setting should (or must) be AHCI. One of the
reasons given was this setting was necessary to support Trim, which is
support for SSD garbage collection that is built into Windows 7. Hence
when I bought and installed an SSD my plan was to switch over the bios
to AHCI. In fact I found I had little choice because (no matter what I
did) the SSD drive remained invisible to the OS when the bios was
set to RAID.
In contrast
IDE is barely mentioned in references, which usually only say it is there
to provide legacy support. I don't ever remember reading any discussion
of what IDE is missing, or how it differs from the other bios sata settings.
Consequently until recently (Aug 14) I never even tried the IDE setting.
I had my original set of closes from my first install operating under RAID,
and my second set of trial Windows 7 clones operating under AHCI.
Testing
IDE bios sata setting (8/14/14)
I finally
popped the bios sata setting into IDE and took a look. First surprise is
that my AHCI clones booted and appeared to work normally and all drives
were visible. However, the RAID clones would not boot, so IDE seems
to be more like AHCI than RAID.
I suspected
that operating under IDE there were problems or limitations not readily
apparent. For example, that SSD Trim was now disabled. Using the command
box Trim support can be queried [fsutil behavior query DisableDeleteNotify],
which yields 0 = Trim enabled or 1 = Trim disabled. When I run this
command with IDE, I get a 0, indicating that Trim is enabled. This contradicts
what I have read.
I have not
tested this, but one reference says that IDE drops the sata transfer rate
back to sata 1 value (150 Mbit/sec), whereas AHCI will set transfer rates
at sata 2 (300 Mbit/sec) on nearly all machines or sata 3 (600 Mbit/sec)
on newer machines. This difference might show up in boot times or transfer
rates of large files. However, with more testing I don't think this is
true on my machine. Normally in RAID or AHCI mode my bios also shows a
sata (rate) setting [Sata 1 -- Enable/Disable], but when I switch the sata
mode to IDE, another entry appears in the bios [Sata 2 -- Enable/Disable].
When I was doing my IDE tests, both of these were enabled.
I think this
means my motherboard very likely supports a sata 2 (300 Mbit/sec) transfer
rate. That AHCI or RAID mode, by default, enable the sata 2 rate, which
is why it disappears from the options. In IDE mode there is the options
to enable/disable the sata 2 rate. It had always confused me why there
was only a sata 1 enable/disable option in AHCI (and RAID), but I think
now it all makes sense.
Bottom line --- At this point I see no advantage in changing
the bios sata setting from AHCI to (older) IDE. At this point IDE with
sata 2 enabled they seem to work the same, or nearly the same. (AHCI may
have some queing and hot plug advantages, but these seem like minor issues.)
AHCI vs IDE
After doing
my own tests and finding the OS on SSD appear to work under IDE pretty
much the same as AHCI, I did a search of 'AHCI vs IDE'. Some forum posters
simple dismissed it, saying it was there to support the old pre-sata days
of drive attached with wide ribbon cables. These are the comments I had
remembered and why I initially paid no attention to IDE. But with more
digging I find these comments:
-- There's not going to be a whole LOT of difference
between the two (AHCI and IDE), although the AHCI protocol used for for
SATA includes some additional performance options that IDE doesn't support.
For new systems there really is no reason to use IDE, it's there solely
to support older hardware or software drivers such as those included in
Windows XP. Warning - if you installed Windows with the BIOS configured
in IDE emulation mode, switching to AHCI (SATA) mode will render it unbootable.
There's a relatively easy fix for this which I can post if you need it.
-- Wrong, it's not a dying interface. There is a huge
market for IDE replacement SSD drives in older computers, especially laptops.
The performance increase will be considerable for any software which requires
overlaying from RAM to mass storage. Want a faster machine? Happy
with what your existing one does? Slap in an IDE SSD. Companies like OWC
recognise this with their IDE/ATA SSD.
Ideas to speed a new installation of Windows
Since realizing
that a major limitation of various backup and clone schemes, virtually
untalked of in the press, is the system bios (and SSDs), some reinstalling
of Windows may be unavoidable. So the question arises how to make this
easier? By trial and error I have found that maybe half the program
I regularly use can just be copied over and will work. Is there a way to
pull together copies of these 'copy over' programs? The first step is to
see make an inventory and find their location.
Desktop shortcuts
are another possible group of items that can perhaps be copied over. These
come in two groups, those that link to OS utilities (like sndvol) and those
that link to programs. I did a lot of googling to find where shortcuts
live and nothing. So I decided to run a test. I right clicked sndvol shortcut
and copied it to 'Temp' folder, then deleted the shortcut. When I went
to paste the shortcut back up popped this message: 'Could not find this
item. It is no longer located at:
c:\user\don\desktop
Above seems
to be what I was looking for. This is potentially a very useful directory.
It appear to contain all the shortcuts I have on my desktop. All are 1
to 3 Kbyte in size except (for some reason) 'regedit', which is 14 Kbyte.
Testing [c:\user\don\desktop] folder
I ran some
tests and found when I deleted a shortcut on my desktop, it disappeared
from this directory. Conversely when I pasted a shortcut into this directory
it appears (immediately) on my desktop (and worked properly). Ok this seems
simple.
But then
I ran some more tests, bigger tests, and I got contradictory results. I
renamed the shortcut directory (c:\user\don\desktop2), and my desktop was
unaffected! I removed the entire shortcut directory, same result. I deleted
half the files in the shortcut directory and again my desktop was unaffected
(even after a reboot). All the shortcuts were still on the desktop.
I was baffled. It seemed from the bigger tests that must be a backup somewhere
(the desktop itself?).
Thinking about
this, the tool to find a potential backup directory was probably my superb
search utility 'Agent Ransack'. I can specify it only list files that have
changed after a specific minute. Just change the desktop, and it will show
me what files have just changed. I did this (several times) and each time
the directory ['c:\user\don\desktop'] would change, but when I looked for
any other files that changed at exactly the same time, there were none!
Still baffled.
I next selected
(hold down left mouse key) a bunch of desktop icons and deleted them (emptied
the recyle bin too), and this change stuck. The selected shortcuts were
gone from the desktop and were gone from [c:\user\don\desktop] directory
and were remained gone after a reboot. Based on my tests desktop shortcuts
appear to work like this:
a) All desktop
shortcuts are found at [c:\user\don\desktop] folder
b) Shortcuts
added or deleted from the desktop are reflected in [c:\user\don\desktop]
* c) Shortcuts deleted in
[c:\user\don\desktop] do not affect the desktop
(key result --- explains early test results)
** d) Shortcuts copied (added) to
[c:\user\don\desktop] appear on the desktop
(key result --- quick way to set up desktop)
While I haven't
done a systematic series of tests to confirm the above picture, it does
makes sense. The normal user would be adding and deleting shortcuts on
the desktop, so no problem here. The fact that deletion of files from [c:\user\don\desktop]
doesn't affect the desktop is probably a robusting restriction added by
Microsoft. The desktop has to be very robust. (I still don't know where
the desktop shortcuts are stored, but I saw hints in one article that it
might be in the registry.)
However if
c) above is right, then a new Windows install (on same machine) could be
speeded by copying over the contents of [c:\user\don\desktop] folder, restoring
much of the desktop in one fell swoop. This can be tested: from desktop
delete all (or nearly all) the shortcuts. Then add them back by adding
the files to [c:\user\don\desktop], and for good measure I will store this
folder in a different partition. (I am doing all these tests on my SSD
upper partition clone, so there is zero risk of losing any info. Another
plus for clones.)
I ran the test
and it was a success. I deleted from the desktop nearly all the shortcuts,
confirming they were also gone from [c:\user\don\desktop]. I then copies
the contents of [c:\user\don\desktop] from SSD lower partition that I had
archived into [c:\user\don\desktop] of the clone SSD upper partition and
all the desktop shortcuts returned! The only thing not preserved was the
desktop location of the shortcuts, they all clustered on the left side
of the screen.
Bottom line: This is good news. It means that I
can indeed speed the setting up the desktop of a new (identical) install
of Windows 7 by copying the contents of folder with desktop shortcuts [c:\user\don\desktop]
from an existing installation into the new installation!
Copy over programs
As I have
gone along setting up new Windows, I have kept notes on which programs
(that I use) that don't need to be installed. One complication is that
they are not (now) in the same folder, but I am not sure how important
this is.
Can be copied over (and will work)
Paint Shop Pro 8
root
The KMPlayer
root
Netscape 4.8
root and Program files (x86)
inSSider 2.0
Program files (x86)
MiViewCap (Cosview, digital microscope utility)
Program files (x86)
HP hardware diagnostics, PC-Doctor for Windows
Program files
I tried moving
the three files not in Program files (x86) to Program files (x86).
Two of the three ran, only Paint Shop Pro threw an error (missing library)
when moved out of the root.
------------------------
Script programs
AutoHotKey (keyboard vol)
root
Create Restore point
c:\speed\spfiles\CreateRestorePoint.vbs
Might work
EasyBCD (NeoSmart Technologies)
Program files (x86)
ACDSee 7.0
Program files (x86)
Lightscreen
Program files (x86)
Magical jelly bean (key recovery)
Program files (x86)
Rather than
testing programs one by one I am beginning to suspect that the quickest
way to figure out what can be done would be to just copy over most programs
(and data directories) plus the shortcut folder [c:\user\don\desktop].
At a minimum this should bring over all the shortcuts to OS functions.
Desktop shortcuts could then be tried to see which programs work. If they
don't work, those program folders need to be deleted and the programs installed
installed. Of course this presumes that an existing copy (clone) of the
new Windows exists and is accessible, something that in general would not
be the case.
Bios block
It is really
quite amazing. I have been reading these detailed forum threads on system
recovery. My experience of severl months is that a bios change is a total
obstacle to recovery. (At least everything I have tried has not been able
to get around it.) Yet in everything I read about Windows recovery, the
issue of keeping bios unchanged is never even mentioned! No one seems to
recognize it for the huge problem it is, especially with SSD becoming more
popular.
MBR (master
boot record) --- In a forum picked up some good info on the MBR and recovery.
MBR is the first 512 bytes on the hard disk. It does not live in
the System partition. Windows and Marrium images include MBR so when the
image is recovered it overwrites the MBR with the one from the image. This
explains I think why the bios setting can't be changed. I think the bios
sata setting determines how the MBR is read, where the system partitions
are located.
Changing from RAID to AHCI forum posting
I have been
down this road before and this is not a solution to my problem.
I
believe I have the solution to your problem and I verified it against a
Dell machine that has similar controller with your machine. Changing from
AHCI to RAID, http://support.microsoft.com/kb/922976
fix will work. (This Window posting is titled: 'Error message
occurs after you change the SATA mode of the boot drive' yielding error
message: STOP 0x0000007B INACCESSABLE_BOOT_DEVICE)
Changing from
RAID to AHCI, you need one more step. Msahci driver requires Atapi.sys
miniport to be loaded during boot as well. So you need to change the Start
value to 0 for both of the following entries in your registry. You can
use regedit.exe utility.
HKEY_LOCAL_MACHINE\System\CurrentControlSet\Services\msahci
HKEY_LOCAL_MACHINE\System\CurrentControlSet\Services\atapi
For example, assume that you install Windows Vista or
Windows 7 on a computer that contains a controller that uses the Pciide.sys
driver. Later, you change the SATA mode to AHCI. Therefore, the drive must
now load the Msahci.sys driver. However, you must enable the Msahci.sys
driver before you make this change. This issue affects only the boot drive.
If the drive that you change is not the boot drive, you do not experience
this issue. (msahci.sys is in my drivers folder, but disk manger says new
Windows, which is running fine AHCI, is using 'disk.sys' disk driver)
Totally new approach to enable AHCI in Windows 8
This is procedure
is rather odd. Windows is commanded on next boot to boot into safe mode.
On this boot the bios is entered and the sata setting changed to AHCI and
the boot continues to safe mode. The command to boot to safe mode is reversed
and on the next boot Windows 8 will boot with bios set to AHCI. In other
words the change of the bios setting to AHCI is done in safe mode.
As written
this doesn't seem to apply to Windows 7 because 'bcdedit /?' does show
any safeboot command. However, there is a way in services to get windows
7 to boot into safe mode: [msconfig, boot tab, safe boot, minimal].
A
lot of feedback has been given with our visitors sharing different levels
of success on the below method. The method had worked for me and some users
but an easier version for Windows 8 is below which seems to work for everyone.
(Thanks Marcel!)
1) In search, write cmd, right click it and run it in
administrator mode.
2) Type the following command to enable SafeMode boot:
bcdedit /set {current} safeboot minimal
3) Restart the computer and boot to the system BIOS.
This is normally done by by pressing the delete key during system boot.
4) Update the ATA Drive setting in the BIOS from ATA
Mode to AHCI Mode. Save the setting and restart your computer to boot into
Windows.
5) Windows will boot in SafeMode as per step 2.
6) Open the command prompt again by following step 1
and run the following command to remove the the SafeMode boot option:
bcdedit /deletevalue {current} safeboot
7) Restart the computer and boot normally.
I tried this safemode bios change approach,
doing the opposite, changing the bios to RAID and trying to boot into new
Windows both on SSD and HDD in my enclosure. Neither of them would boot.
---------------------
Alternate view
This guy appears
to taken a Macrium image of c:\ drive made with bios at IDE, restored it
to an SSD with the bios changed to AHCI, and it booted.
http://windowssecrets.com/forums/showthread.php/151647-Install-SSD-and-keep-SATA-drive-for-data
--------------------------------------------------------------------------------------------
Fixing boot files using command prompt
Got the commands
below from a comprehensive 45 min YouTube video (by Window secrets book
writer). I suspect EasyBCD allows all these commands to be done from within
Windows. Certainly EasyBCD makes editing the (dual) boot menu much much
easier than using BcdEdit. Below I've tried to match up EasyBCD options
with the Command line options.
Strangely I
found on my SSD 'cd boot' yield path not found and 'BootRec' is not recognized?
The explanation must be that these commands are (likely) only available
in Command Prompt window when it is running under the System Recovery environment.
BCD Backup/Repair
a) Reset BCD configuration
[BootRec /FixBoot]
b) Re-create/repair boot files
[BootRec /RebuildBcd]
c) Change boot drive
BCD Deployment
a) Install BCD (into selected partition)
"create bootable media"
[BootRec /FixBoot]
b) Install Windows 7 bootloader to MBR, Write MBR
[BootRec /FixMBR]
BcdEdit /export c:\bcd_backup
boot menu backup
(Boot Configuration Data Store Editor)
c:
cd boot
attrib bcd -s -h -r
renam c:\boot\bcd bcd.old
save bcd file
BootRec /RebuildBcd
rebuilds all boot files for Windows 7
BootRec /FixMBR
write new Master Boot Record
BootRec /FixBoot
write new boot sector to disk
BootRec /scanOS
search for windows installations
BcdEdit
can be used to edit the boot menu
----------------------------------------------------------------------------------------------------
Clone saves me again (7/25/14)
I like the
KMPlayer video player, but it is so darn complex and delicate. Watching
a video I hit some key combination by mistake and suddenly the screen went
BLACK while it contined to play. I have no idea why there would be a black
screen mode. There is no freaking way to recover from something like
this. So I exited and restated KMPlay expecting it would start normally,
but still a black screen, the sucker had apparently saved the bad mode!
Knowing that KMPlayer could be just copied over and would work, I copied
over the entire KMPlayer folder from the SSD upper clone. Still black screen.
Yikes. KMPlayer must have saved the messed up setting somewhere, but I
knew not where. I booted to SSD upper clone and verified that KMPlayer
there worked normally, and it did.
I recovered
by recloning by SSD upper partition clone back to my main SSD drive (lower
partition). I had done a clone of lower SSD to upper SSD just a few days
ago, but still it took 30 min or so preparing, updating all the upper SSD
clone data files that had changed in the last few days, but this did the
trick. Recloning my clone fixed KMPlayer.
--------------------------------------------------------------------------------------------------
Adding Windows 7 to a Windows 8 machine as dual boot
I have avoided
(until now) reading anything about Windows 8, but my search for new Windows
7 machines has shown very limited choices, so I have dipped my toe into
Windows 8 to explore adding Windows 7 as a dual boot.
First look
at Windows 8 is the video below and my reaction is HOLY CRAP everything
bios related is changed, and why, just for the hell of it! Just getting
to the bios screen in Windows 8 (according to this video) requires incredible
conniptions. It's like 15 steps with reboots, turn off auto booting, turn
off fast booting, and (cryptically) to be able to boot to Windows 7 you
need to choose something called 'CSM' boot mode, which is some sort of
legecy compatibility mode. (Well that's sure clear!)
Youtube video
on all the steps required to change bios and add dual boot for Windows
7 on a stock (retail) Windows 8 machine (Toshiba).
http://www.youtube.com/watch?v=fnJVZ5xGF9M
-- To get into
the (Windows 8) BIOS, open Settings, then select General. Under Advanced
Startup, click on Restart Now. This will restart your computer into the
boot menu.
-- CSM booting:
For backwards compatibility, most of the UEFI implementations on PC-class
machines also support booting in legacy BIOS mode from MBR-partitioned
disks, through the Compatibility Support Module (CSM) which provides legacy
BIOS compatibility. In that scenario, booting is performed in the same
way as on legacy BIOS-based systems, by ignoring the partition table and
relying on the content of a boot sector. (Wikipedia UEFI, Unified Extensible
Firmware Interface)
-- Genuine
Windows 8 units do have new BIOS options called; "Secure Boot" and "UEFI
Boot". These options have to be changed if you want to boot from an external
device like an USB stick or a bootable CD-media. Please change the option
"Secure Boot" to "disabled" and the "UEFI Boot" to "CSM Boot" in
order to allow the system to boot from external devices. (Toshiba)
-- One of Microsofts
new rules for Windows 8 is that any manufacturer that ships a windows 8
computer must enable UEFI secure boot by default. The UEFI BIOS is created
for Windows 8 and if you need to use other system like Windows 7, Linux
or any other OS, you have to disable the UEFI BIOS and Secure Boot options.
(As it comes from the factory, a Windows 8 machine won't boot from a DVD
or a bootable USB flash drive.) UEFI boots directly into Windows 8 without
giving you any (function key) options to change boot order, enter setup,
enter bios, etc. Essentially you must disable the UEFI boot to get access
to the usual bios. (However a video on an HP Windows 8 machine does appear
to show getting into bios by holding down F10 while booting.)
-- Windows
8.1 Enabling AHCI after installing Windows (several steps of
command line entries!)
Look at this list, which is what is in the video. (Notice
how obscure many of these selections are, not at all logical, it's a crazy
sequence that must be learned and remembered, nobody would ever figure
this out:
To enter Setup Utility:
(1) Open the Charm Bar by pressing Windows Key-C
(2) Click on Settings
(3) Click on Change PC Settings
(4) Click on General
(5) Scroll to the bottom and click on Advanced Startup
-> Restart Now
(6) Click on Troubleshoot
(7) Click on Advanced Options
(8) Click on UEFI Firmware Settings
(9) Click on Restart
To access the Boot Menu:
(1) Open the Charm Bar by pressing Windows Key-C
(2) Click on Settings
(3) Click on Change PC Settings
(4) Click on General
(5) Scroll to the bottom and click on Advanced Startup
-> Restart Now
(6) Click on Use A Device
(7) Click on Boot Menu
-- Windows
8 doesn't really shut down the laptop completely, but puts it into hibernation
state. This is called "hybrid shutdown", and was invented to speedup
subsequent Windows startup. The F2 prompt on startup (to access bios on
Lenovo machines), only appears from a true cold boot. You can force
the system to do a true shutdown by accessing the menu, press and hold
the shift key and while holding it, select shut down. (Another hidden command
in Windows 8)
-- 'GPT disk'.
Microsoft in key instructions say for install repeatedly uses obscure abbreviations,
like 'GPT disk'. I have been working with Windows and booting for months
and I never heard of a 'GPT disk'. I have no clue what this means, and
of course Microsoft does give any clue either. A google search shows 'GPT'
is a type of hard disk partition an alternate to MBR (Master boot record)
partitioning.
-- When installing Windows 8.1 on UEFI-based
PCs using Windows Setup, your hard drive partition style must be set up
to support either UEFI mode or legacy BIOS-compatibility mode. For example,
if you receive the error message: Windows cannot be installed to this
disk. The selected disk is not of the GPT partition style, its because
your PC is booted in UEFI mode, but your hard drive is not configured for
UEFI mode. Youve got a few options:
* Reboot the PC in legacy BIOS-compatibility
mode. This option lets you keep the existing partition style. For more
info, see Boot to UEFI Mode or Legacy BIOS mode.
* Reformat the drive for UEFI by using the GPT partition
style. This option lets you use the PCs UEFI firmware features. You can
do this yourself by reformatting the drive using the instructions below,
or if you need to preserve the data, use a third-party utility to convert
the drive to GPT format. (I looked and my AOMEI disk partition software
has an option to convert between MBR and GPT disk.)
UEFI tutorial
Stumbled onto
this (long) excellent tutorial on booting (written by 'AdamW'). Explains
clearly how bios booting works, its many limitations, and how the new UEFI
standard works. Bios was a defacto standard, everyone just did it
like the IBM PC had done in in the 1980s. UEFI is a written standard (link
to standard included) for how to do do booting, pioneered by Intel, but
supported by a consortum of vendors (including Apple).
Bios Booting
It works,
in fact, in a very, very simple way. On your bog-standard old-skool BIOS
PC, you have one or more disks which have an MBR (master boot record).
The MBR is another de facto standard; basically, the very start of the
disk describes the partitions on the disk in a particular format, and contains
a boot loader, a very small piece of code that a BIOS firmware knows
how to execute, whose job it is to boot the operating system(s). (Modern
bootloaders frequently are much bigger than can be contained in the MBR
space and have to use a multi-stage design where the bit in the MBR just
knows how to load the next stage from somewhere else, but thats not important
to us right now).
All a BIOS
firmware knows, in the context of booting the system, is what disks
the system contains. You, the owner of this BIOS-based computer, can tell
the BIOS firmware which disk you want it to boot the system from. The firmware
has no knowledge of anything beyond that. It executes the bootloader it
finds in the MBR of the specified disk, and thats it. The firmware is
no longer involved in booting.
In the BIOS
world, absolutely all forms of multi-booting are handled above the firmware
layer. The firmware layer doesnt really know what a bootloader is, or
what an operating system is. Hell, it doesnt know what a partition is.
All it can do is run the boot loader from a disks MBR. You also cannot
configure the boot process from outside of the firmware.
https://www.happyassassin.net/2014/01/25/uefi-boot-how-does-that-actually-work-then/
------------------------------------------------------
An email to engineering colleagues about Windows 7
Title: Ruminations
on Windows 7 (8/5/14)
I have a little
info on Windows 7 that's not well known and you might find useful.
I have
been exploring Windows and hard drives intently for months, writing a long
essay and in the process building up a huge setup to play with: three installs
of Windows 7 on two machines each install with its own set of clones, under
three different bios sata settings, one install of windows activated, two
running in trial mode, six hard drives (five rotating, one solid state),
each drive has on av three partitions so effectively 18 drives including
USB drives, sata drives, esata drives, some inside, outside, and in enclosures.
On Windows
7 --- If you want to stick with Windows 7 for a while, it would be good
to plan ahead, as options are disappearing. The only version of Windows
7 you can buy anymore is OEM version. OEM windows is locked to a specific
motherboard and can't be moved to a new machine. You can still buy retail
computers with Windows 7 and this will be an OEM license or for 90 bucks
at Amazon buy an OEM disk with Microsoft license key. I bought this for
insurance. The Amazon OEM key will allow you to install Windows on any
machine, but it will then be locked to that machine.
However,
there is another Windows 7 alternative which appears to be little known,
provided by Microsoft for convenience of Windows developers and IT guys,
but available to all. You can download for FREE from an official Microsoft
channel any version of Windows 7 which is clean (bloat free). It is a one
hour 3.2 Gbyte download xxxx.iso file, which you burn to a single DVD.
You now have a bootable Windows install DVD, which will install to the
partition of your choice. It will run without activation, i.e. without
a windows key being entered, for a 30 day trial period. (This allows developers
to test things and then just delete the install.) I have done this and
used the DVD to do two installs. This is a fully functioning version of
Windows, the only limitations are that it is time limited, and, of course,
it comes with generic drivers. You probably need to go the manuf to get
some drivers specific to your hardware.
But it gets
better. Microsoft allows (by entering a single line in the command box)
the 30 trial period to be extended three times, so Microsoft officially
allows anyone to run any version of Windows 7 on multiple machines for
4 x 30 = 120 days.
It gets
still better. Microsoft restricts the hell out of their licenses, and we
all know their competence leaves something to be desired. (Windows image
backup for example is freaking nightmare.) They keep track of the number
of 30 day trial extensions with a little counter ('rearm count') in the
registry, and surprise (!) they introduced a bug in Windows 7 allowing
the counter to be reset. They then 'fixed' the bug by locking this registry
entry, but someone has cracked the lock.
This
lock crack looked clean to me, so I tried it (twice) and it works! A three
line batch file that you run from the Windows recovery environment resets
the 'rearm count' to five giving you an additional (5+1) x 30 days or six
months.
This means
you can run Windows 7 on any machine for free for 120 days with Microsoft's
blessing. Using the trick discovered to reset the rearm counter you can
add six month extensions without limit, so you can run Windows 7 forever!
This is how I am now running two of my Windows 7 installations. It is true
that once a month you do need to extend the trial period, but since I added
a desktop shortcut it now just a single mouse click.
All the
details are in my dual boot clone essay. Hope this is useful.
Don
========================================================================================================
My Windows 8.1 trial
9/1/14
I had no interest
in Windows 8, so it took me months to stumble onto the fact that Microsoft
offers free for a 180 trial an xxxxx.iso of one (and only one) version
of Windows 8: Windows 8.1 Enterprise. This xxx.iso download is intended
for IT professionals to evaluate the product. You must register, but anyone
is free to download. In size (3.9 Gbytes) and resource demands it is about
the same as Windows 7. While it took two tries to get a bootable version,
I got it installed (on a spare partition on my enclosure HDD) and took
it for a spin. Below are my observation playing with the defaults for a
few hours. I also captured some screen images.
Bottom line (9/2/14)
Windows 8.1 is basically
Windows 7 onto which they have slapped on a tablet interface (Metro) while
adding a lot of annoyances. I find the look of it (flat, spare) crude.
And no compensating advantage, I failed to find a single thing it did better
(for the desktop user) than Windows 7. So while it is usable, it looks
to me to be a step backwards from Windows 7.
First reaction
--- It's just a messed up version of Windows 7 (with a metro overlay slapped
on). Commands which in Windows 7 are all grouped around the Start button,
are now all scattered. And the menu graphics are coarse, poorly organized,
and just plain UGLY. Sorting of directories now requires hunting for the
sort option buttons (embedded in about 50 other buttons). Metro in 8.1
is easy to avoid (well sort of, sometimes the wrong mouse movement will
cause metro features to pop up!). Start button was totally removed in 8,
which everyone hated, so in 8.1 they added (lower left) a (half-ass) quasi-Start
button. If this new Start button is clicked you enter Metro, but if right
clicked it brings up a (crude) listing of programs. It looks like a kludge,
because that is probably what it is. At startup a single click shuts down
the (colorful) metro splash screen and brings up the familiar Windows 7
like desktop. Most of the system commands seem to have filenames the same
as standard Windows and are in the same directories. In other words internally
this is Windows 7.
Metro --- Another
negative. First reaction is it adds nothing for a desktop user except as
a portal to feed me live commercials! Most of the default windows are just
bloatware, I deleted all I could. Some could not be deleted, and I found
one of these was (big) 'live' windows was just an advertising billboard
continually scrolling showing new shit to buy in the Microsoft store. Just
what I need, an advertising windows built into the OS! My programs copied
over created no metro windows, however, the good news is they ran OK (including
Netscape 4.8 which I use to write these essays). Many of the default metro
windows spilled off screen right, I had no idea how to see them.
Annoyances
--- The install would not proceed unless I entered my Hotmail (Microsoft)
password. Now I have to enter my password every time I boot up! I was surprised
one time when I set down the mouse a metro overlay (big and gross) popped
up covering part of my directory (see below). Don't know if there is anyway
to totally kill metro. (I read 'hot corners' can be turned off.) A real
annoyance with Paint Shop is that it does not accurately show the directory
where images are being saved. This does not happen in Windows 7.
(I have to pull up a search utility to find them, and it locates them in
some sort of virtual user directory about four levels deep.) I saved them
to the c:\root, it might be that Windows 8.1 has moved them to protect
the root.
2nd look a few days later (update)
What I find
most annoying on going back to Windows 8.1 a few days later (besides having
to sign in) is the directory sorting. This should be easy, instinctive,
built into muscle memory, but in Windows 8 it's not, because it's not stable,
sometimes the old sort button is there and sometimes it's not and you need
to go hunting. This is really annoying and shows how Windows 8 is a real
step backward, they screwed up simple, basic functions of the OS. And for
what? There's no excuse for this. Also I really dislike the flat, spare,
low contrast look of all the windows and features of the OS. It's ugly!
Drivers --- Here
I ran into a real roadblock. I was hoping I could go to HP support and
get hardware drivers for Windows 8. Nope, one time Windows 8 came up, but
several other times did not, and in no case was there a video driver offered
at HP. My video hardware is integrated on the motherboard (and maybe AMD
specific). HP says if we don't have the driver, get it from then manuf.
Yea, just try it. Once I figured out the video hardware model number (ATI
Technologies RS880) of my hardware (this took forever) I couldn't find
a driver for it on the ATI Radeon site. (I tried the Windows 7 driver,
but it would not install.) I am still operating with the Windows 8 basic
video driver, so resolution choices are very limited and no support of
2nd monitor. Given my experience I think there would be real risk with
drivers (especially for integrated hardware) in trying to upgrade your
machine to Windows 8 (research this).
Video driver (update)
I was surprised
a few days later while Windows 8 was just sitting open, I noticed the screen
resolution had changed. A close look shows that 'on its own' Windows 8
had updated the video driver to the (dual monitor) driver used on Windows
7. When I powered down it took a long time installing 31 updates, so even
though I had tried to turn off automatic updates during install they must
be on, so this is apparently a way to fix a (difficult) driver problem.
Activation ---
The xxx.iso of Windows 8.1 comes with a (default) 25 digit product key,
as do all the Windows xxxx.iso downloads. It claims to have activated during
installation, but whether it called home or not is anyone's guess.
(The installed default key can be read out by Magical Jelly Bean.) The
default run time is 90 days and a check of the rearm count shows it is
'1', so another 90 days is available. The command to check rearm [slmgr
/dlv] is the same as it is in Windows 7.
3rd Windows 8 install
I had read
that the Enterprise xxxx.iso was good for two installs, and this appears
to be right. When for fun I tried a different way of installing it a 3rd
time, it did install, but showed the trial period had expired, though the
rearm count remained at '1'.
Installation ---
I had been through the xxxx.iso download procedure twice with Windows,
so I knew what to do. When I booted the DVD I had burned (on same machine
that wrote it), I got the cryptic error 'missing driver'. Well, that's
helpful, typical Microsoft. A google search brings up a Microsoft page
saying that this error message in the trial Windows 8.1 install means something
is corrupted, either the download file or the burn. So I changed both.
I did a 2nd download (this time the file size was 3.9 Gbytes much larger
than before) and since I had a PNY flash stick with good speed and lots
of room for the first time I 'burned' the xxxx.iso to the USB flash. A
google search showed the easiest way to do this is just download a Microsoft
tool designed specifically for this task (point it at the xxx.iso file
and everything is automated). This worked fine, install time with the PNY
was very reasonable.
Here are some
screen captures I made of my Windows 8.1 Enterprise installation after
I had installed a few programs and shortcuts to the desktop. (For reasons
explained above this is the default basic Windows 8.1 video driver (1,028
resolution)). The three programs I just copied over from Windows 7 [Netscape
4.8, inSSIDer, and Paint Shop pro, plus KMPlayer] all ran fine. These are
all using the default basic Windows video driver.
Here's the Windows 8.1 desktop after I added a few
shortcuts.
Notice it looks just about like Windows 7 desktop
except the (lower left corneer) real Start button (and functions) are replaced
by the quasi-Start button.
(This is the default Windows 8.1 wallpaper, which
I think is not at all attractive.)
Right click of quasi-Start button brings up this (ugly)
set of choices
How freaking stupid are the people at Microsoft?
A recent review
of 8.1 compared how shut down changed relative to the original Windows
8. I would argue that this one example of a commonly used function being
a total kludge in the original Windows 8 is pretty much proof positive
of how stupid the people at Microsoft really are. The 'shut down' menu
entry (above) is new in 8.1
-- "This fixed the ridiculous situation in Windows 8 where you had
to open the Charms bar, click Settings, then click Power to choose the
(shut down) option you wanted." (This idiocy flowed from decision
to break apart all the functions that centered around Windows 7 Start button
and start menu. Common tasks that were previously simple and straightforward
became hidden and buried several levels deep.)
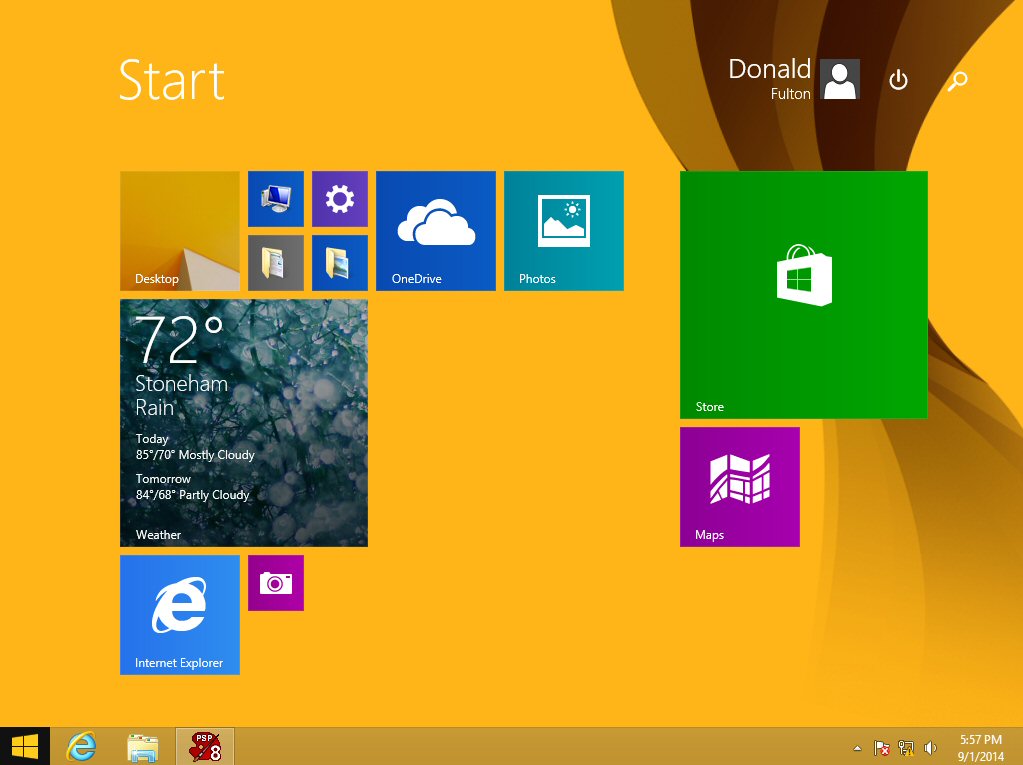
Clicking the quasi-Start button enters metro screen.
Here I have deleted all the bloat screens I could.
(Notice the weather box. The internet is down
when I captured this and this is is the weather for yesterday!)
(Before I set the big green 'Store' box to 'live off'
it was continually scrolling me shit to buy!)
This capture shows
the look of Explorer (rather ugly I think), and along the top is what is
called the 'ribbon'. This is a step backward for the desktop user since
it both takes up screen space and hides the sort button. However, the ribbon
can be minimized (turned off), then explorer works pretty much like in
Windows 7. File search in Windows 8.1 works as badly as in Windows 7.
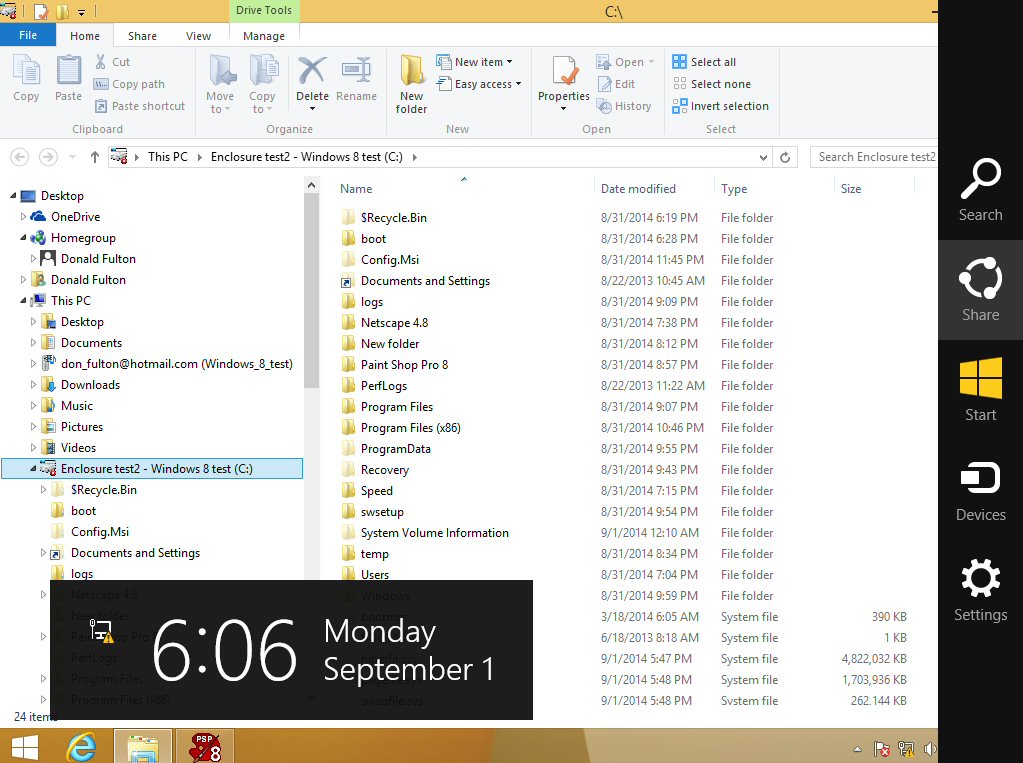
I set my mouse down and its (inadvertant) movement
brought up this (gross) metro overlay.
This is the default sizes. Wouldn't you say the time/data
box is a little LARGE.
(Note no 'pm' after 6:06. I bet the argument is:
the user knows whether it is morning or evening so
why do we need to tell him. This is the spare design plilosophy in action!)
Installing Windows 8.1 again -- surprise
To gain a
little more experience with Windows 8.1 I decided to use my USB flash stick
to install it on an empty partition on my Vista portable, and I got an
unpleasant surprise. When I put the USB stick in, Explorer opened so just
thinking I was saving a little time, I clicked setup.exe. The install started,
I walked away, and only when the install was nearly done did I realized
that it had never asked where to install. It was overwriting something,
but I did not know what as I have several OS on that machine. And I found
there
was no way to stop the install, no cancel or windows close button, no back
button.
When I realized
the install was going to activate windows
during the install and
would not proceed until this was done, I pulled the power to my cable modem.
It soon put up a window saying it could not complete the install, but gave
no way out (even ctrl-alt-del did nothing). So I had to power down and
assummed that when I powered back up I would be at my usual multi-boot
screen, and I could assess the damage. But no, it rebooted directly into
the Windows 8.1 install again which still would not complete if it could
not activate. (infinite loop?) Only when I powered down/up a 2nd time did
I get a message saying installation failed and restoring your old OS. I
then realized that installing from within Windows had caused the install
software to do (without asking!) an 'upgrade' install on that partition.
If I hadn't killed the install, I would have lost my Windows 7 install
on that machine.
Why is Microsoft
software so freaking unfriendly? They put out an evaluation package
that installs one way if booted to (you get to chose which partition it
installs on, and there was the usual choice of an 'upgrade' or 'custom'
install), but another way if started from within Windows, it doesn't ask,
it doesn't warn, it just proceed to replace the OS on what ever partition
the OS is running on. Gees!
How freaking hard are simple things like shortcuts
in Windows?
A huge hole
in Windows (8 and 7), which I have never seen anyone comment on, is that
there is no 'create shortcut' page. One of the most useful type of shortcuts,
if you are a power user, are shortcuts to system utilities. I have a bunch
of them on my desktop, but all Windows provides to create them is a box
where you need to supply a file location. There is no obvious way
to find even the names of files that controls many system functions,
for example volume, much less where they are. You'd think it might be called
'volume', but nope, I remember a couple of years ago it took me an hour
to figure out the filename of the volume box was 'sndvol.exe'. Only with
experience have I learned that most system files live at [c:\windows\system32].
With applications
that are missing shortcuts you need to dig into their folders and make
a guess as to which file to right click, often it's the biggest file, but
not always. The whole process of creating shortcuts, which are key to most
users, is clearly a kludge that's never been given any real thought by
Microsoft. And every shortcut created has the stupid word 'shortcut' in
its name, which I always have to delete. It's also totally obscure (without
a template) as to how create any but the simplest directory shortcuts.
The code needed for a useful shortcut in Windows 8 (since the start menu
is gone) like the 'Run' box, which I added, is truly bizarre (below).
* Make a shortcut to open 'Run' box
Copy this address into shortcut window: %windir%\explorer.exe shell:::{2559a1f3-21d7-11d4-bdaf-00c04f60b9f0}
Gees!
Windows 9 coming
I read Windows
9 will be coming in spring of 2015. Will Windows 8 be looked back on as
Vista, a failure. I suspect so.
Windows footnotes
1) (minor
annoyance) Microsoft having received activation request for my Windows
8 installs had taken the opportunity to start sending me junk emails about
the glories of Windows 8.
2) (more serious)
In a bizarre coincidence two days after my Windows 8 contacted Microsoft
to activate, I got two calls (on the same day) from people with Indian
accents identifying themselves as Microsoft technical support telling my
my computer was infected, had been taken over and shouldn't be used until
it is cleaned. I didn't know what to think, since one of my computers had
just contacted Microsoft, so after the first call, where I couldn't understand
much of what the guy was saying since the tel connection was so bad, I
ran some virus scans which (not surprisingly) all came up clean.
In the 2nd
call a few hours later (better connection) I tell him I didn't receive
any emails about this. He says we can't send you emails because they will
be intercepted, and the only reason for this call is that I didn't respond
to messages they had sent. Sent me messages how, this made no sense, I
now was very suspicious.
Turns out this
is a well known scam. Guys always with Indian accents cold call and identify
themselves as Microsoft technical support. They ask to take remote control
of PC so they can check and clean it. (Boy, that's asking for trouble!)
Try to sell a $300 package. With control of your PC if you don't pay up
they trash your PC deleting your files, even uninstalling your network
driver so you can't get back online!
All this is
captured in some YouTube videos including a 25 min one when they stupidly
called a designer at Malwarebytes (leading anti-virus package). He captured
the whole call including the file deletions and a technician in a message
box signing off with 'bye asshole'. When the guy tells his indian salesman
that the technician has just called him an asshole, the salesman says the
'technician is always correct'!
http://www.youtube.com/watch?v=FDJWixw4TCI
https://blog.malwarebytes.org/tech-support-scams/
----------------------------------------------------------------------------------------------------------------------------------------------------------------------------
Computer
won't boot --- partially fixed (11/28/16)
Major crisis
a few days ago suddenly my computer with quad OS reducancy would not boot!
It hung every time. Prior to this my system was a little flaky reporting
a it had created a paging file at boot and pop up kept telling me to authorize
the format of non-existent drives.
The boot problem
was triggered when my mouse fell off the arm of my easy chair onto the
floor, and it caused an instant blue screen of death. When I tried multiple
times to reboot every time it hung. Finally by playing with F11 (recovery)
quite a few times I got a boot (very marginal). Once in I opened a command
box and ran 'system file checker' (c:\windows\system32\sfc /scannow), which
is very effective because it compares and replaces damaged Widows files
using a backup cache of Windows files. It reported no file errors. I ran
chkdsk.com and it reported no file errors.
Rebooting several
times when playing with F11 (recovery) different things would happen.
Most often boot hung, sometimes it would just boot (once after a 15 minute
delay, be patient!), but occasionally it would 'load files' and bring up
the recovery menu. I chose Windows start utility. It trundled a while said
it fixed something, details showing my OS files were OK, but it had found
an error in partition table (on boot sector I think) and 'fixed' it.
Unfortunately it told me the same thing on another try, so I guess it didn't
fix it. Did a System Restore to a few days earlier. Didn't help,
which is not surprising because all it does if fix system files. Also used
F8 to boot into Safe mode, but this didn't help either.
A boot sector
or partition table error makes sense. The boot code has to know where on
the disk to look for the partition selected. This would explain not booting
yet all the windows files are Ok. Stumped and with booting very marginal,
when I did get a boot I resolved as a workaround to not shut off the computer,
and I ran this way with no problems for several days.
Key is ' Re-create/repair Boot files' tool in EasyBCD
I dug into the boot
utility EasyBCD, whose name I had forgotten. Ran as administrator and rediscovered
under 'BCD Backup and Repair' the option to 'Re-create/repair Boot files',
so I clicked on it. This didn't completely solve the problem, but clearly
it helped. After this the system always booted (see caveat), albeit
abnormally slowly, it usually pauses for 1-3 minutes, but it boots. However,
it boots, but only from an unpowered state. It still hangs on a
'Restart'. I could let it power down or force a power down, still boots.
I have been able to boot to the OS at SSD (upper partition).
So that's were
I stand. I have a method for reliably booting. It as not hung once in a
couple of days from a cold power off state. But clearly the booting
is not clean. The only thing I can think of to do next is to do a clean
install of Windows on one of the two stolid state drives (probably SSD-2).
Would need to disconnect all the other drives, because the Windows installer
DVD cannot be trusted around multiple drives. If I am lucky, the files
of SSD would be visible on Windows, so this would speed copying them over.
Still a lot of files would need to be installed. A ton of work. Once Windows
was set up, I could parition that drive and clone it to the other three
paritions, rebuilding my quad redundancy.
For now I plan
to just live with my slow, sick, but apparently reliable boot!
(update 11/30/16))
I got rid
of one of the flakiness at boot: a popup window telling me that Windows
had created a paging files to use as RAM. I had had a burst of this months
ago and it just went away. Most online commentary says this paging stuff
is an error. Anyway when I checked I found the paging size for all my many
disk drives and partitions was set to zero. I changed paging on my usual
OS (c:\ drive on SSD (lower partition) to system control, and the
paging popup box went away. I hope it doesn't use this disk memory excessively
since it is part of a solid state drive with limited read/writes, but I
think I am OK since I expanded the real RAM in my machine a couple of years
ago.
WiFi down (4/29/17)
(no WiFi, no internet connection)
Every few
months my WiFi for no obvious reason goes down. Just happened again. My
tablet shows no WiFi signal and my desktop has no internet connection.
Clicking the Mot cable modem icon (http://192.168.100.1/)
gives no connection.
Is this my
problem or Comcast? My go to fix is powering down the cable modem, and
I tried it several times with no success. I was fixated on the cable modem
because I didn't think the LEDs look right, but I had never documented
them and that is partly the purpose of this note. Next morning still no
internet. My next thought was to remove the RF cable from my splitter to
the cable modem and scrape it clean. But before I did that, I realized
I had forgotten about the router.
I powered down
the router and that was the problem WiFi was back. Up popped my WiFi signal
on my tablet and my desktop was back online. (I still down understand why
I could not communicate with my cable modem with the router down, because
I think there is an ethernet connection to the cable modem.)
WiFi OK -- normal cable modem Led pattern (4/29/17)
(Mot cable modem Surfboard SB6121, top to bottom)
1) white,
dim (solid)
2) blue, bright
(solid)
3) blue, bright
(solid)
4) white,
dim (solid)
5) orange
(blinking, slow, somewhat irregular)
How
to set local file links in Netscape Composer (5/23/17)
Left to its
own devices Netscape Composer uses relative addresses for local files,
but for multiple web browsers (in different directories) to open a local
file, the local file addresses on my homepage need to be absolute addresses.
Somehow when I changed the name of my homepage, many of my local addresses
stopped working. It took mucho hours to figure out what was going on and
come up with a fix, the correct way to set local file 'Links' in Netscape
Composer, addresses that work not only for Composer, but will work for
all the different browsers on my machine.
Here's the correct format.
file://localhost/c:/speed/spfiles/Ma_Darcy_&_Don_Notes.htm
(right --- enter local link addresses in Composer this way:
file://localhost/(local windows file path)
file:///c:/speed/spfiles/Ma_Darcy_&_Don_Notes.htm
(wrong --- while above link address will display this way
in Chrome, etc, it cannot be used as the local
link address in Composer. It will not work.)
What faked
me out was the 'correct' local file address entered in Netscape Composer
will display differently in the address line of Chrome and my other
browsers ('localhost' is removed!) than it does in Composer. And if you
(logically) try to use the format of the local file address you see in
the Chrome address line as a file link in Composer, it does not work! Composer
changes it (to relative file addressing?). It took me hours to figure this
out and come up with a clean solution for how to do local addressing correctly
in Netscape Composer [file:///(local windows path) => file://localhost/(local
windows path)].
Addundum
When you go
to first try to 'save' a file in Composer after editing it, you
may be told it can't be saved (disk full, etc), so use 'save as'.
After first 'save as', you can use normal 'save'. You may be asked if you
want to replace an existimg file? Ans: Yes. Do you want to
replace all the embedded linked files? Ans: No to all.